In this tutorial, Rimantas explains how to integrate MailChimp with the Signal Magician for creating trial access to products via MailChimp signup form.
Go to MailChimp to create a new list
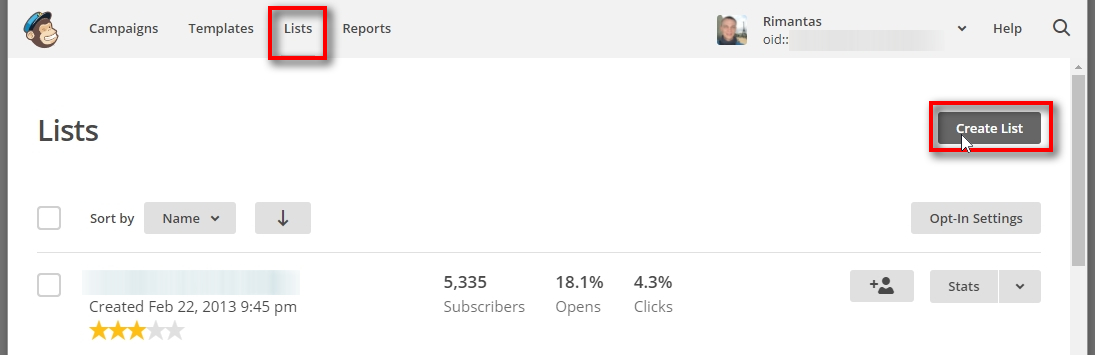
Log into your MailChimp account, open the “Lists” section and click the “Create List” button.
Fill in the information of your new list
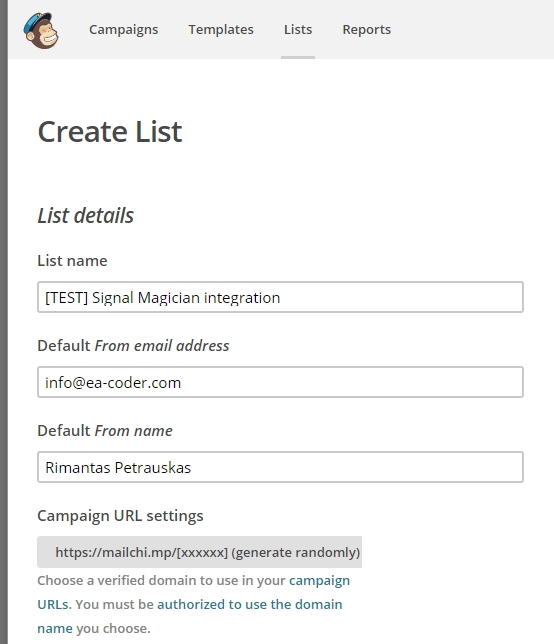
This will be the email list which will be connected to your Signal Magician system.
All the fields you see on this form will be visible to your subscribers/customers.
Click Save to create the list
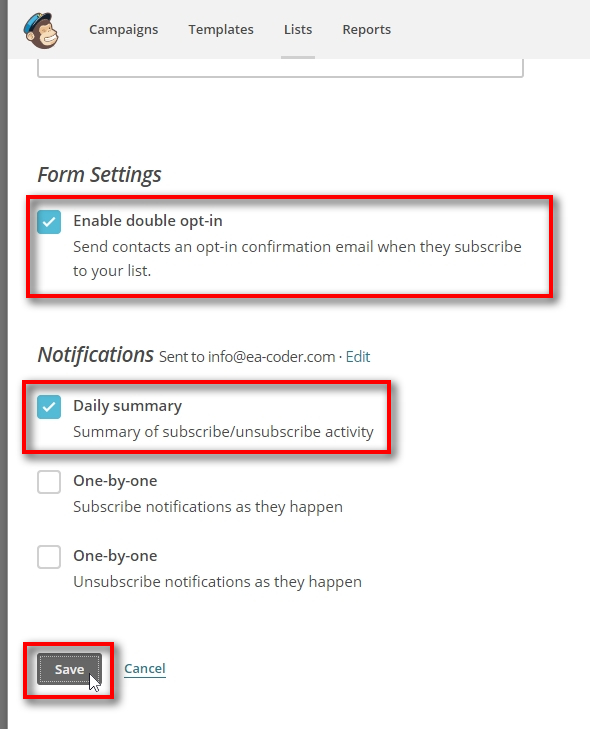
Make sure you select “Enable double opt-in”. This is highly recommended because it will require users to click the link in their inbox to confirm the subscription. This way you’ll keep away false emails from registering.
Also, keep in mind that the double opt-in function is required for businesses in Europe.
I also recommend checking the Daily summary box so that MailChimp sends you daily emails with the number of subscribers joined your list.
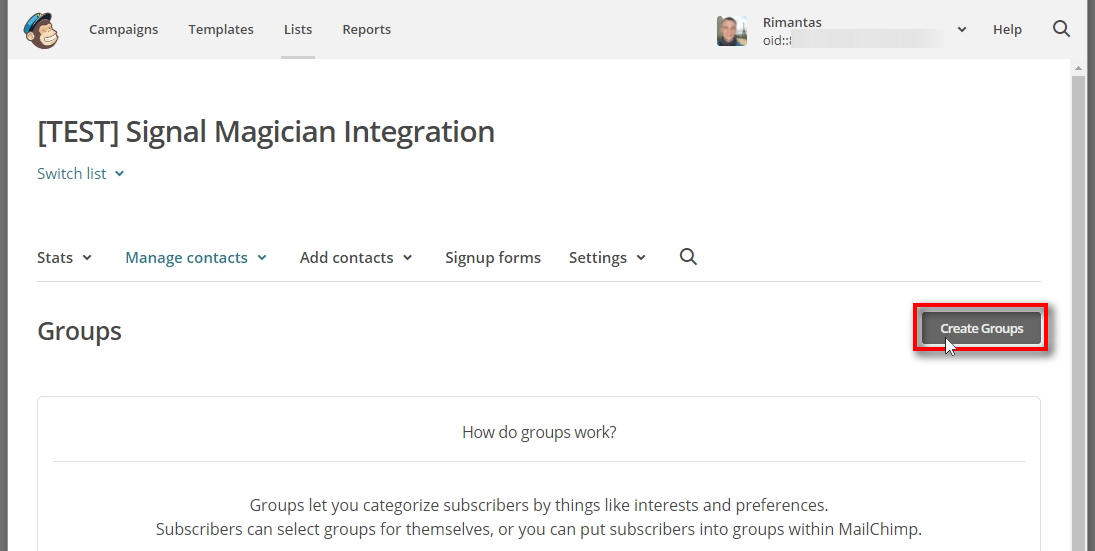
Open Groups page
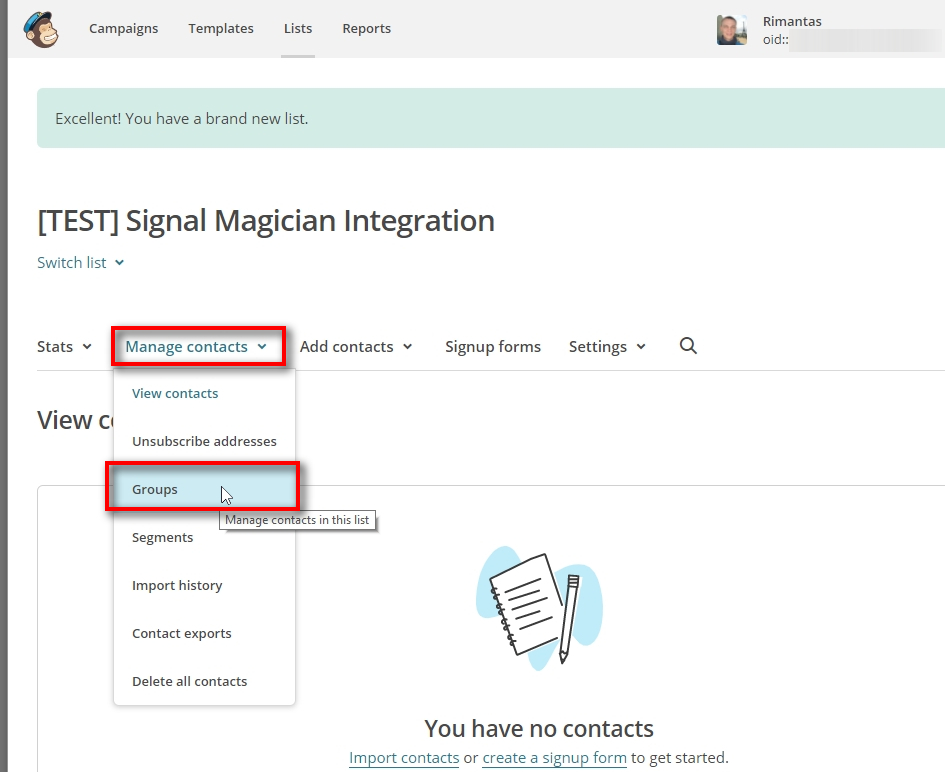
Once inside the list, click the “Manage contacts” and then click “Groups”.
Click the “Create Groups” button
Create new Groups
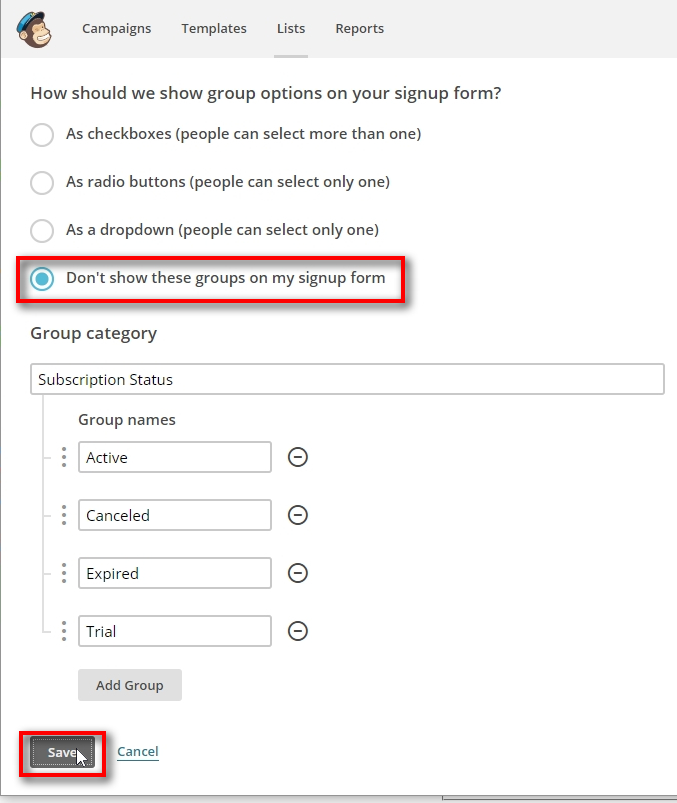
Select the option “Don’t show these groups on my signup form”
Then, enter the name of a new Group category (i.e. “Subscription status”).
Next, add four groups under than group category. Click the “Add Group” button to add new fields if required.
The groups required for Signal Magician are: Active, Canceled, Expired, and Trial.
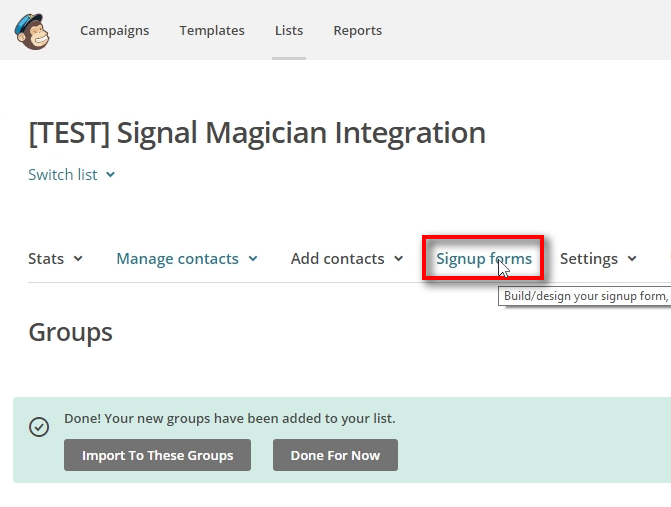
Click the “Signup forms” in the list menu
Open the form builder
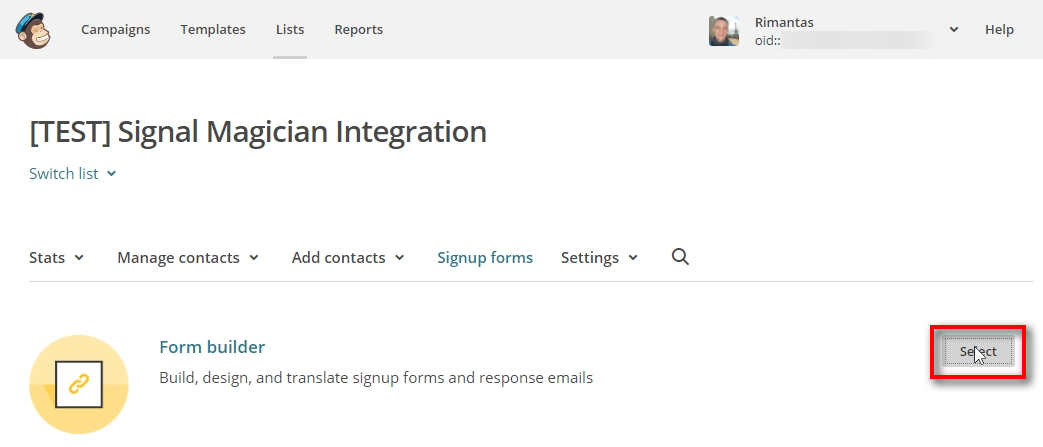
Click the “Select” button next to the “Form builder”.
Delete unnecessary fields
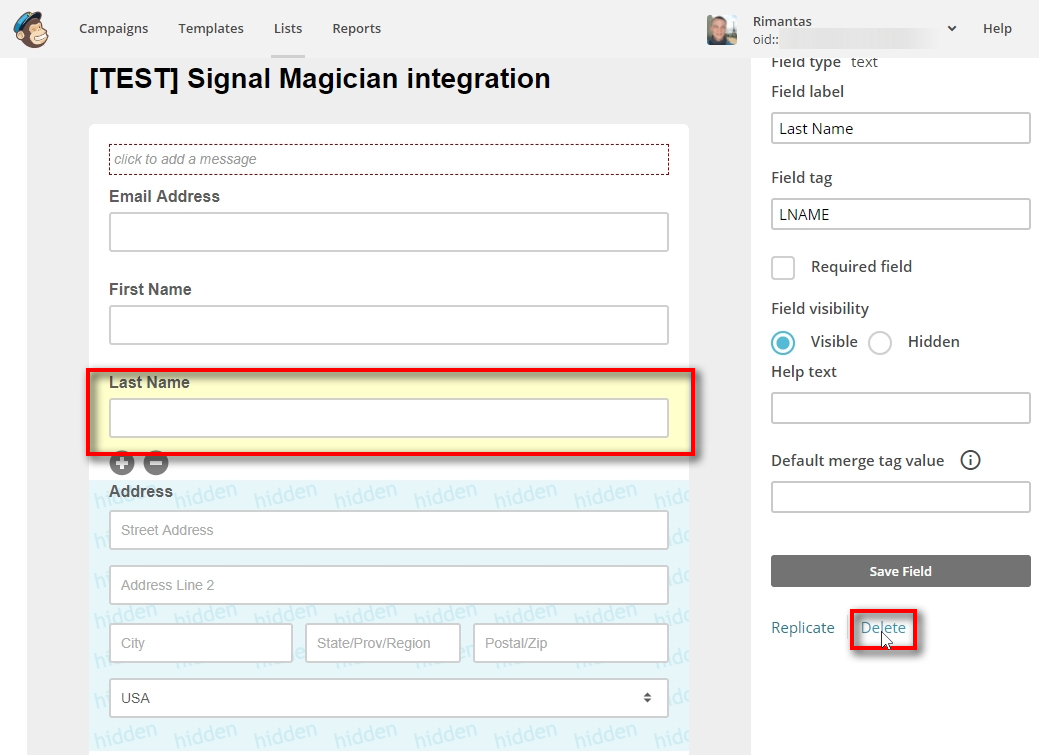
I will delete unnecessary fields such as: “Last Name” and “Address”.
One way to delete a field is to click on the field itself to select it and then click the “Delete” link on the right.
Confirm the action
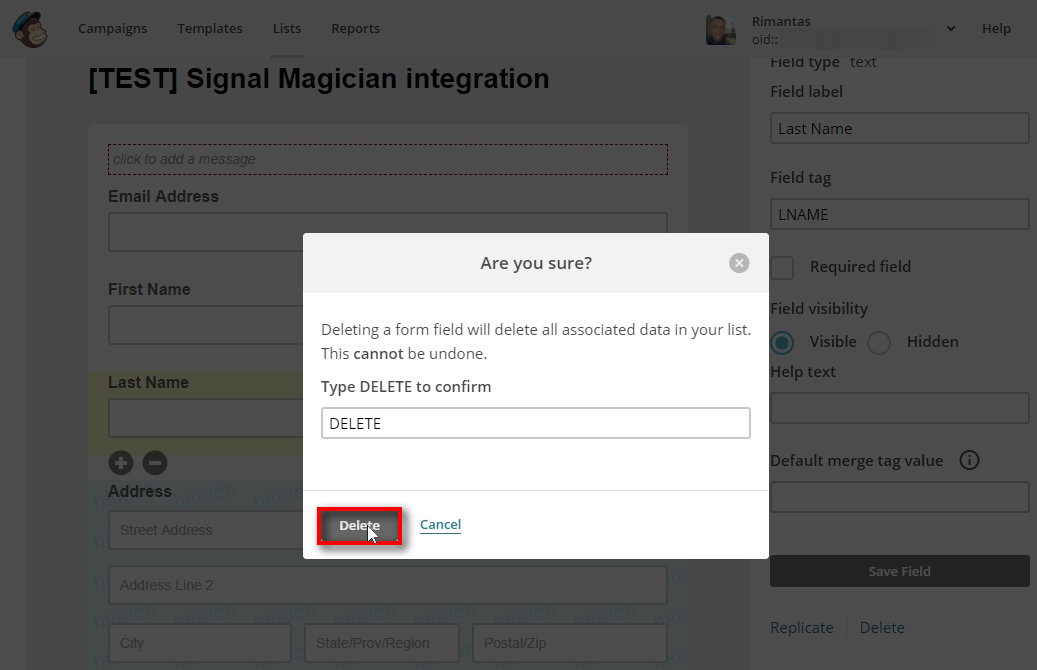
Type DELETE to confirm and click the Delete button.
Delete Address field
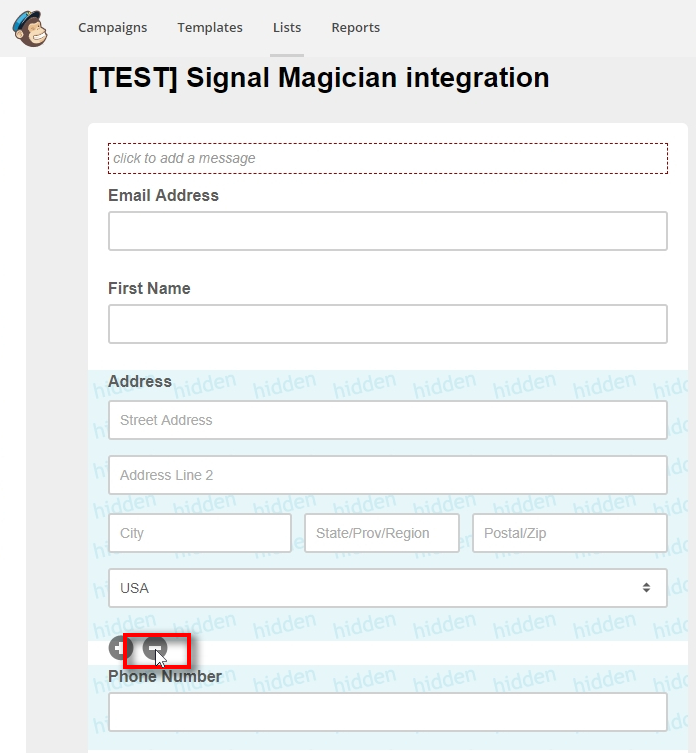
Another way to delete a field is to click the minus sign below the field.
You will again have to confirm the action in the next step by typing DELETE to confirm and clicking the Delete button.
Set Phone Number field visible
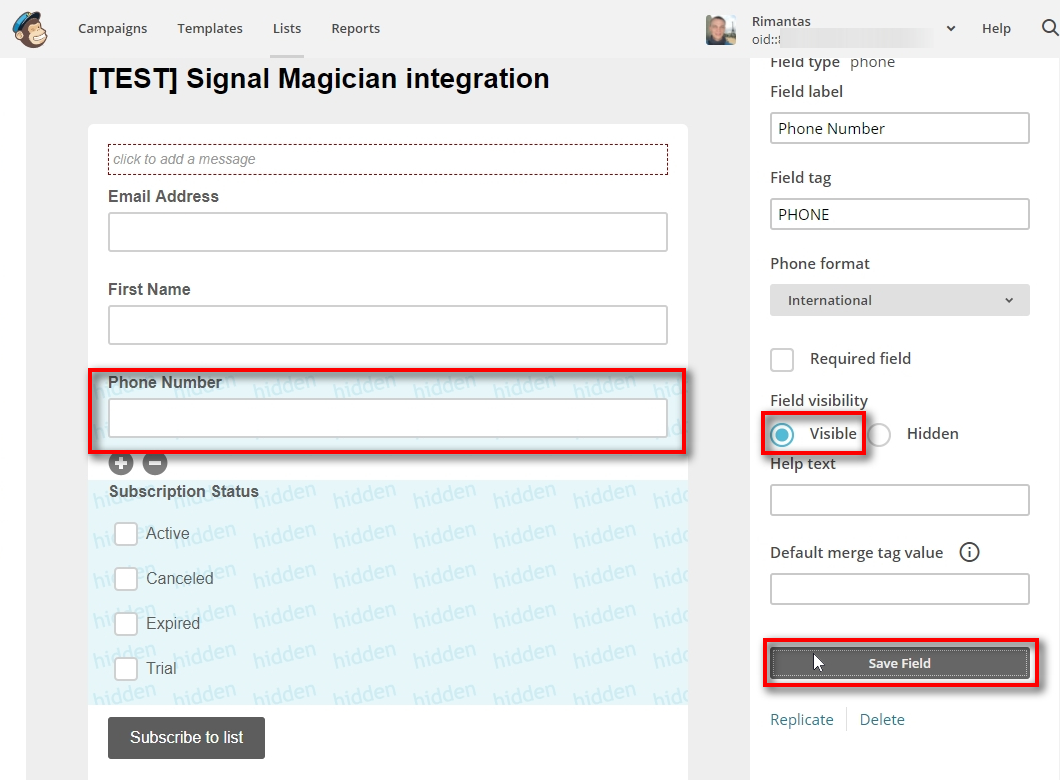
Click on the Phone Number field to select it.
Then, select “Visible” in the “Field visibility” section and then click the “Save Field” button.
Edit the message at the top
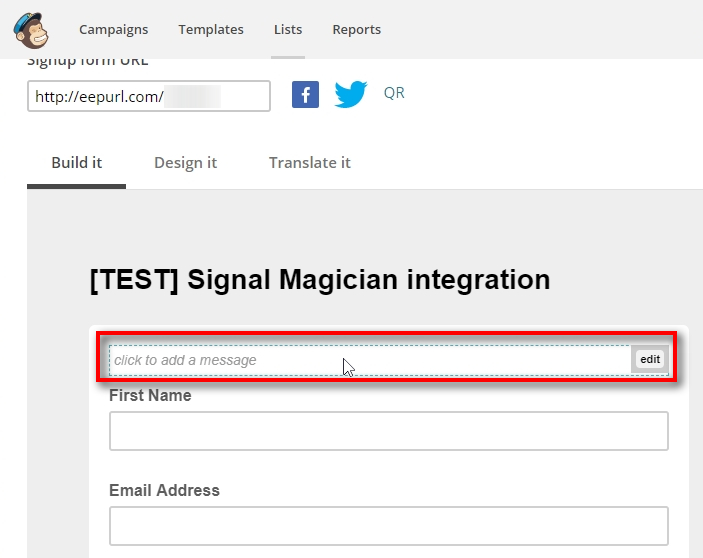
The on the “click to add a message” to open the text editor.
Type the message and save it
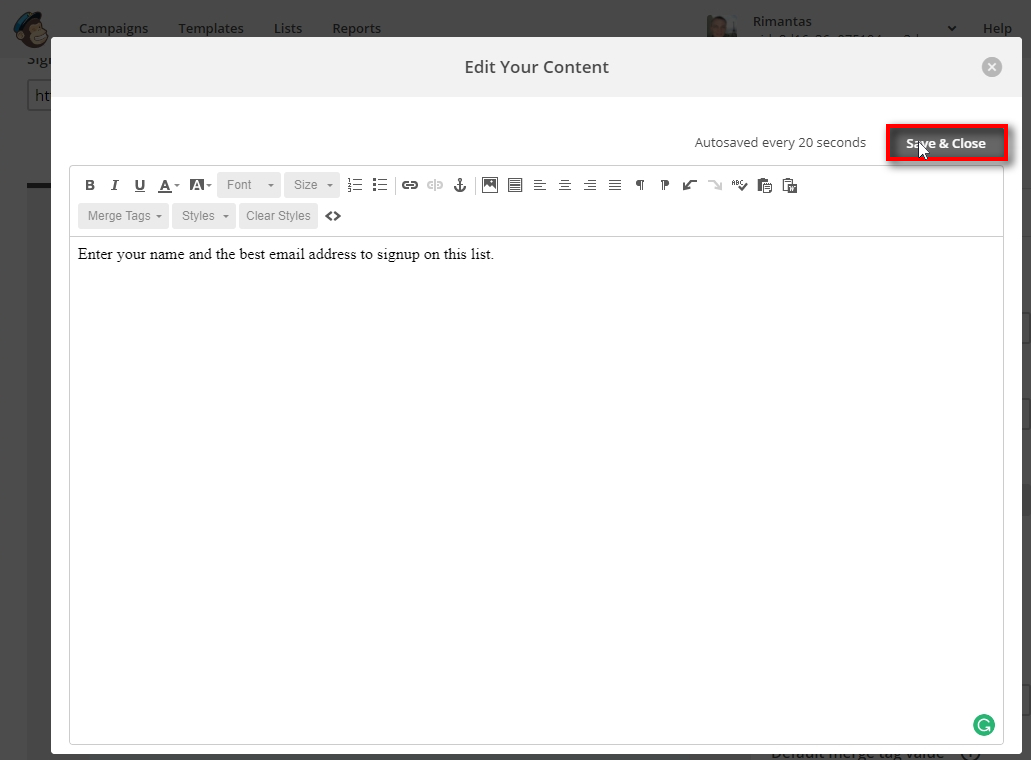
Type your message in the editor.
Example: Enter your name and the best email address to signup on this list.
Then, click the “Save & Close” button.
Open the “Signup thank you page”
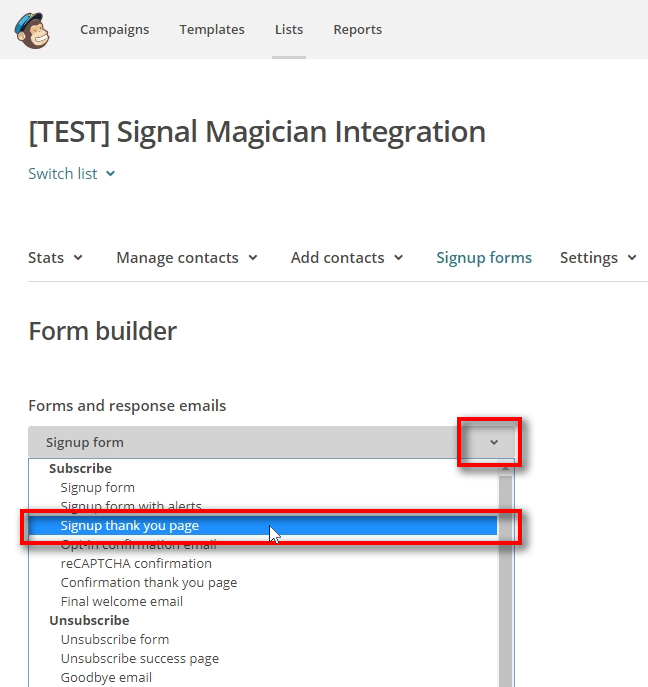
At the top of the Form builder page, open the list of forms and response emails and choose the “Signup thank you page”.
This form will be displayed to the user after he/she fills up the signup form.
If you use double opt-in option then on this page you should explain that the confirmation email has been sent to their inbox and he/she needs to click the link inside to confirm the email address.
Edit the “Signup thank you page”

You can edit the “Signup thank you page” to fit your needs.
Also, you can set your own URL. In such case, everyone who signups on your form will be redirected to that URL by MailChimp.
If you leave URL field empty MailChimp will show this default form.
It is fine to use the default form. You can add the URL anytime later.
Open the “Opt-in confirmation email”
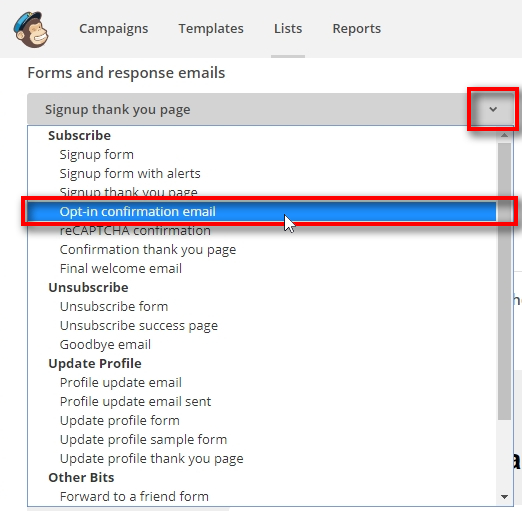
At the top of the Form builder page, open the list of forms and response emails and choose the “Opt-in confirmation email”.
This email will be sent to the user after he/she fills up the signup form. Normally, this email is being sent while the user is landed on the “Signup thank you page” from the previous steps.
Edit the “Opt-in confirmation email”
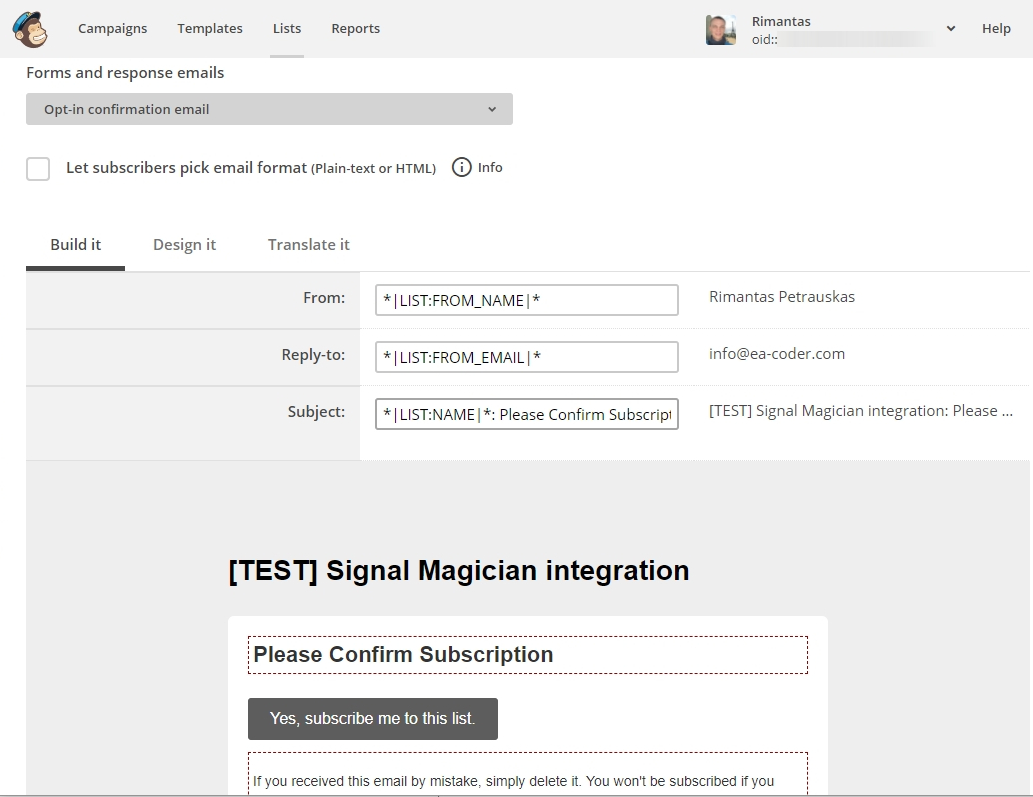
You can edit the “Opt-in confirmation email” to fit your needs.
It is fine to use the default form. You can edit it anytime later.
Open the “Confirmation thank you page”
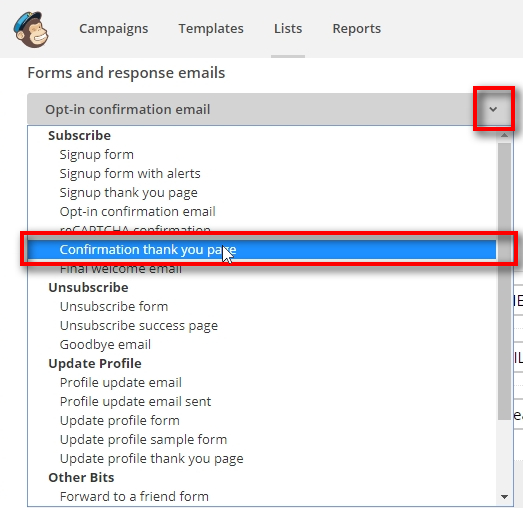
At the top of the Form builder page, open the list of forms and response emails and choose the “Confirmation thank you page”.
This form will be displayed to the user after he/she clicks the link in their inbox to confirm the email address.
Edit the “Confirmation thank you page”

You can edit the “Confirmation thank you page” to fit your needs.
Also, you can set your own URL. In such case, everyone who confirms their email address by clicking the link inside their inbox will be redirected to that URL by MailChimp.
If you leave URL field empty MailChimp will show this default form.
It is fine to use the default form. You can add the URL anytime later.
Switch to Signal Magician to continue MailChimp integration
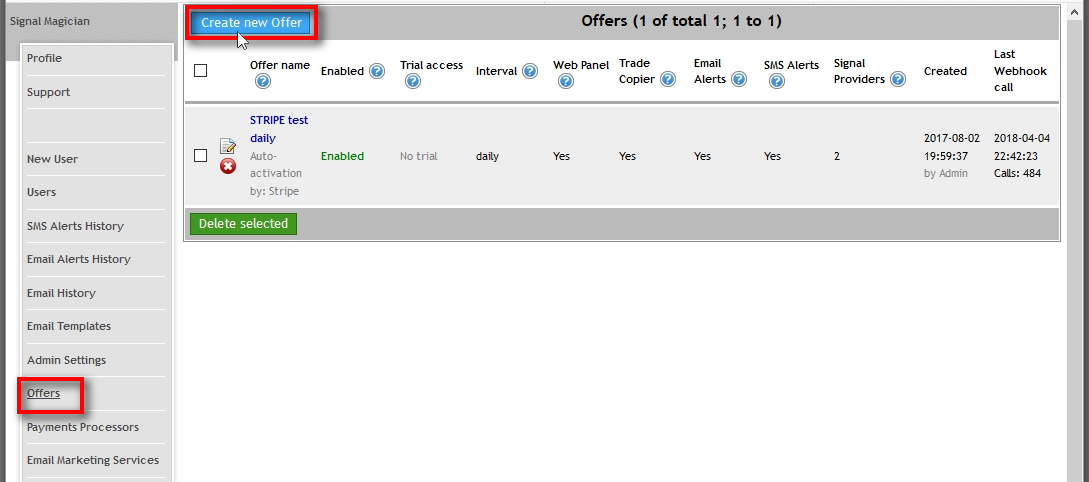
First, we need to create an Offer which will be linked to the MailChimp list we’ve just created.
Open the Offers page from the menu on the left.
Click the “Create new Offer” button.
Create a Trial Offer
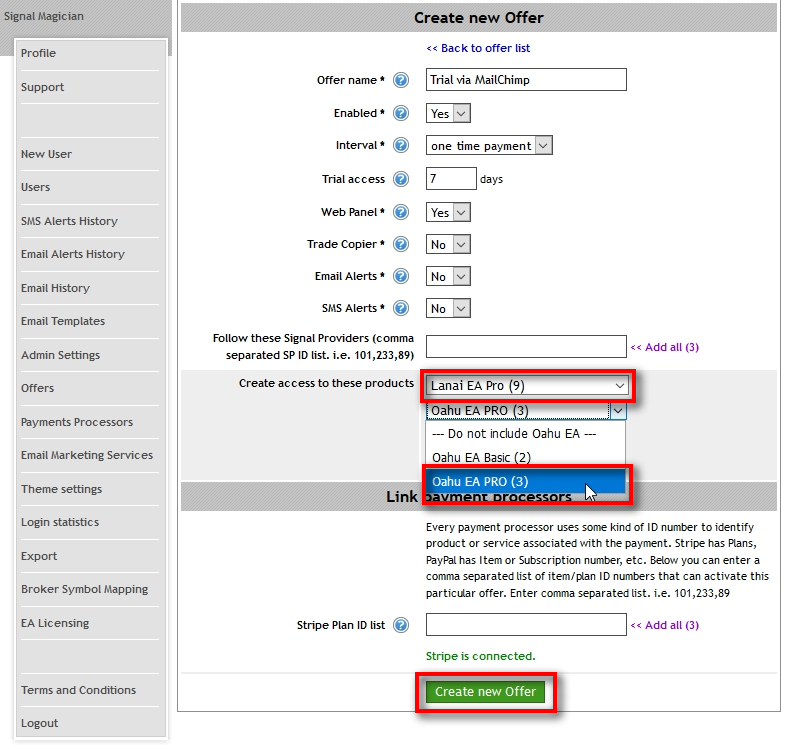
Fill in the required fields to create a Trial Offer.
Offer name = choose any (i.e. Trial via MailChimp).
Enabled = Yes
Interval = one-time payment (it does not mean it will be a payment, it simply means there will be no recurring subscription).
Trial access = the number of days for the trial (i.e. 7 days).
Web Panel = Yes (this Offer should enable web panel access for the user).
Trade Copier = No (this Offer will not enable access to this type of service for this user).
Email Alerts = No (this Offer will not enable access to this type of service for this user).
SMS Alerts = No (this Offer will not enable access to this type of service for this user).
Follow these Signal Providers = leave empty (this Offer will not enable access to this type of service for this user).
Create access to these products = select the products you want this offer to enable. In this example, I choose “Lanai EA Pro” and “Oahu EA PRO”, which means user will get 7-day trial access to these both apps once he/she signups via my MailChimp form.
Stripe Plan ID list = leave empty (it means this Offer will not be activated via Stripe. I recommend creating new Offer for Stripe if you need it).
Click the “Create new Offer” button.
Create a MailChimp API Key
To connect the MailChimp with the Signal Magician we need to create a MailChimp API Key.
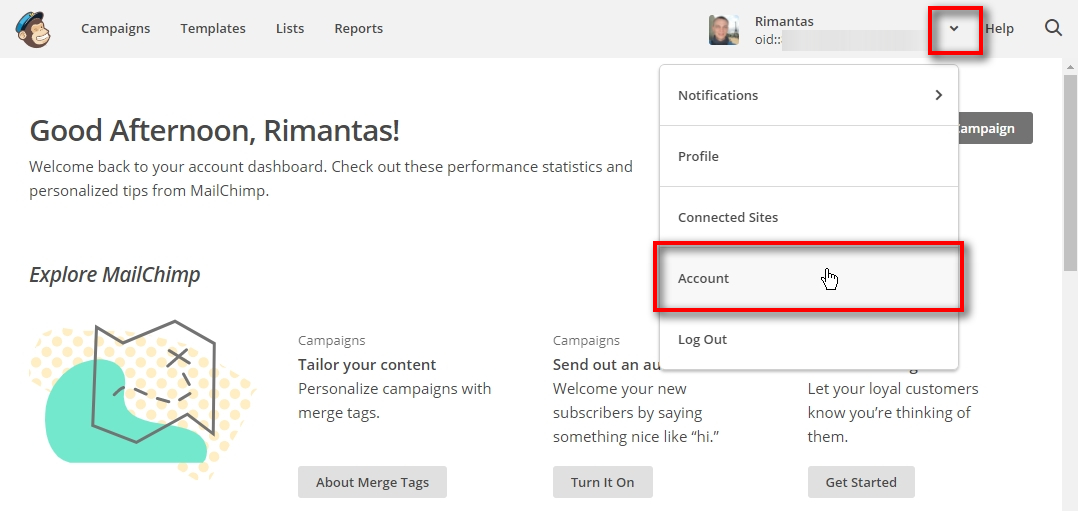
Click on the arrow in the top-right corner and then click on the “Account”.
Open the API Keys page
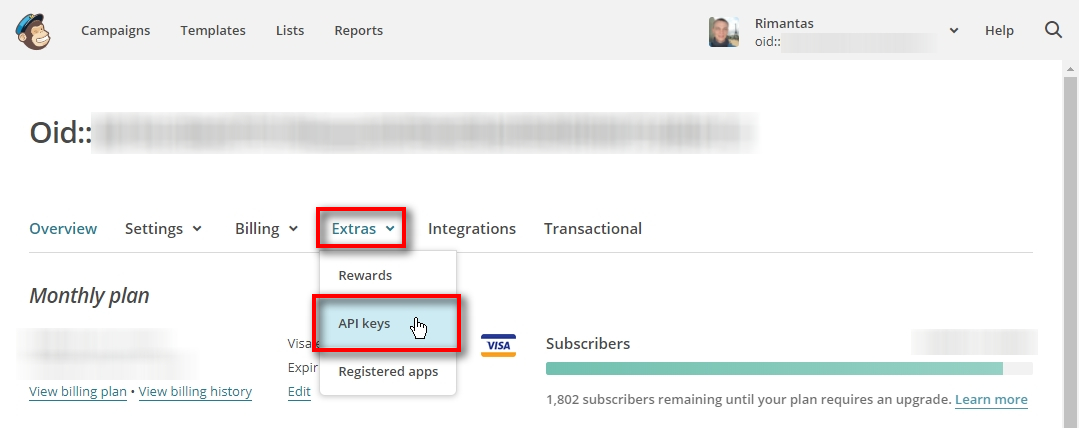
Click on Extras and then click on the “API keys”.
Click the “Create A Key” button
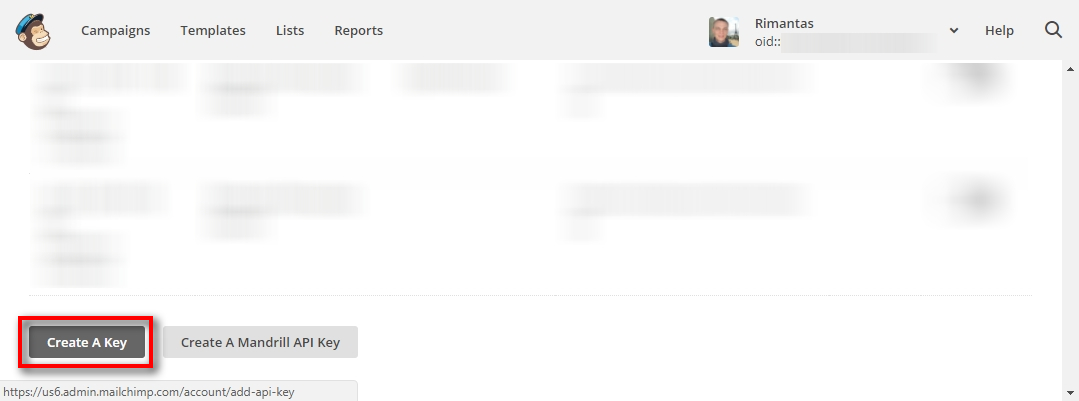
When you click the “Create A Key” button a new API Key will be created immediately.
Give your new API key a name
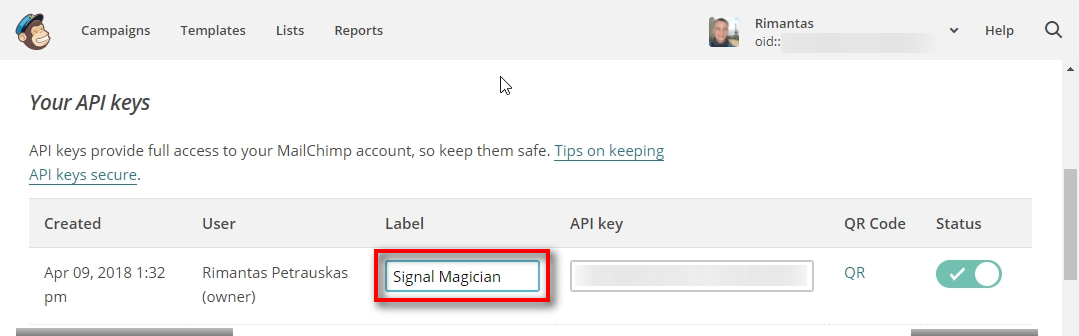
The newly created API key will appear at the top of the page. Click on its label and give it a name. This is for your own reference so use something you can remember (i.e. Signal Magician).
If you ever need to disable Signal Magician’s access to your MailChimp account or you’ll feel it has been compromised then you can disable this API key immediately by clicking on the green checkmark in the Status column. Disabling the API key will disable access to your MailChimp account for all the apps that are using this particular API key.
Copy the API key to the clipboard
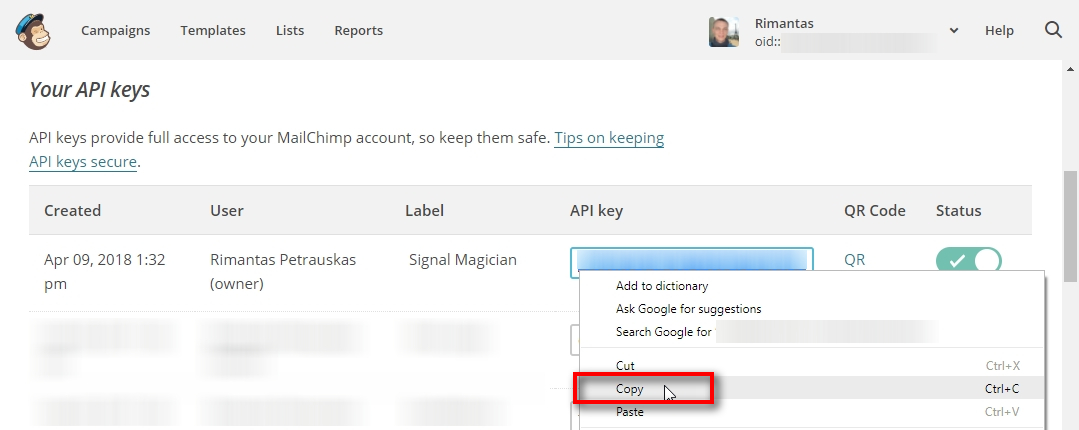
Right-click on the API key and select “Copy” to copy it to the clipboard. Then switch to your Signal Magician web panel to paste it.
Paste the MailChimp API key to the Signal Magician web panel
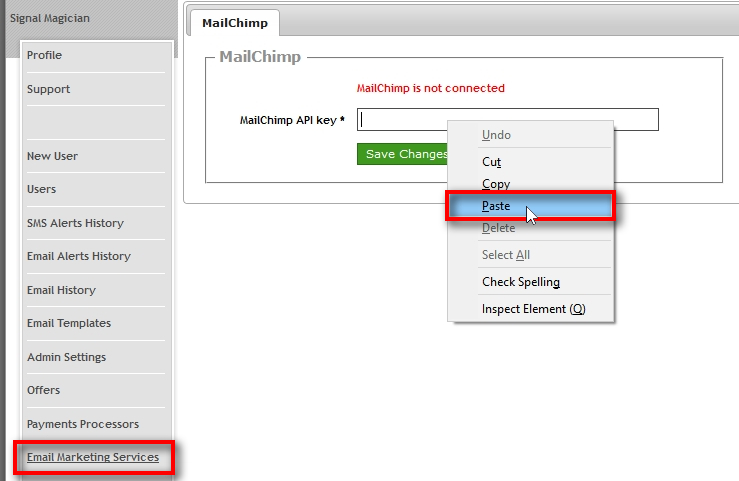
Switch to your Signal Magician web panel and open the “Email Marketing Services” page.
Then, paste the MailChimp API key into the corresponding field and click “Save Changes”.
Select your MailChimp list
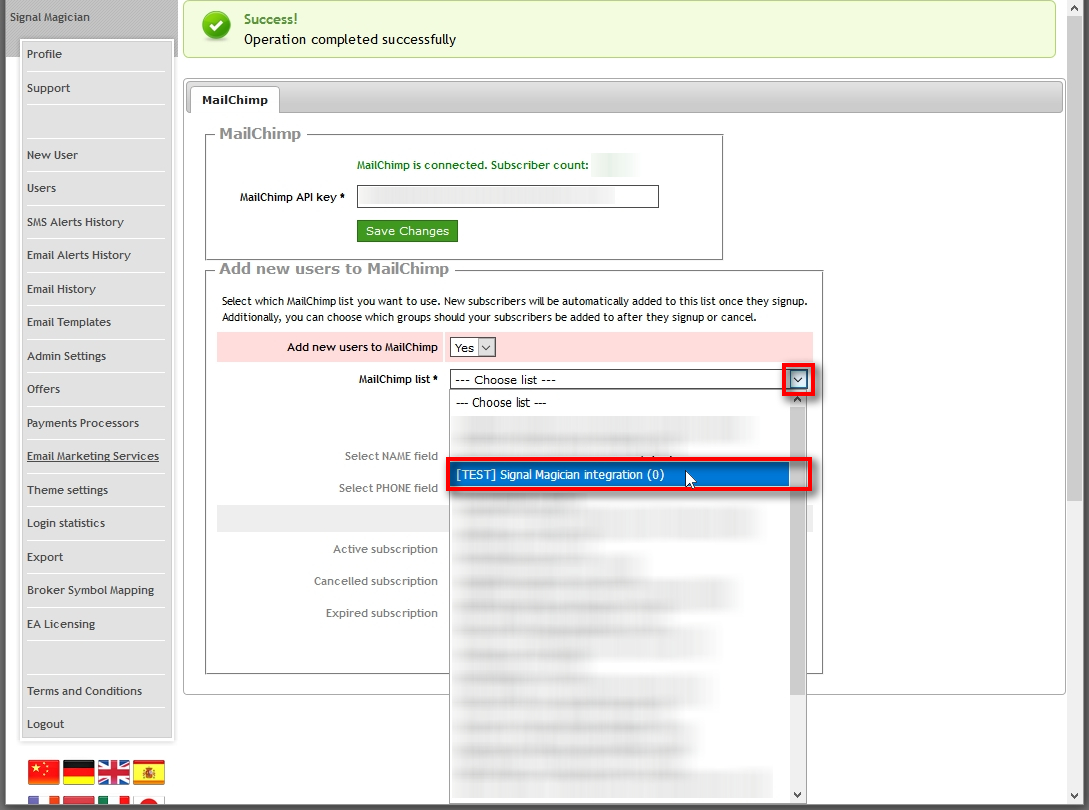
When you enter a correct MailChimp API key, the Signal Magician will be able to connect to MailChimp.
Then, you can continue the integration.
Choose “Yes,” if If you want Signal Magician to add new users to your MailChimp when they signup (you can change this anytime). New subscribers will be automatically added to this list once they signup via Stripe, PayPal or are added manually by the admin. Additionally, in the next step, you can choose which groups should your subscribers be added to after they signup or cancel.
Then, select your MailChimp list you’ve just created. You can choose another list later if needed.
In this example, I choose the list “[TEST] Signal Magician integration (0)”. The zero here indicates the number of subscribers this list currently has.
Click on “Save Changes” button

First, I need to save changes when the MailChimp list selected. Then, I will be able to choose fields and groups.
Click on “Save Changes” button
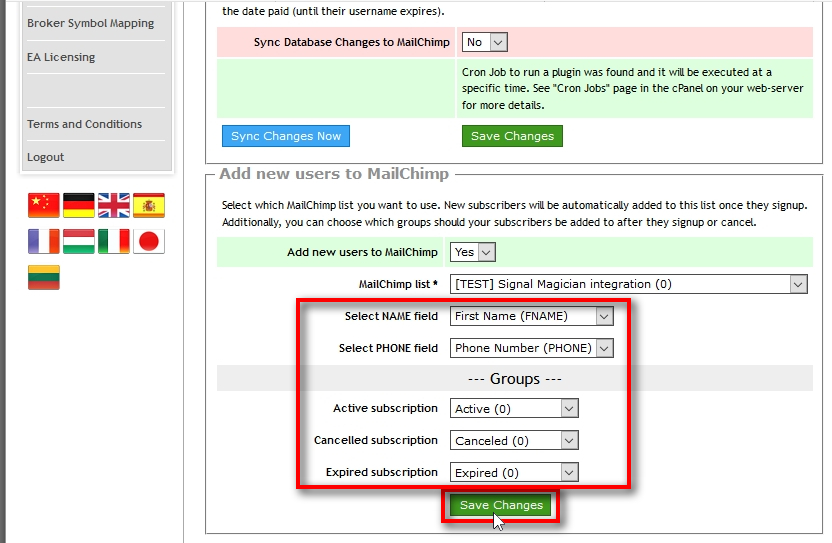
Now, when the list is selected, I need to set correct fields and groups.
Note that you might have different field names if you have them named differently on your MailChimp form.
For the NAME field, I choose “First Name (FNAME)” item.
For the PHONE field, I choose “Phone Number (PHONE)” item.
For the “Active subscription” group I choose group “Active.”
For the “Canceled subscription” group I choose group “Canceled.”
For the “Expired subscription” group I choose group “Expired.”
Signal Magician will assign users to the corresponding groups based on their subscription status.
Click “Save Changes.”
If you won’t select correct fields, then Signal Magician might fail to add users to your MailChimp list.
If you don’t select groups, then Signal Magician will add users to your MailChimp list, but you won’t be able to group them by their subscription status.
When you assign users to a proper group, you can always send emails to all subscribers of a particular group. Refer to this article for a detailed explanation of how to send mass emails to MailChimp subscribers.
You can also set up Signal Magician to synchronize subscription status changes once per day by using a so-called “Cron Job” task. Refer to this tutorial for a detailed explanation how to create a Cron Job task and configure Signal Magician to sync database changes to MailChimp.
Enable MailChimp trial signups
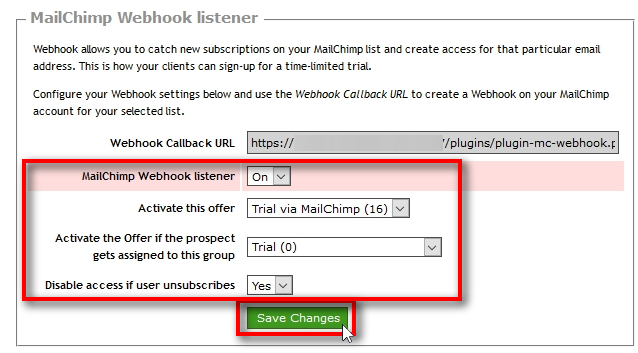
In the MailChimp Webhook listener table, you can enable trial signups via MailChimp.
It works even if you choose “No” for the “Add new users to MailChimp” in the previous steps.
IMPORTANT! For trial signups to work, we need to create a Webhook on your MailChimp account, but we’ll do that a bit later, in the next steps.
MailChimp Webhook listener = On
Activate this offer = choose the Offer we’ve created in the previous steps (i.e. “Trial via MailChimp”).
Activate the Offer if the prospect gets assigned to this group = choose a group which tells the Signal Magician what subscribers should get the trial access to your product(s) (i.e., Trial).
If you choose “Any group or no group,” then all subscribers who signup to your MailChimp list via a form (or added by admin on MailChimp) will get trial access created.
If you choose a group “Trial,” then only subscribers who are assigned to this particular group on your MailChimp list via a form (or added by admin on MailChimp) will get trial access created.
Disable access if the user unsubscribes = Yes. This will disable user’s trial access if they unsubscribe from your MailChimp list. If the user upgrades to a paid plan then unsubscribe action on MailChimp will not affect paid subscriptions.
Click on “Save Changes” button.
Create a Webhook on MailChimp
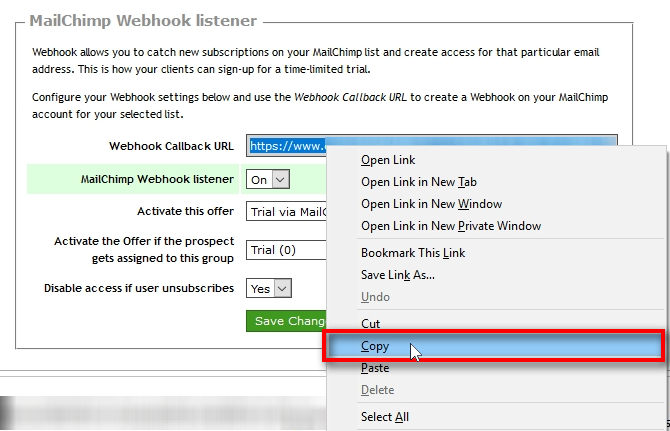
For trial signups to work, we need to create a Webhook on your MailChimp account.
Triple-click on the “Webhook Callback URL” to select it all. Then, right-click on it and choose “Copy” from the menu.
It is best to have SSL certificate installed for your Signal Magician web panel sub-domain. You know you have SSL certificate installed when you access web panel via HTTPS URL (notice the “s” a the end) instead of regular HTTP URL. In this example, Webhook Callback URL starts with the “https” which means we are on a secure and encrypted network.
Open Webhooks page on MailChimp
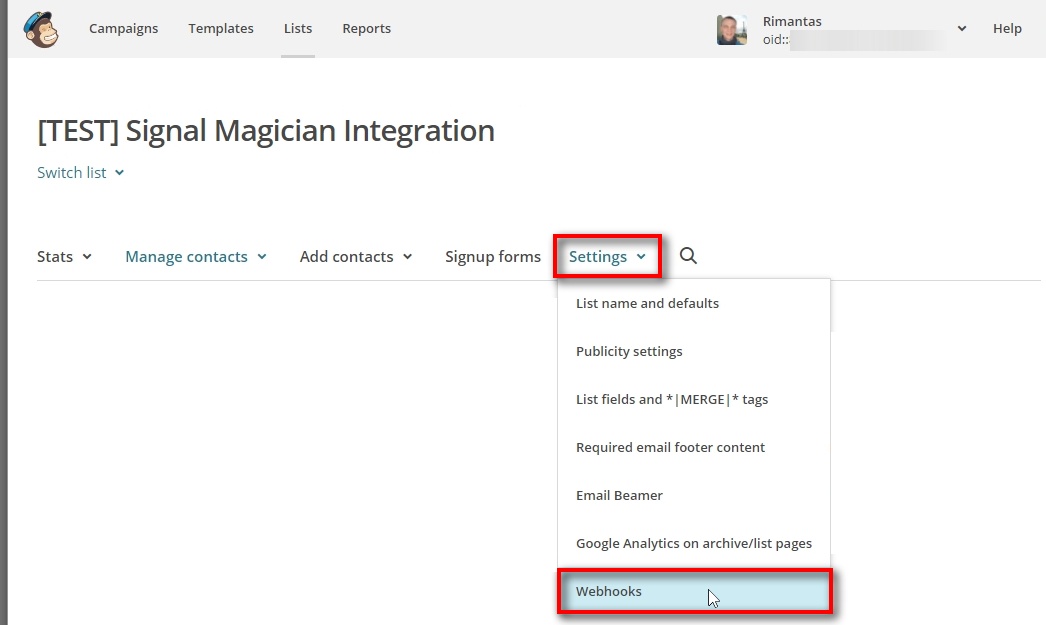
Switch to your MailChimp account and open Webhooks page from the Settings menu.
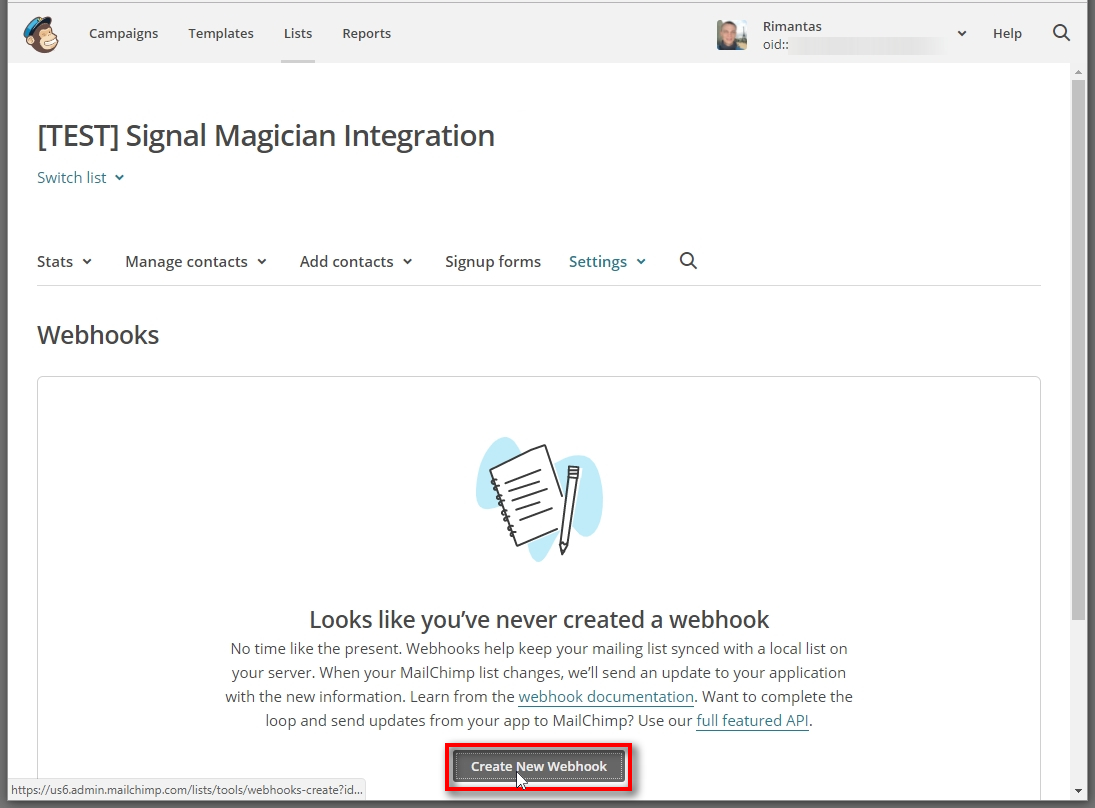
Click on “Create New Webhook” button
Paste your Webhook Callback URL from Signal Magician
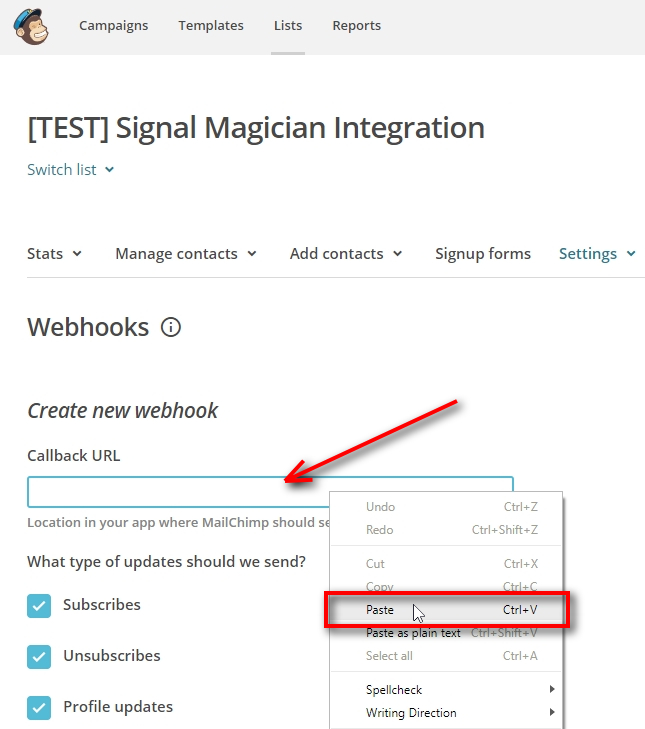
Right-click on the “Callback URL” field and choose “Paste” from the menu. This will add your “Webhook Callback URL” from Signal Magician here in this field.
Then, scroll down for more options described in the next step.
Save the MailChimp Webhook
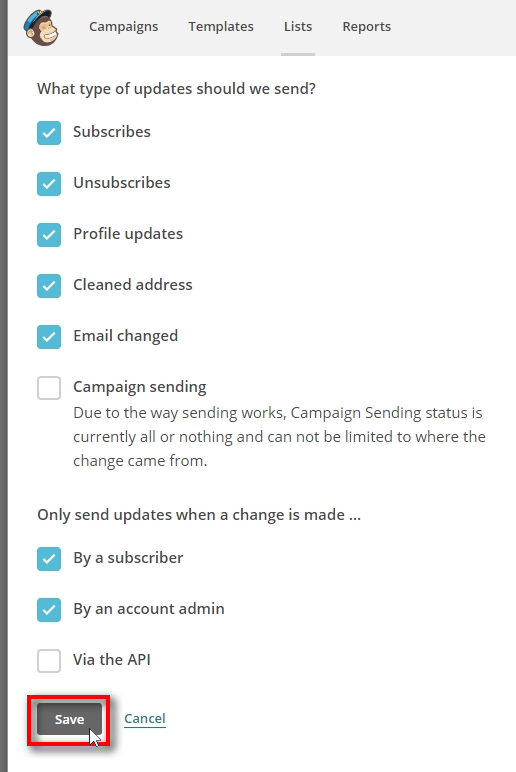
For optimal performance, make sure these are selected.
What type of updates should we send?
- Subscribes
- Unsubscribes
- Profile updates
- Cleaned address
- Email changed
Only send updates when a change is made …
- By a subscriber
- By an account admin
IMPORTANT! Do NOT select “Via the API” here or you will see duplicate signups.
Click “Save” to create the Webhook.
Your MailChimp Webhooks
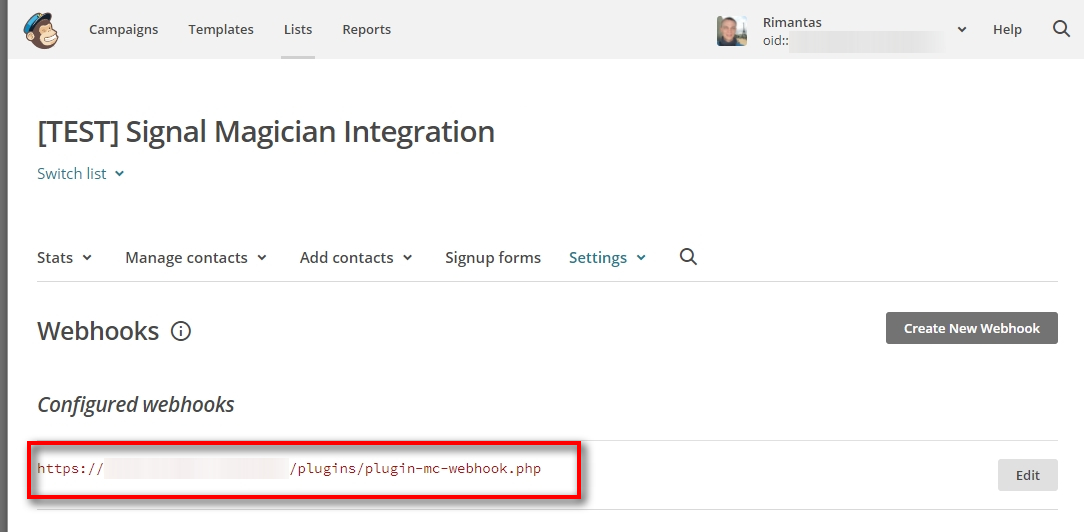
On this page, you see your MailChimp Webhooks. If you ever need to change Webhook settings use the “Edit” button next to it.
Now, when you have a MailChimp Webhook created and linked it with your Signal Magician Offer, any subscriber who signups to your MailChimp list via a form (or added by the admin) will get not only on your MailChimp list but also have trial access created for your products.
Test your MailChimp connection

You can test your MailChimp connection to see if it works.
Fill in this “Test” form with a correct email address then click the “Add” button.
If the connection is working, you’ll see this email added to your MailChimp list you’ve linked with Signal Magician in the previous steps.
Note that this does not give an option to choose groups and is created only for testing purposes.
If you want to add a subscriber on your MailChimp list and assign to it a particular group, then do this in MailChimp.
Open Contacts list on your MailChimp account
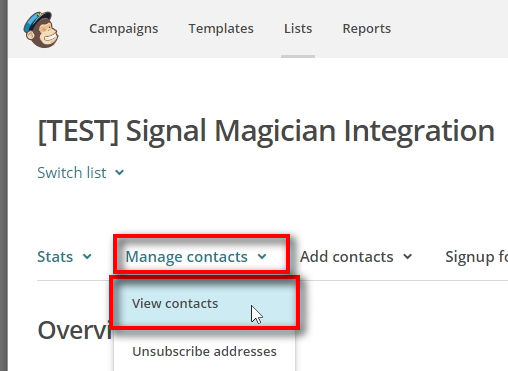
Switch to MailChimp account and choose “View contacts” from the “Manage contacts” menu.
Look for the email address on the Contacts list
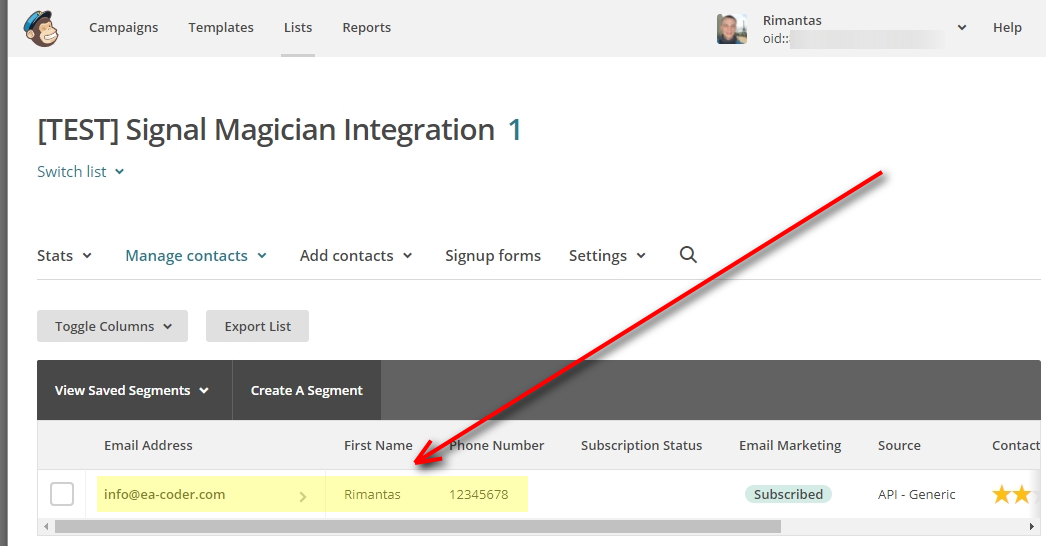
If everything works fine you should see the email address on the contacts list.
What can I do next?
Now that you have Signal Magician connected with MailChimp you can continue the integration on your website.
You have done:
- Created MailChimp list with groups.
- Linked the list and its fields and groups with Signal Magician.
- Created trial Offer on Signal Magician.
- Created Webhook and tied it to the trial Offer.
What you should do next:
- Add MailChimp signup form on your website. Your website developer should help you with that. Alternatively, you can use the hosted MailChimp signup form.
- Create Cron Job task on your web-server to enable daily database synchronization with MailChimp.