In this tutorial, we explain step-by-step how to connect Signal Magician with your Stripe account and make a test purchase. It allows you to sell products and Forex signals through Stripe. The system will create usernames automatically and renew their subscriptions everytime customer gets billed through Stripe monthly, weekly, or annually.
Last updated: 2019-11-26.
We’ve implemented mandatory changes to how Stripe integrated with Signal Magician in version 1.9.8. It was done to make this integration SCA-READY by using the Stripe Checkout server integration to collect dynamic one-time payments and initiate subscriptions.
If your Signal Magician already is connected with Stripe, you’ll have to implement a few changes explained in this tutorial.
As of September 2019, a regulation called Strong Customer Authentication (SCA) requires businesses in Europe to request additional customer authentication for online payments. Using the new Payment Intent and Setup Intent APIs, Checkout fully supports SCA—including exemption logic—and ensures that you only ask customers to provide additional authentication when strictly necessary.
Turning ON Stripe Webhook listener
Open Payment Processors page
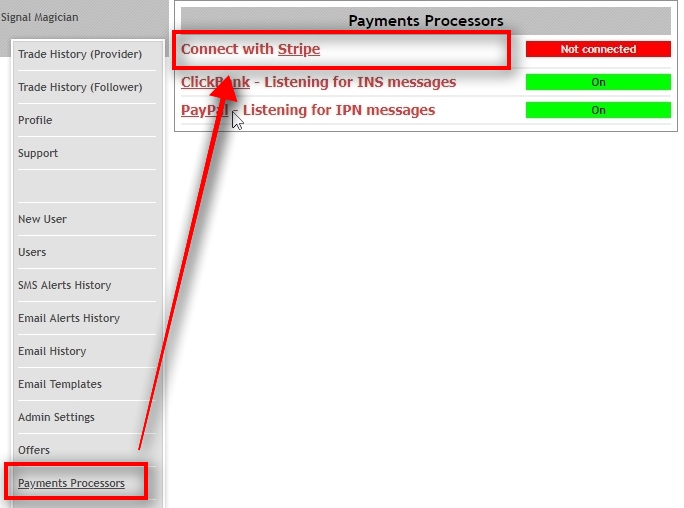
In the Payments Processors page, you’ll find all the payment processors that you can connect with Signal Magician. You’ll see connection status next to each payment processor name.
If the status says “Connected” or “On” it means Signal Magician is waiting for payment notifications from these services. Status “No” means Signal Magician is not listening for any messages from these services.
In this tutorial, we’re connecting Signal Magician with Stripe. Click on “Stripe” to get to the next settings page.
Turn on Stripe Webhook listener
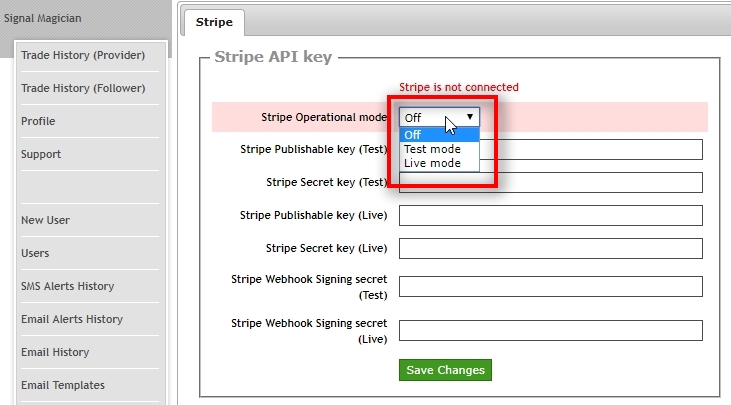
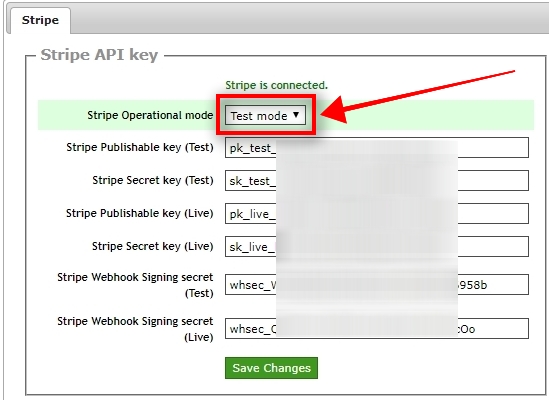
To enable Stripe plug-in in Signal Magician, we need to input six API keys provided by your Stripe account.
Stripe named them “Publishable key”, “Secret key”, and “Webhook Signing secret”.
Each of these codes has a “Test” and a “Live” version, and we need to input all of them.
If Stripe did not activate your account yet, you could use only “Test” API keys for test purchases. That’s fine for now. You can input “Live” API keys when Stripe allows you to use them.
You can learn more about these Stripe API keys in this article: Stripe API Keys.
We recommend connecting Stripe Test Mode with Signal Magician Sandbox. It will allow you to make test purchases any time without affecting your Signal Magician Live environment.
Get Stripe Live API Keys
Login to your Stripe account: https://dashboard.stripe.com
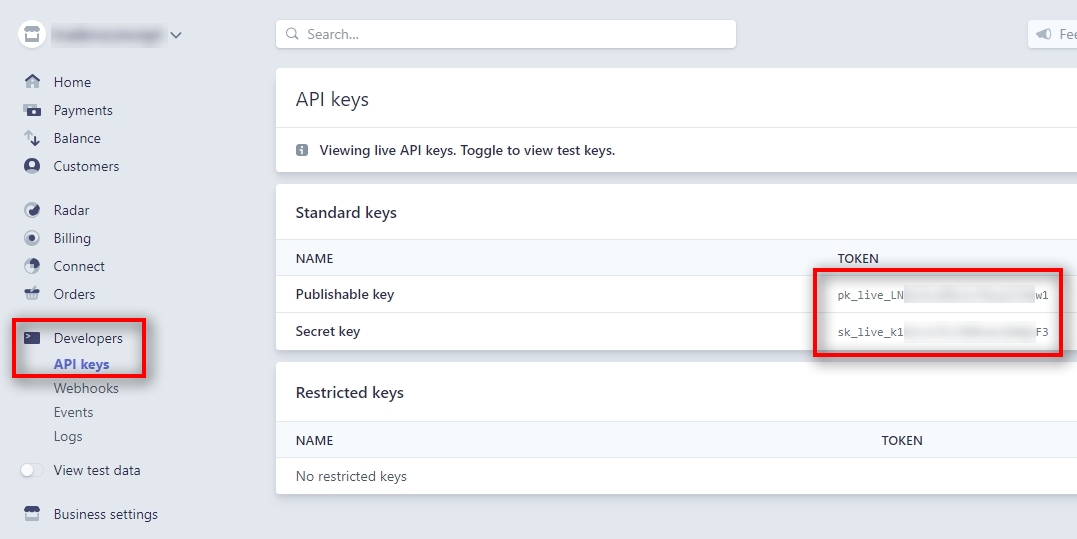
From the left menu, choose “Developers”, then “API keys”.
In the API keys page, you’ll find two keys: “Publishable key” and “Secret key”. Notice they begin with “pk_live_” and “sk_live_” which indicates they are used for real money transactions.
Please Copy & Paste those keys to the Signal Magician and make sure you input them into corresponding fields.
Get Stripe Test API Keys
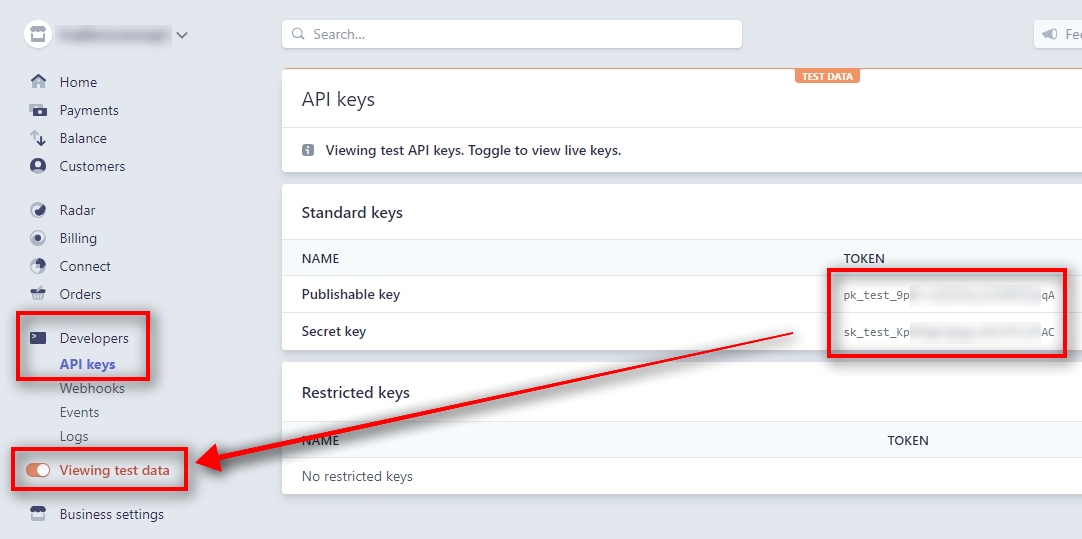
Now we need to input Test API keys. They are stored on the same page “Developers -> API keys”, but you need to switch to “Viewing test data” from the left menu.
When you switch to “test data” mode, you’ll find two API keys for testing. They very similar, but notice they begin with “pk_test_” and “sk_test_” which indicates they are used for testing purposes.
Please Copy & Paste those keys to the Signal Magician and make sure you input them into corresponding fields.
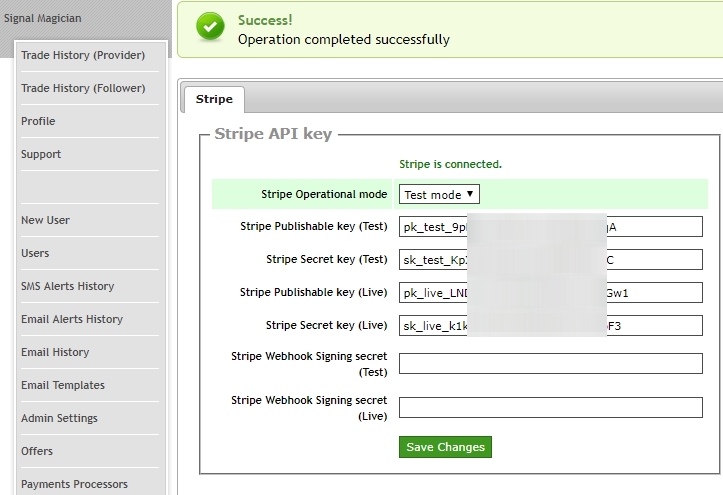
In the image above, “Stripe Operational mode” is set to “Test mode”. It means Signal Magician will use Test API keys to connect with Stripe and you will see Stripe “Test” payment plans on Signal Magician. This way, you can make test purchases.
Once we finish testing, we can switch to a Live mode. Then, Signal Magician will use Live API keys, and Stripe “Live” payment plans will show up on Signal Magician.
When we click “Save Changes”, Signal Magician will save these parameters and enable Stripe Webhook listener. It allows Signal Magician to receive information from Stripe about purchases, cancellations, renewals, and refunds.
But to make Webhook work we need to add it on Stripe.
Also, important to note that Webhooks use “Webhook Signing secret” when transferring information between Stripe and Signal Magician. We need to input these secret codes to Signal Magician. Stripe will create these codes for us after we add the Webhook URL on Stripe.
Add a Webhook URL on Stripe
Copy Stripe Webhook listener URL
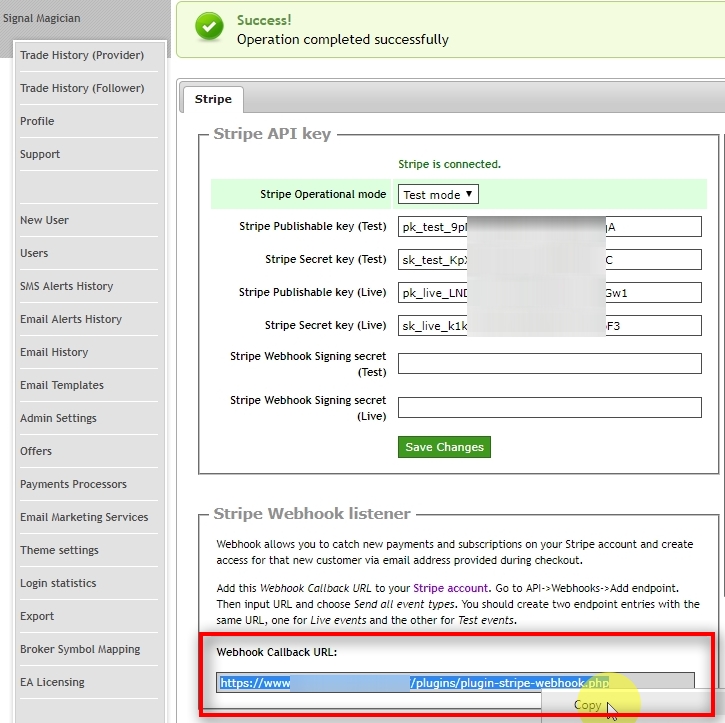
When Stripe Operational mode is set to “Test mode” or “Live mode”, you’ll see Stripe Webhook listener URL displayed. It is your unique URL for Stripe.
You can learn more about Stripe Webhooks in this article: Using Webhooks with Stripe.
Triple-click the Webhook URL to select it all, then right-click on it and choose Copy.
Adding Webhook for Stripe Live mode
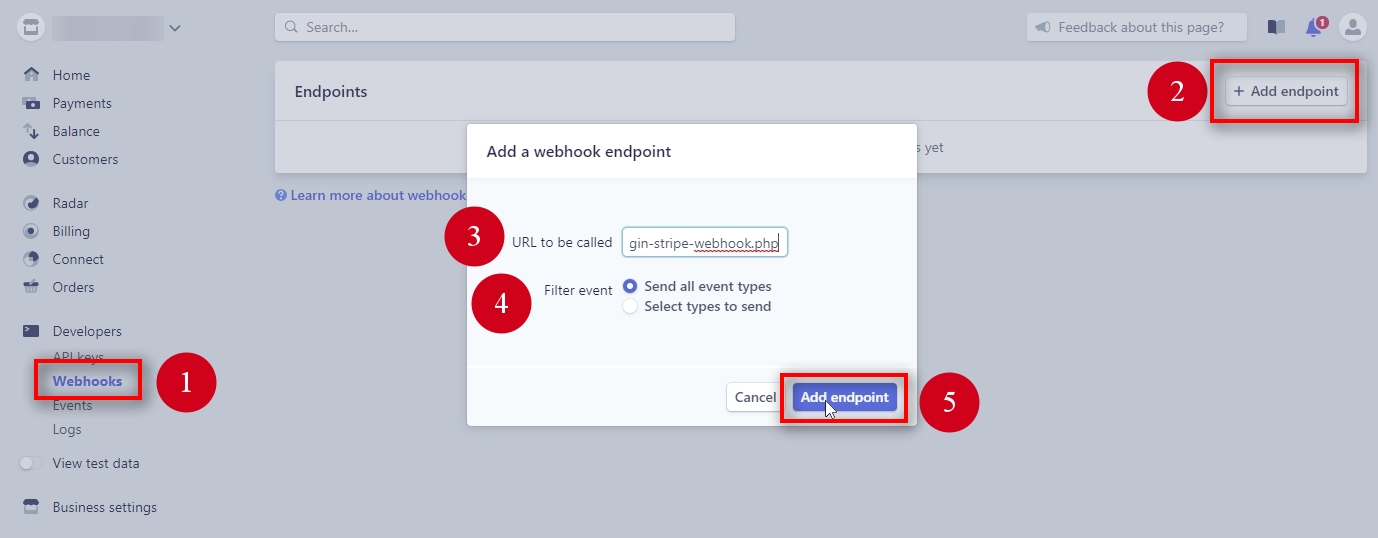
To add a Webhook URL on Stripe, follow these steps:
- Open the “Developers -> Webhooks” page from the left menu.
- Click on “+ Add endpoint” button on the right.
- Paste the Webhook URL from Signal Magician.
- For Signal Magician 1.9.8, choose “2019-09-09” as Webhook version. For Signal Magician 1.9.7, choose “2018-11-08” as Webhook version. If this version is not available anymore, you might need to update your Stripe plug-in, and you’ll need to have “Support & Updates” service active for your Signal Magician license. Contact customer support regarding this question.
- Choose “Send all event types” as Filter event.
- Click on a purple “Add endpoint” button.
Note that we are adding this Webhook (Stripe also calls them endpoints) in Live mode. Notice the “View test data” is turned off in the left menu.
Adding Webhook for Stripe Test mode

To add a Webhook URL on Stripe for Test mode, follow these steps:
- Open the “Developers -> Webhooks” page from the left menu.
- Switch ON the “View test data” from the left menu.
- Click on the “+ Add endpoint” button on the right.
- Paste the Webhook URL from Signal Magician.
- For Signal Magician 1.9.8, choose “2019-09-09” as Webhook version. For Signal Magician 1.9.7, choose “2018-11-08” as Webhook version. If this version is not available anymore, you might need to update your Stripe plug-in, and you’ll need to have “Support & Updates” service active for your Signal Magician license. Contact customer support regarding this question.
- Choose “Send all event types” as Filter event.
- Click on a purple “Add endpoint” button.
Note that we are adding this Webhook in Test mode. Notice the “View test data” is turned on (orange) in the left menu.
Copy Webhook Test Signing secret code to Signal Magician
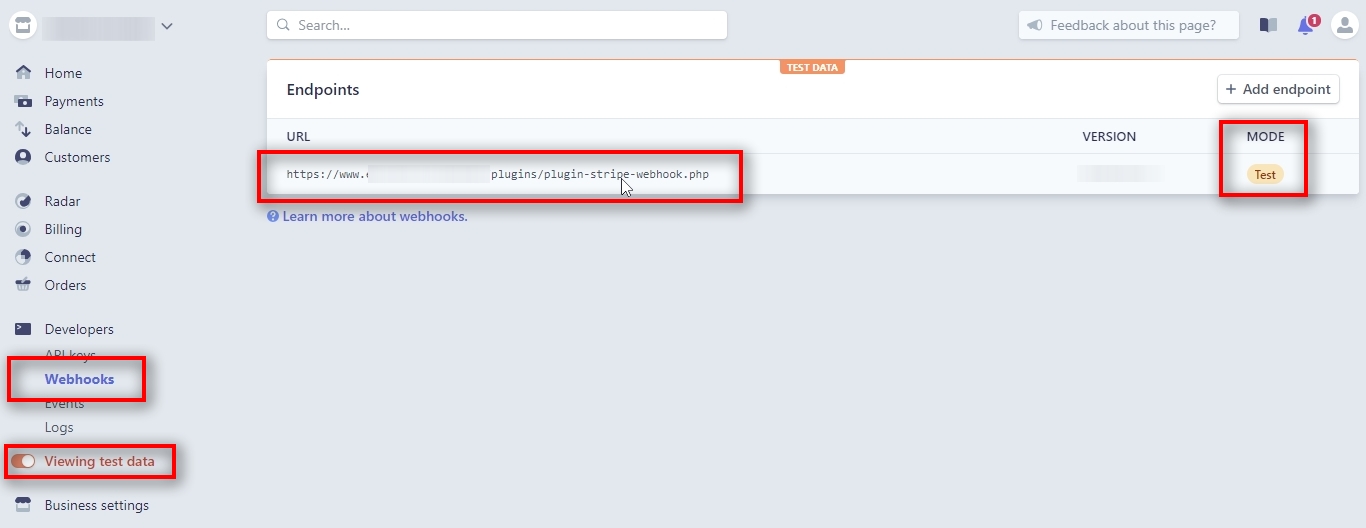
After both Webhook URLs are added on Stripe, we need to copy and paste Webhook Signing secret codes to Signal Magician.
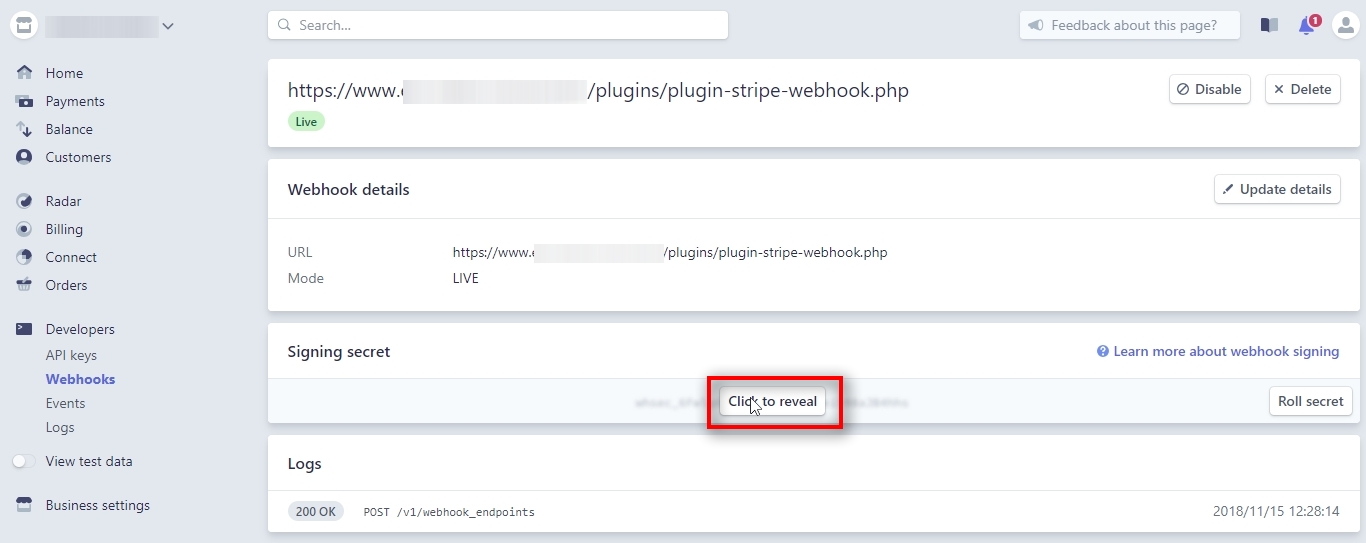
In the “Developers -> Webhooks” page we see a Webhook URL we’ve just added and in the 3rd column it says “Test”.
We click on that URL to open its properties.
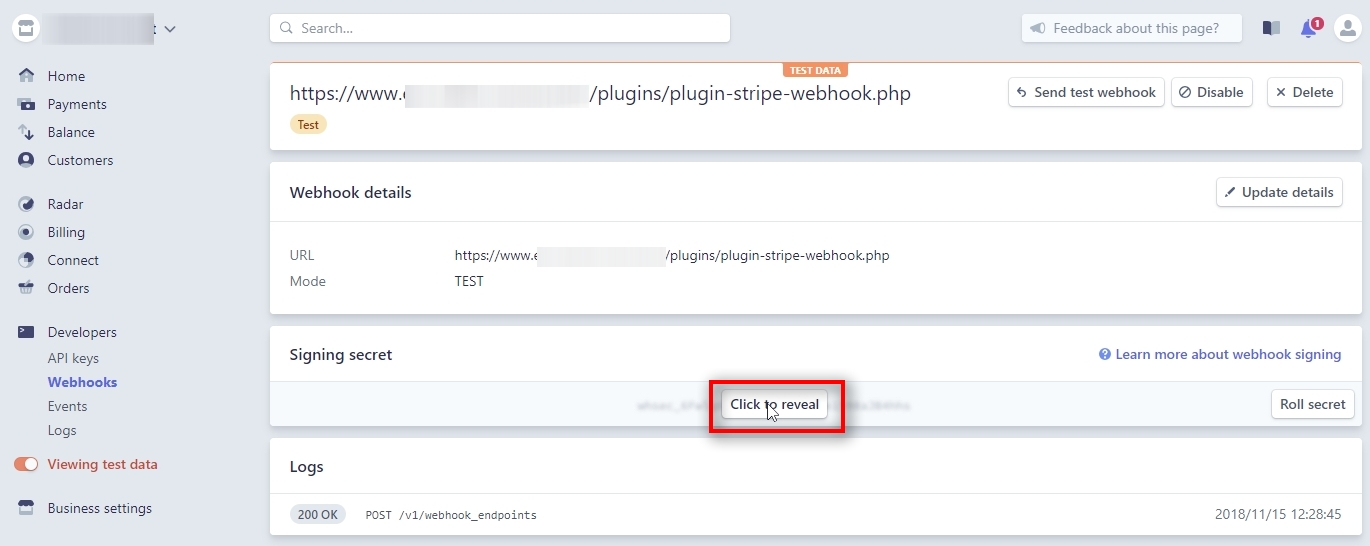
Once on Webhook details page, click on “Click to reveal” in the “Signing secret” section. This will reveal your “Test mode” Webhook Signing secret code.
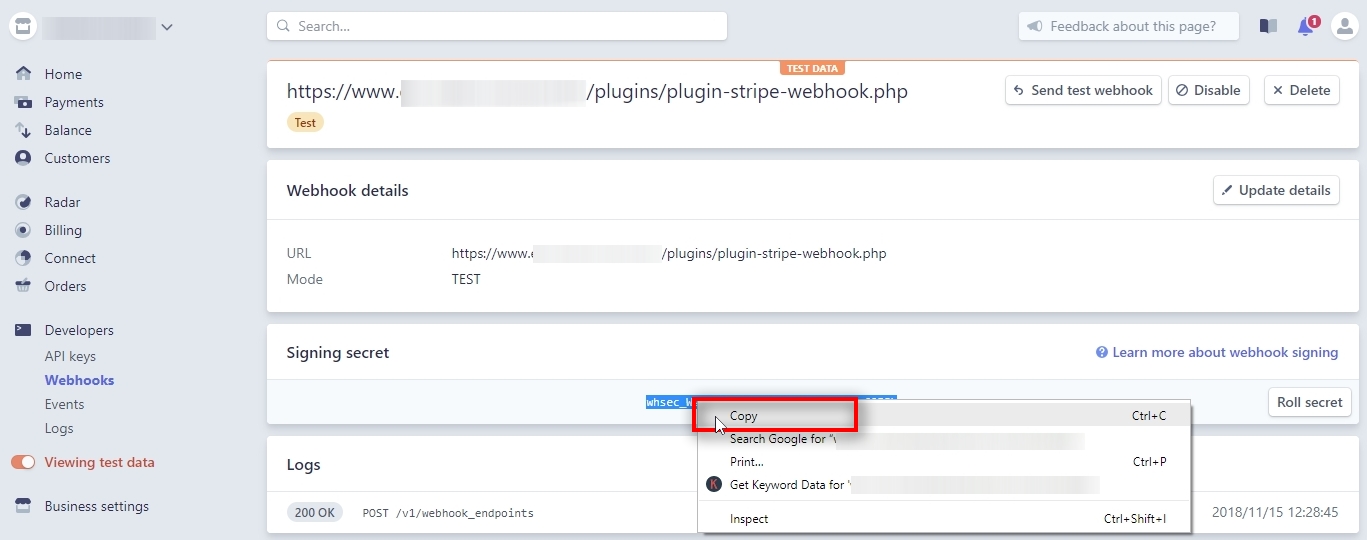
Copy “Webhook Signing secret”, then switch to Signal Magician and paste it into the corresponding field.
Input Webhook Signing secret (Test mode)
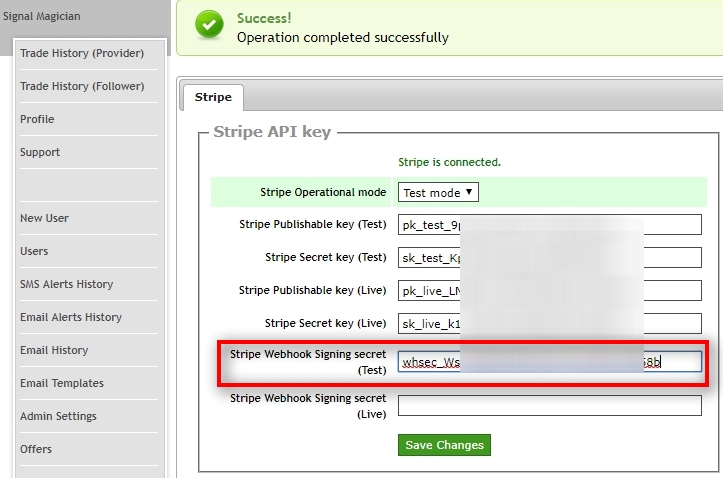
It is very important not to make a mistake when copy-pasting API keys and Signing secret codes to Signal Magician and input them in appropriate fields.
You must add “Test mode” codes to the fields which have “Test” in their name, and “Live mode” codes to the fields which have “Live” in their names.
Copy Webhook Live Signing secret code to Signal Magician
Now, let’s copy and paste Webhook Live Signing secret code to Signal Magician.
First, turn off the “View test data” from the left menu (to make it NOT orange).
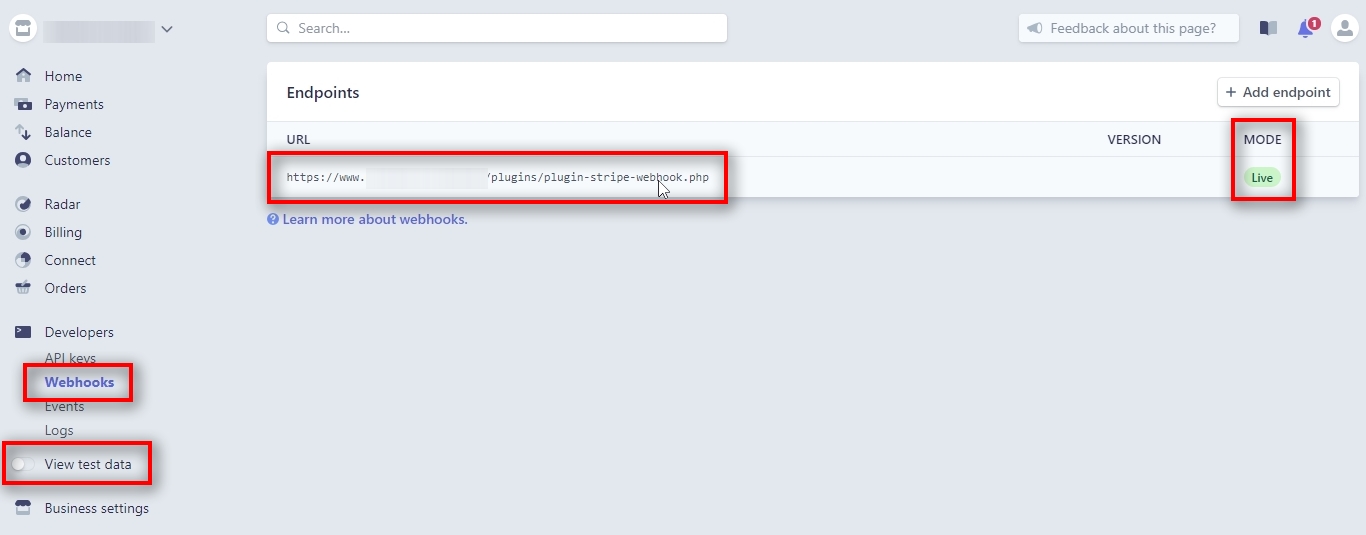
Then, open the “Developers -> Webhooks” page.
Inside, we see a Webhook URL we’ve just added, and in the 3rd column it says “Live”.
We click on that URL to open its properties.
Once on Webhook details page, click on “Click to reveal” in the “Signing secret” section. This will reveal your “Live mode” Webhook Signing secret code.

Copy “Webhook Signing secret”, switch to Signal Magician and paste it into the corresponding field.
Input Webhook Signing secret (Live mode)
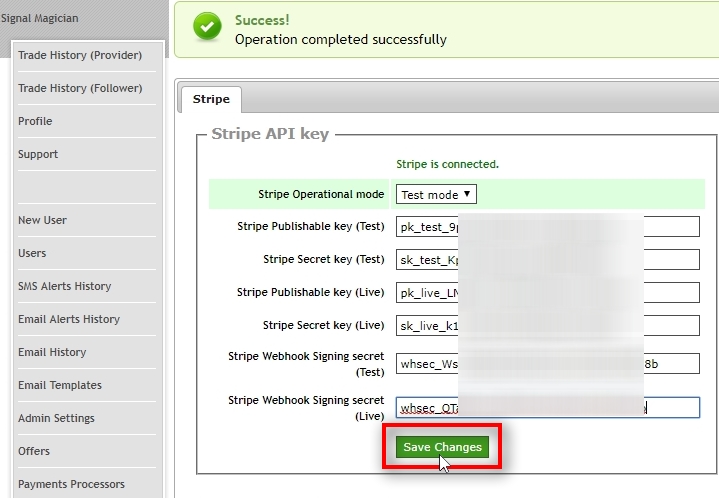
Once we add both Webhook Signing secret codes to Signal Magician, we click on “Save Changes”.
Now we have Stripe fully activated with Signal Magician and ready to proceed to the next step – creating Plans and Offers.
Set URLs for Thank You page and Error pages
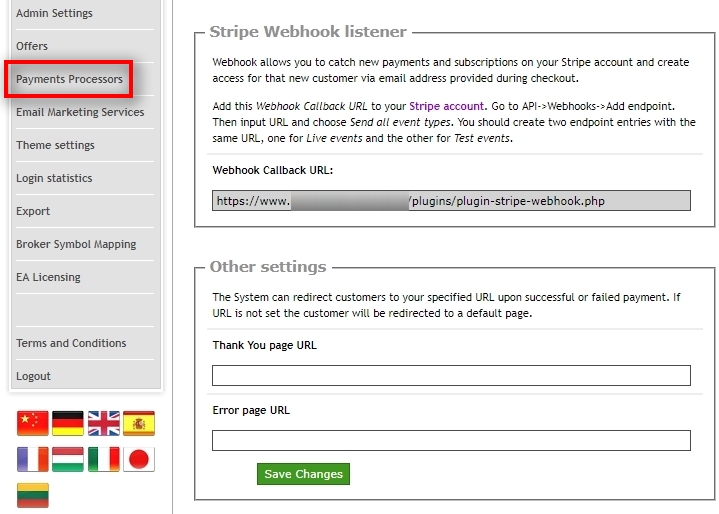
Let’s set a Thank You page and Error page URLs. These are the pages you should create on your website.
To use the default Thank You page and Error page, leave URL parameters empty.
In this example, we leave URL parameters empty to illustrate how a default Thank You page looks like. For you, it should be a webpage on your website.
Thank You page URL – the URL where you provide instructions on how to retrieve the product. Create a page on your website where you want customers to be taken after they complete their checkout. It is usually called “Thank You” page. An example would be, a simple web-page saying something like “Thank you for subscribing to our trading signals. We’ve sent your login information to the email address you use to complete this purchase. Do not forget to check your Spam folder too. Contact our support team here if you don’t receive your login information within 15 minutes“.
Error page URL – the URL where you provide information about what a customer should do in case there’s a problem with their payment. An example text would be “There was a problem with your payment. Please wait for a few minutes or try again. If it still does not work, please contact our customer support team at this email“.
Click on “Save Changes” button.
Creating products and subscription plans on Stripe
In this tutorial, we explain how to create a product or subscription plans on Stripe. We describe only the most necessary steps required to connect your Stripe with Signal Magician.
If at any stage, you have more questions about how to create products or plans on Stripe or how to use Stripe, refer to Stripe documentation.
Useful article: Stripe Billing Quickstart.
Create a product and recurring pricing plans in Stripe Test mode
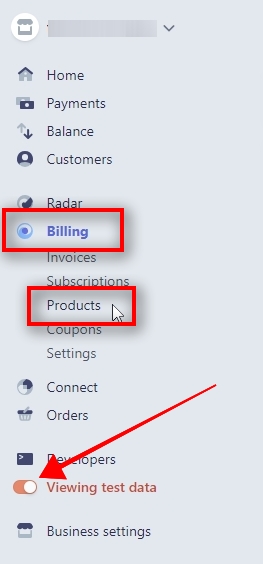
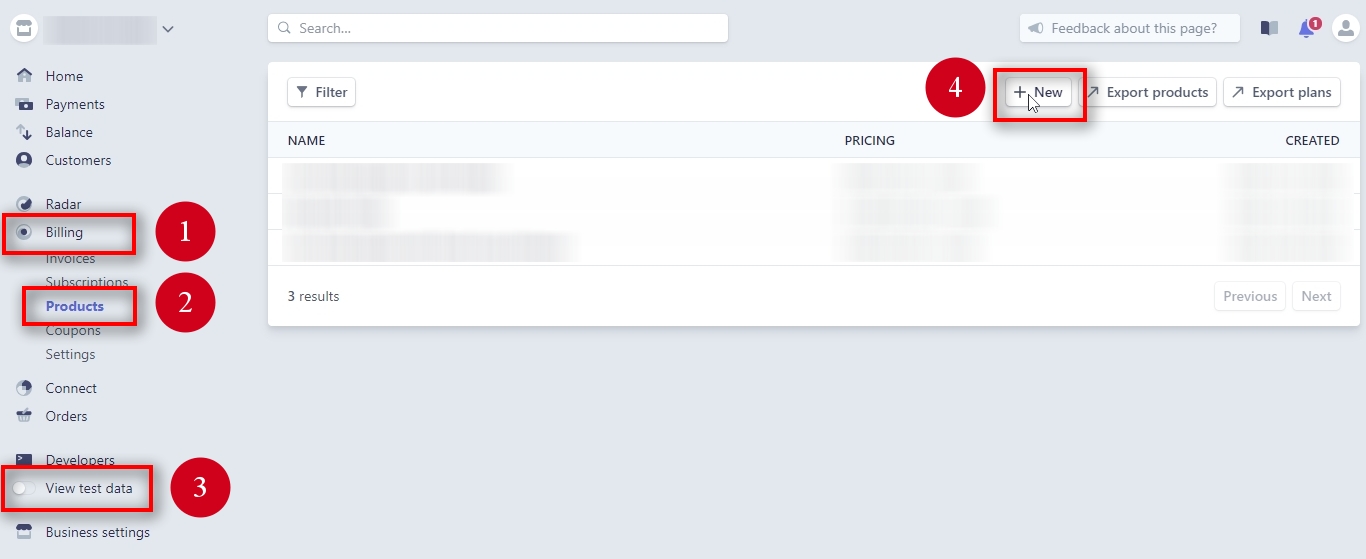
To create products and pricing plans in Test mode we need to open the “Billing -> Products” page and switch to the “Viewing test data” mode.
Make sure the “Viewing test data” switch in the left menu is orange.
You can create two kinds of products on Stripe, one-time purchase products, and recurring products. I’ll mostly focus on recurring products in this tutorial, but later I’ll show how to create one-time payment products too.
Click on “+ New” button
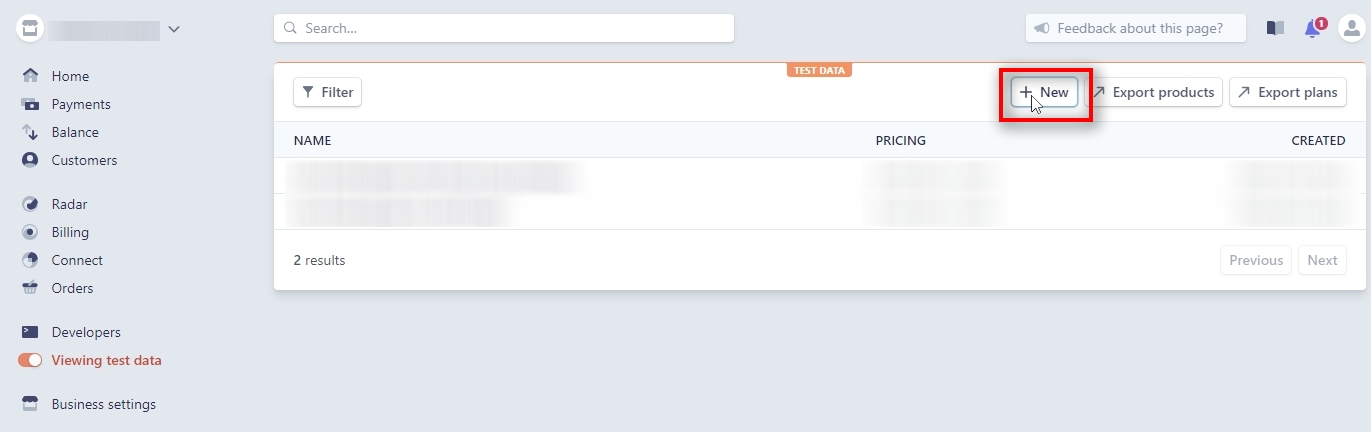
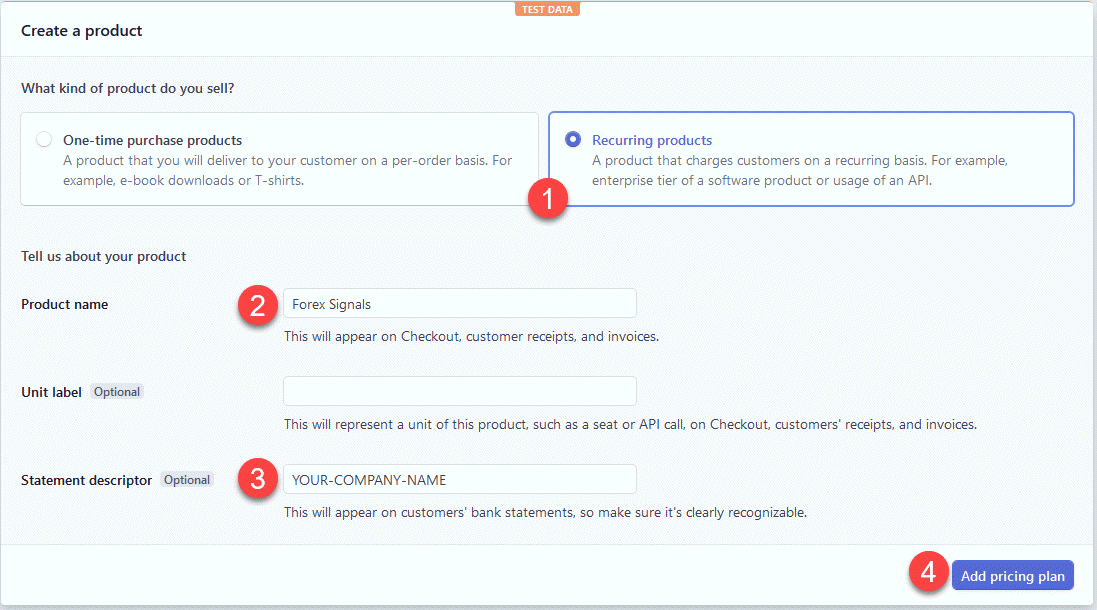
Then, choose “Recurring products” and fill in the fields below.
For best “test purchase” experience we should have products and pricing plans by the same names in TEST mode and LIVE mode. This way we can connect Stripe pricing plans with the same Offer on Signal Magician.
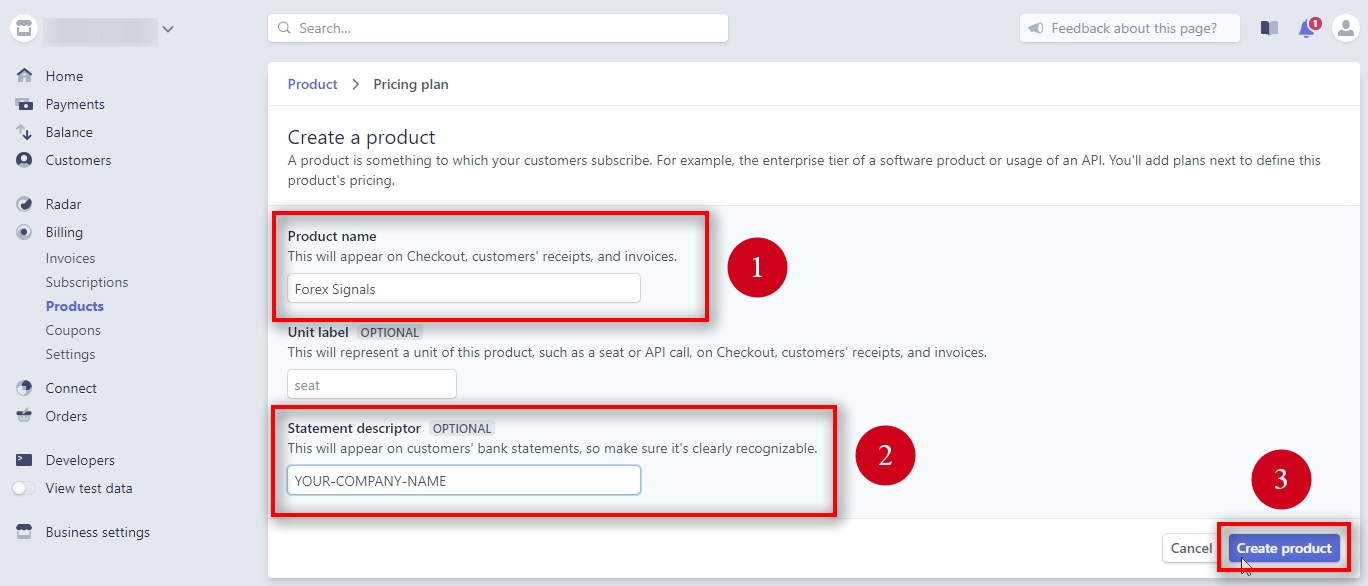
First, we’ll create a product, and then we’ll create pricing plans for that product.
To create a product we need to add a Product name (i.e., Forex Signals) and Statement descriptor (optional).
Click on “Add pricing plan” to continue.
Adding a pricing plan for recurring product in Test mode
When the product is created, you’ll be redirected to add a pricing plan for that product.
We’ll create 3 monthly pricing plans in total. A plan without trial, a plan with a 7-day trial, and a 50% discount plan.
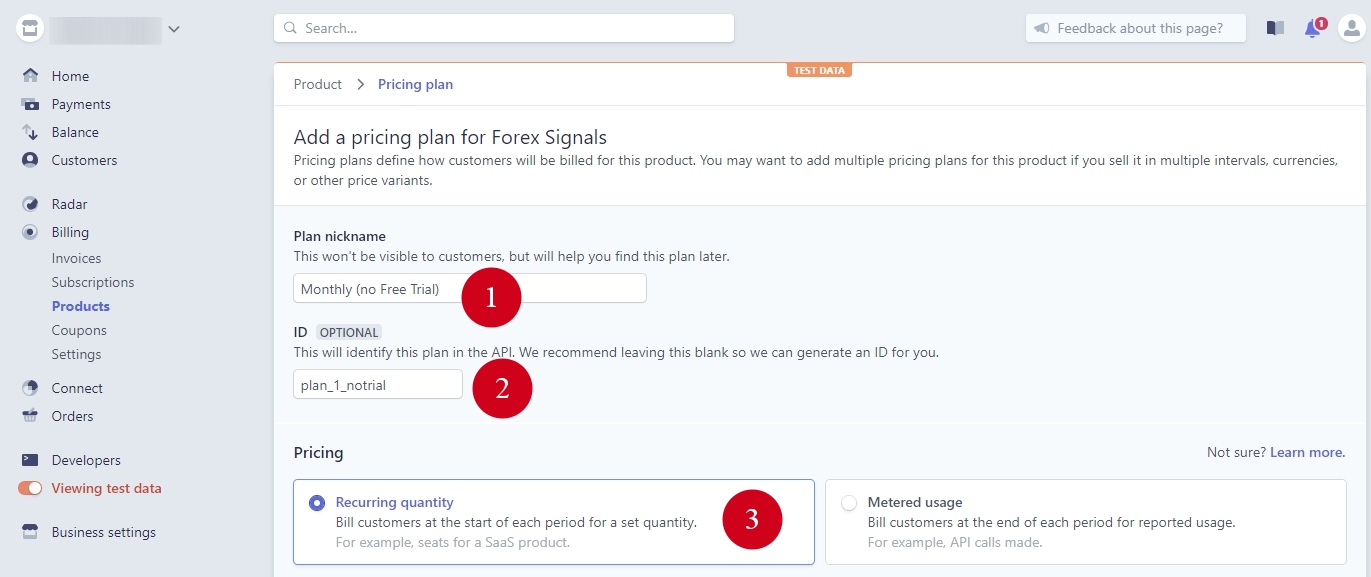
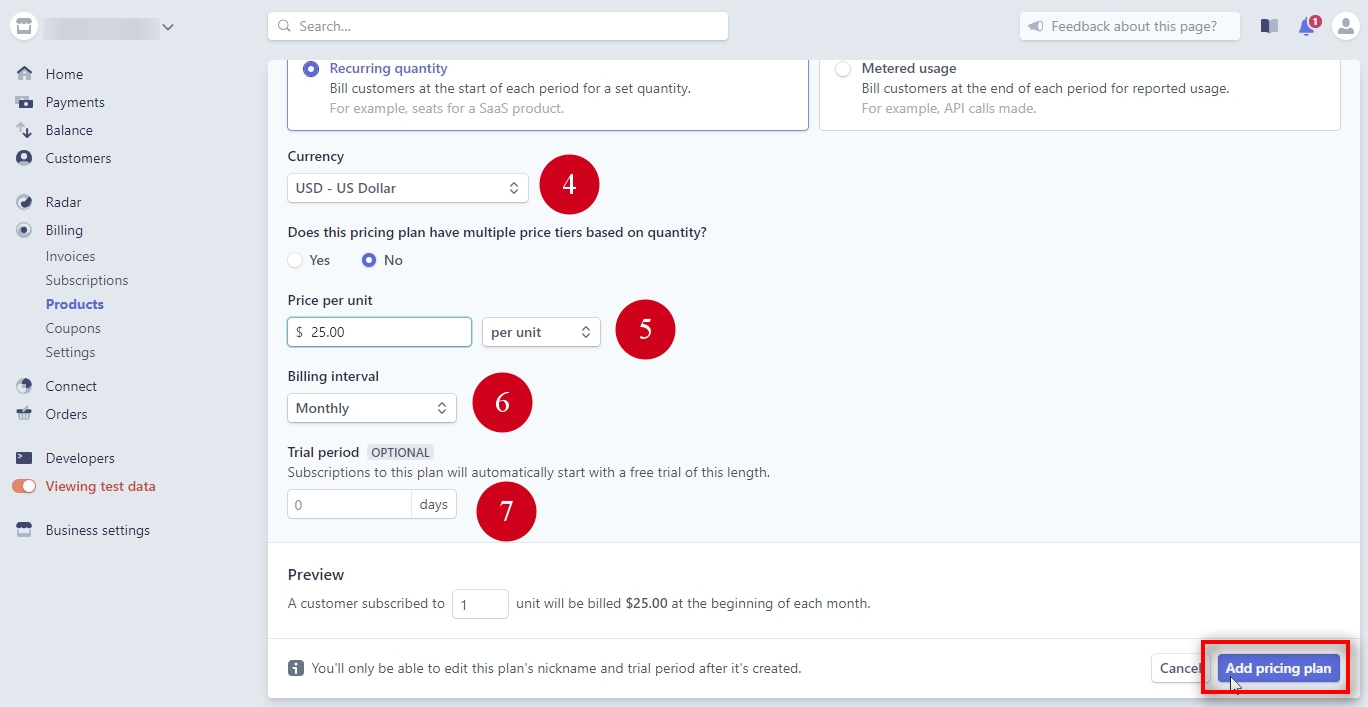
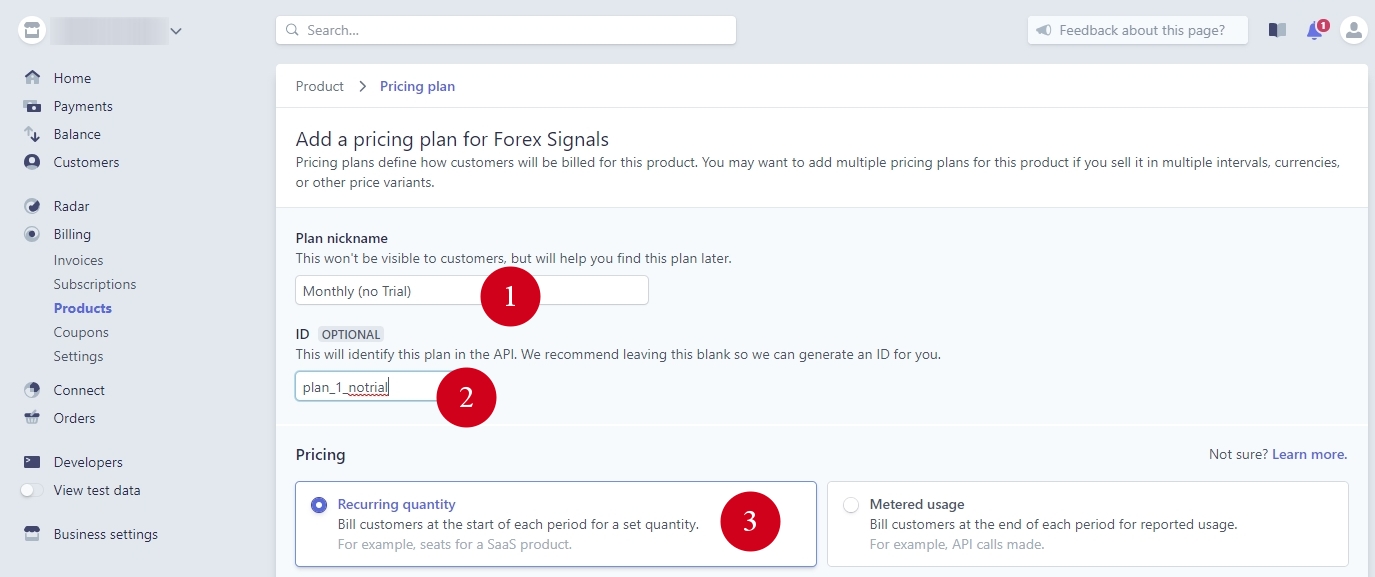
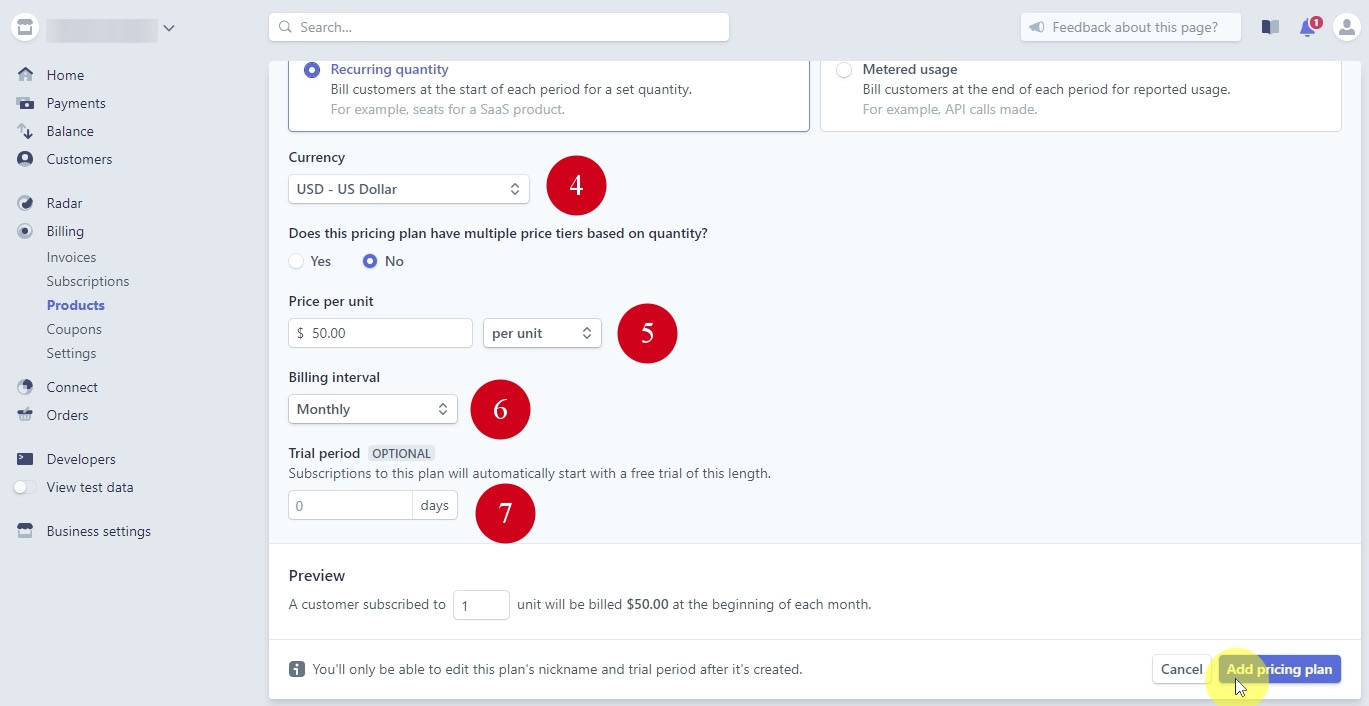
To add a pricing plan we need to choose 7 things.
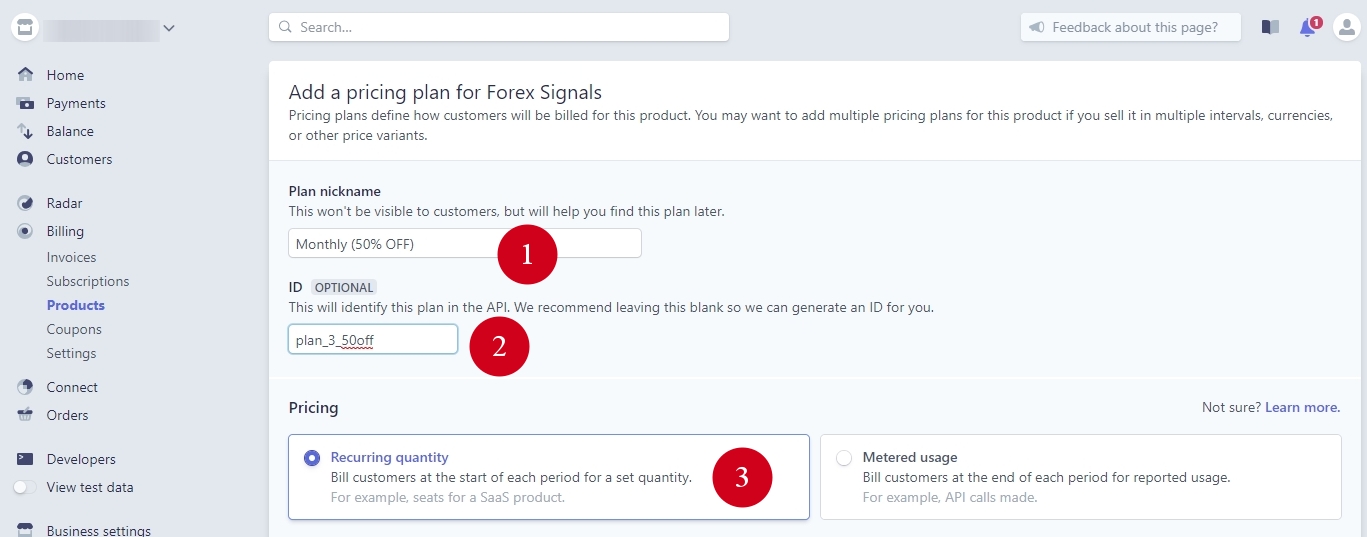
1) Plan nickname – this won’t be visible to customers but will help you find this plan later.
We choose plan nickname “Monthly (no Free Trial)“.
2) ID – this will identify this plan in the API. Stripe recommends leaving this blank so they can generate an ID for you, but in our case, we will NOT leave it blank.
It is important to set plan ID by yourself because that way you can identify all plans fast from just their ID. Plus, we need to use the same plan IDs in Test mode, Live mode and Offers in Signal Magician.
If you let Stripe generate an ID for you, it will be a bunch of letters like “plan_tRtuJhHgF“, and you won’t be able to tell the difference later from several plans IDs.
So, to make it easy, we will use this plan ID: plan_1_notrial
3) Make sure “Recurring quantity” is selected and scroll down for more parameters.
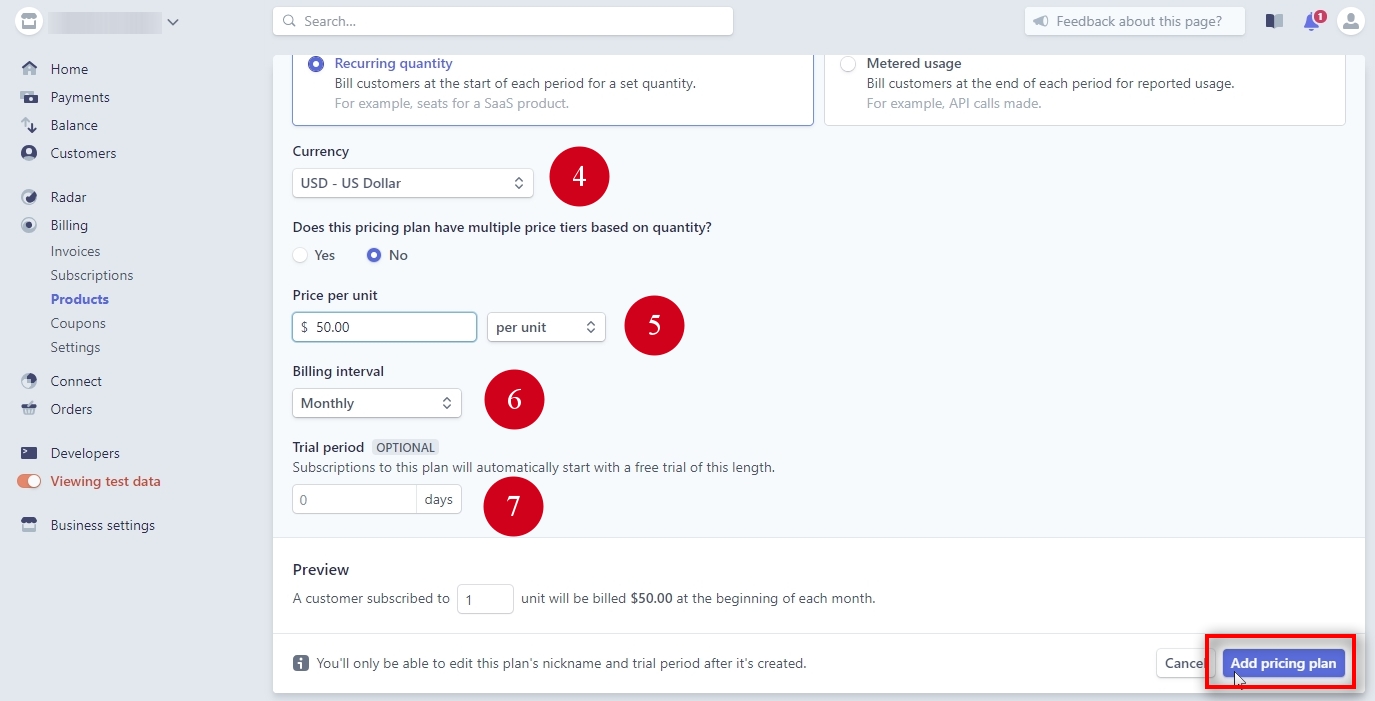
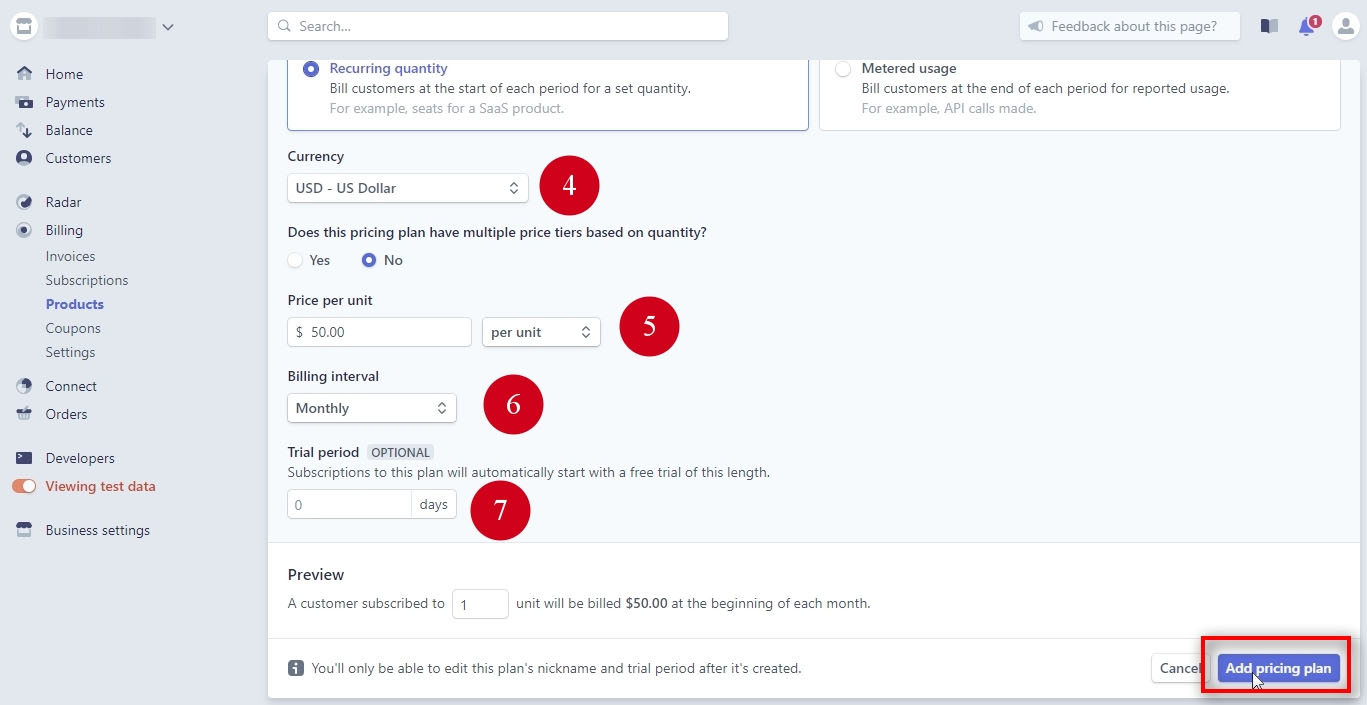
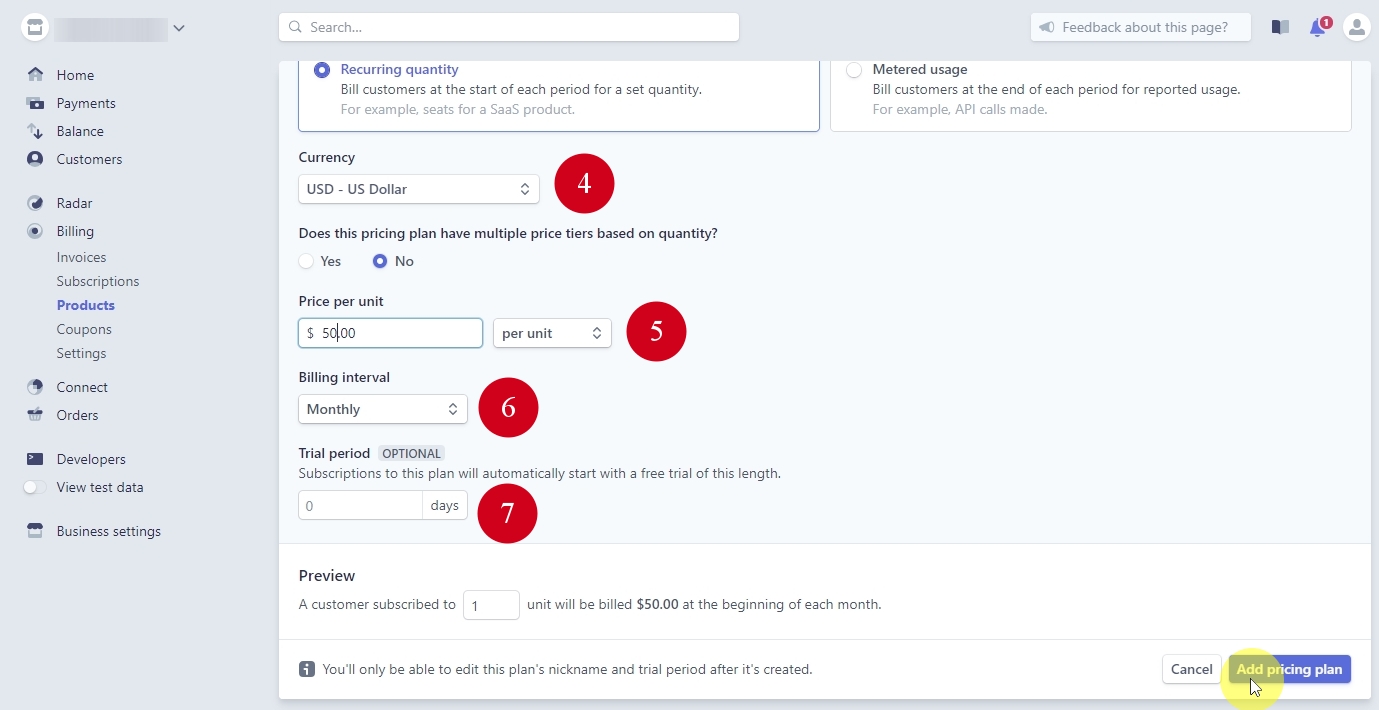
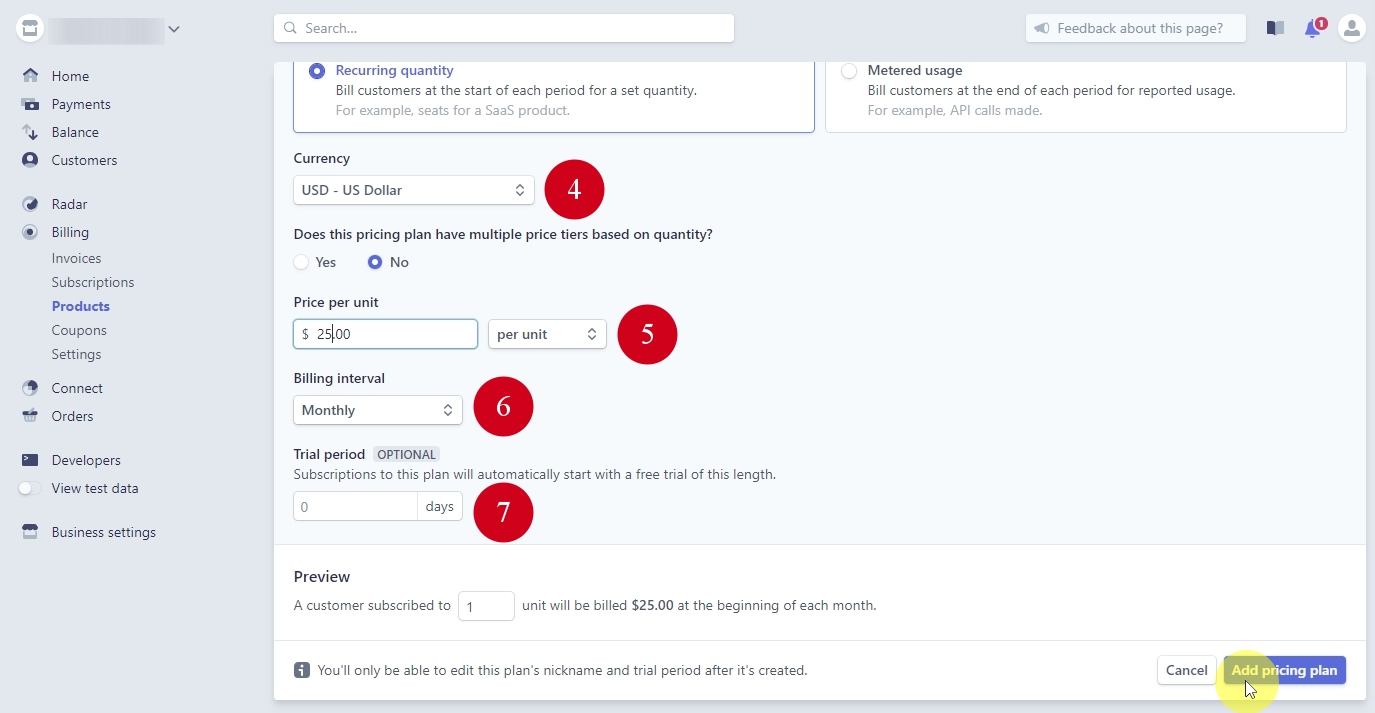
4) Currency – choose USD or whatever currency you want to charge your customers.
5) Price per unit – this is the monthly price to charge.
We choose $50 for this example.
6) Billing interval – how often customers should be billed automatically.
We choose “Monthly“.
7) Trial period – subscriptions can start with a FREE trial, and this is where you set its length. Zero means there is no trial. IMPORTANT: This parameter should be used only with Signal Magician 1.9.7. In the SM 1.9.8 version, the trial period here must always be set to 0 (zero). DO NOT set a trial length here on Stripe as you will set the trial period length in days on Signal Magician when creating an Offer.
In this tutorial, I am connecting Stripe with Signal Magician 1.9.8, so I leave this parameter set to zero.
IMPORTANT: Stripe does not have an option to add a price to the trial period. It is either a FREE trial or no trial at all.
Click on “Add pricing plan”.

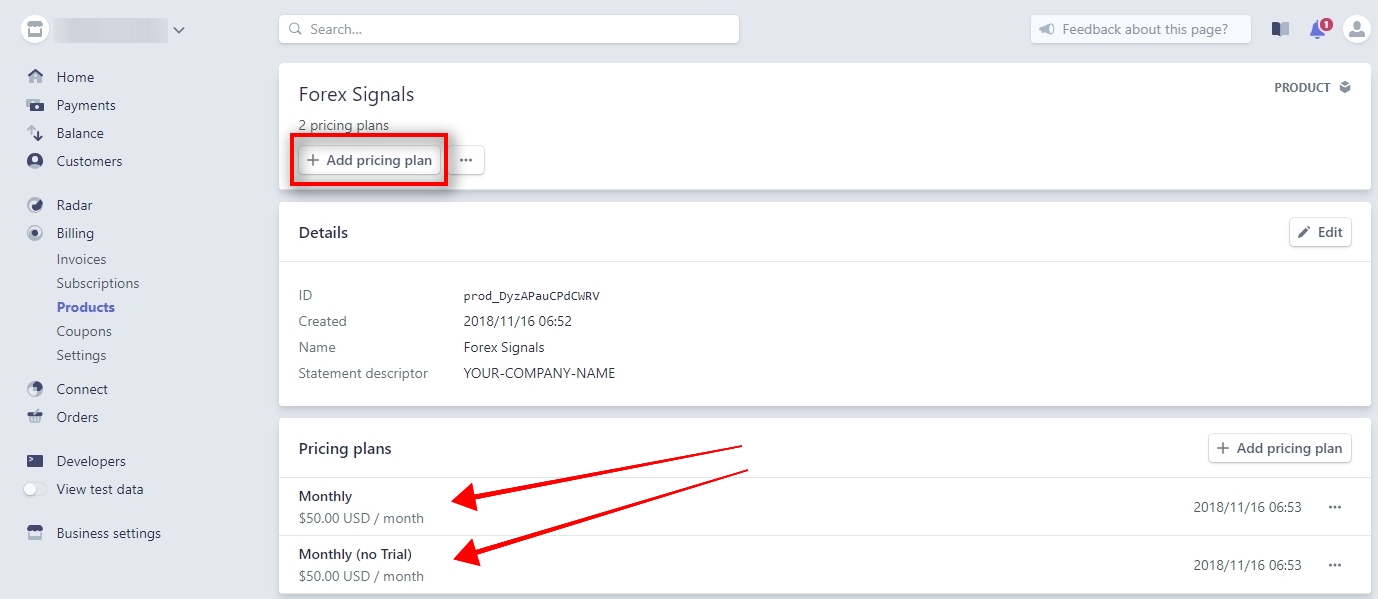
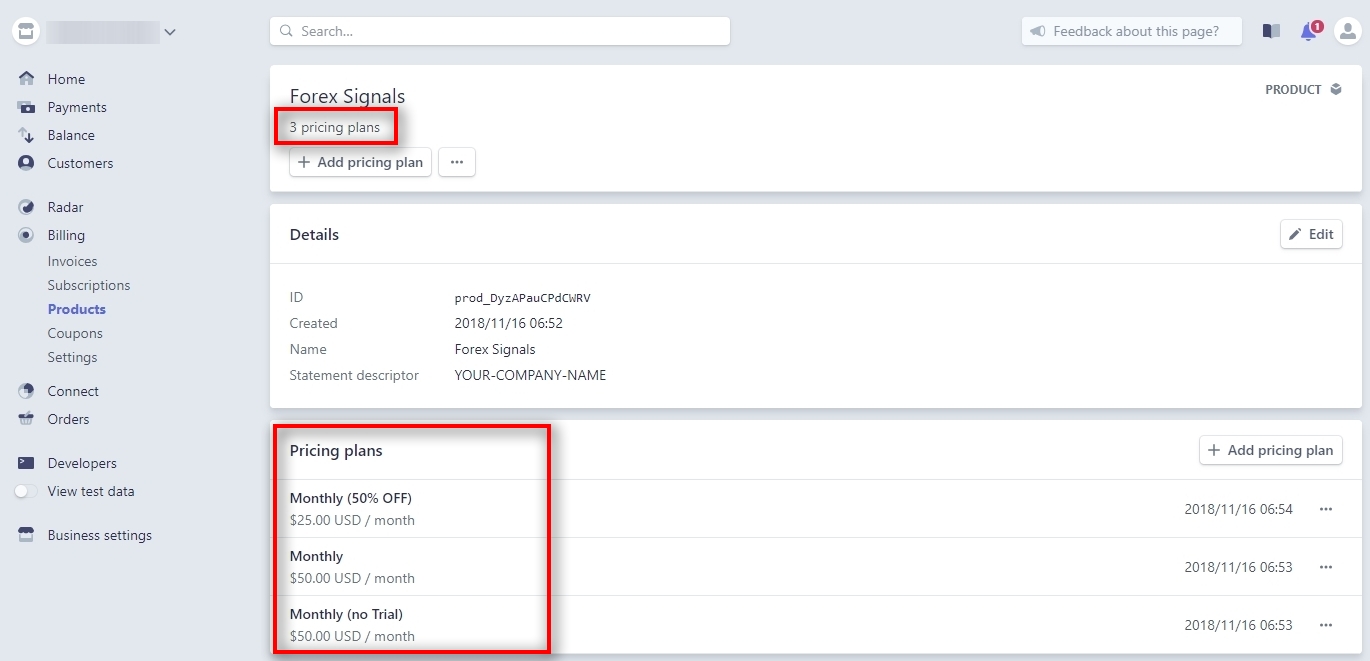
Our first pricing plan was created, and we land on the “Forex Signals” product page.
We can see all plans there in the “Pricing plans” section.
Let’s add two more pricing plans.
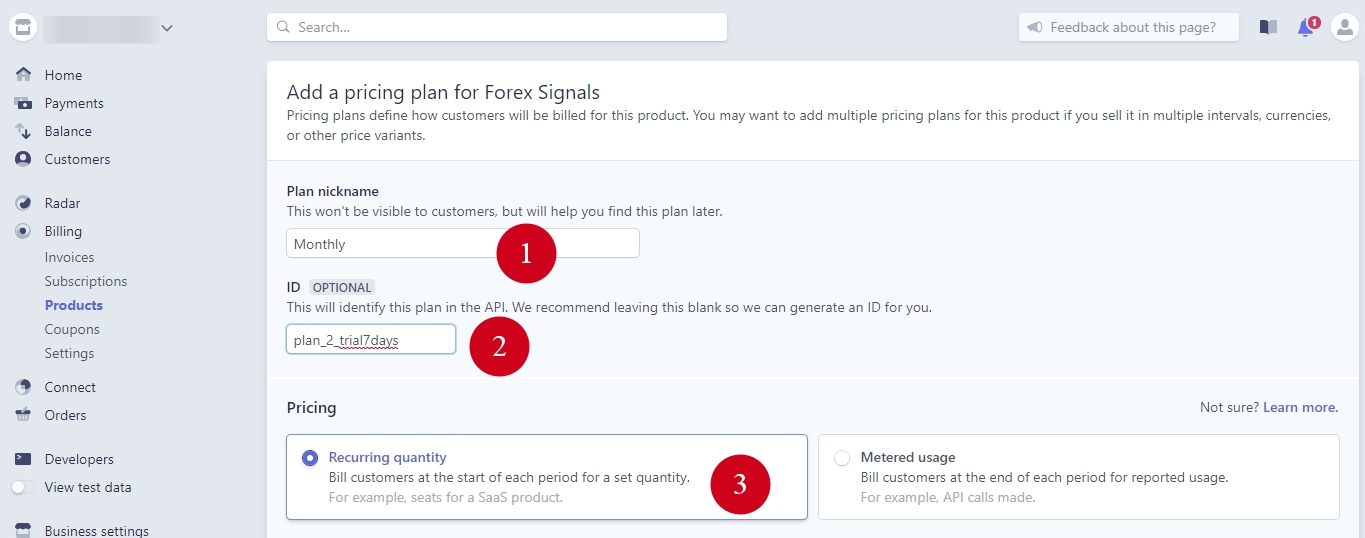
Click on “+ Add pricing plan”.
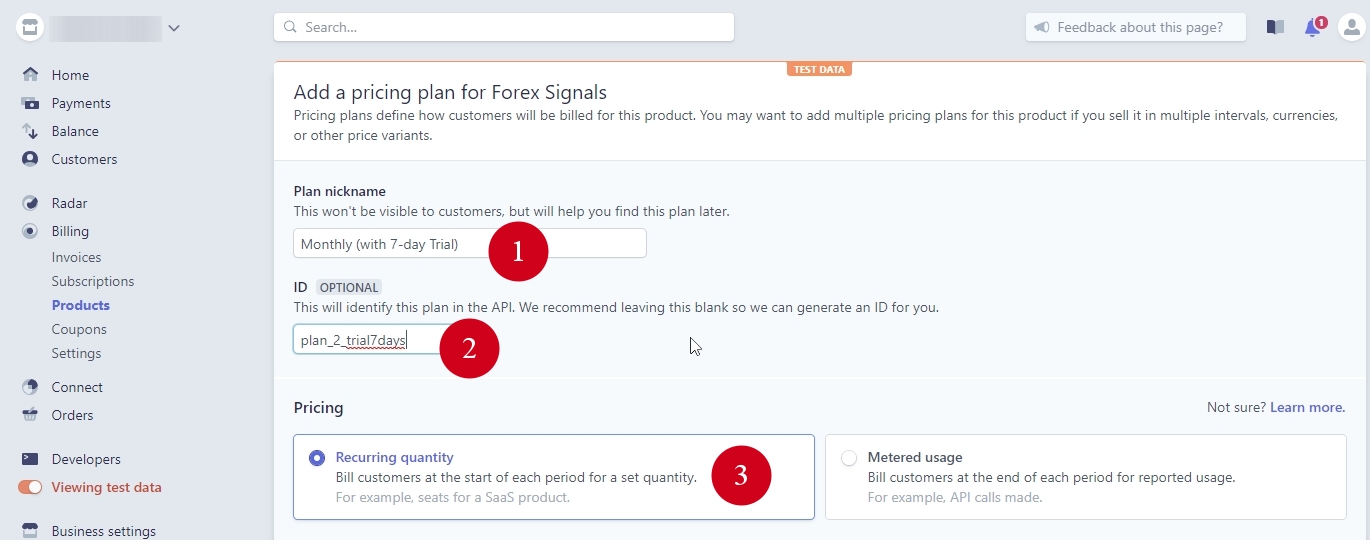
For the second pricing plan, we’ll use a nickname “Monthly (with 7-day Trial)” and an ID plan_2_trial7days to make it easy to remember.
We set a monthly price of $50 USD for the second plan as well.
For the trial period on Stripe, we have to set it to zero. We will set the trial period length in days when we create an Offer for this plan on Signal Magician.
Click on “Add pricing plan”.
This plan is no different than the first one, except for the Plan ID. But we have to have different plans, one without trial and another with a trial period. Because on Signal Magician, we will create an individual Offer for each plan with the appropriate trial length accordingly. You will learn about Offers later in this tutorial, but here it is essential to mention that a Stripe plan can activate only one Offer. That is why we need two different plans and two different Offers here to have one without a trial and another one with a trial.
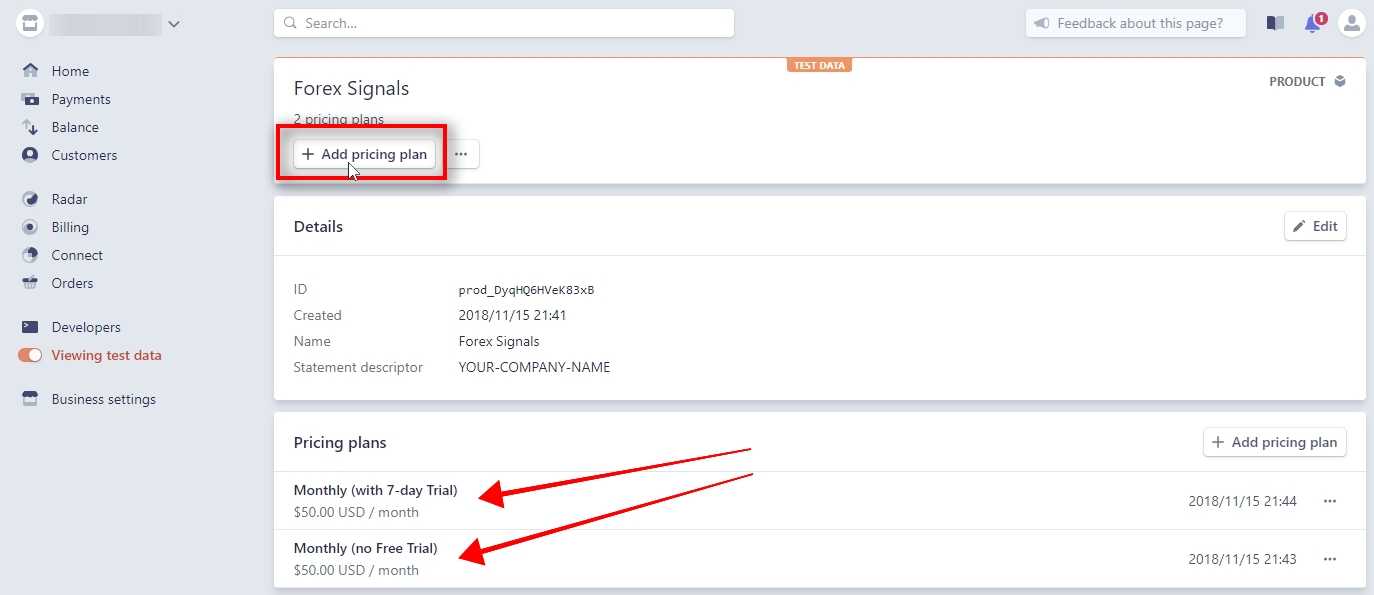
Now we have two pricing plans created in Test mode.
Click on “+ Add pricing plan” to create the 3rd pricing plan.
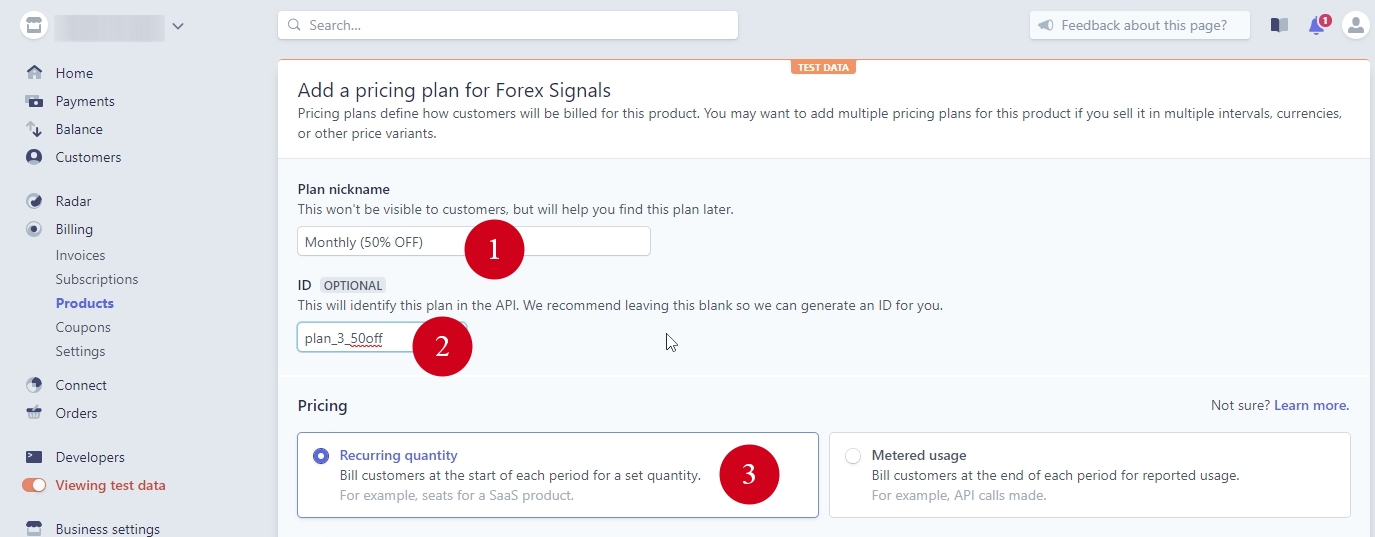
For the third pricing plan, we’ll use a nickname “Monthly (50% OFF)” and an ID plan_3_50off to make it easy to remember.
This time we set a monthly price of $25 USD because the third plan must be priced at 50% off.
Click on “Add pricing plan”.
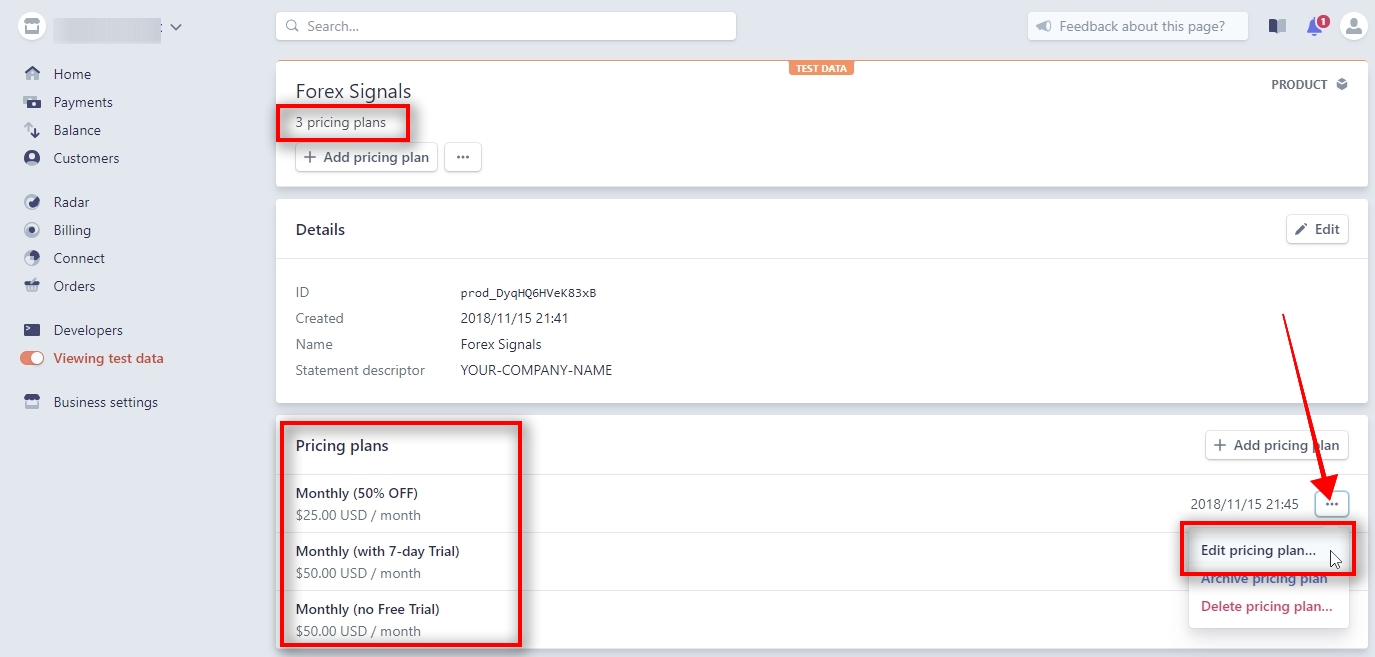
We’ve created three pricing plans in Test mode for a product “Forex Signals”.
All pricing plans are visible on the product page now.
If you ever need to edit plan parameters or delete a plan, click on the “3 dots” icon next to the plan for options. Note, that once a pricing plan is created, only its nickname and trial period can be updated.
IMPORTANT: If you change or delete a pricing plan which already has subscribers, it might lead to unexpected errors. The best practice is to not remove pricing plans from Stripe. If you need to remove a pricing plan from Stripe for some reason, then you better do that when all subscribers on this plan have their subscriptions canceled. If you edit plan parameters, make sure you edit Offer in Signal Magician accordingly.
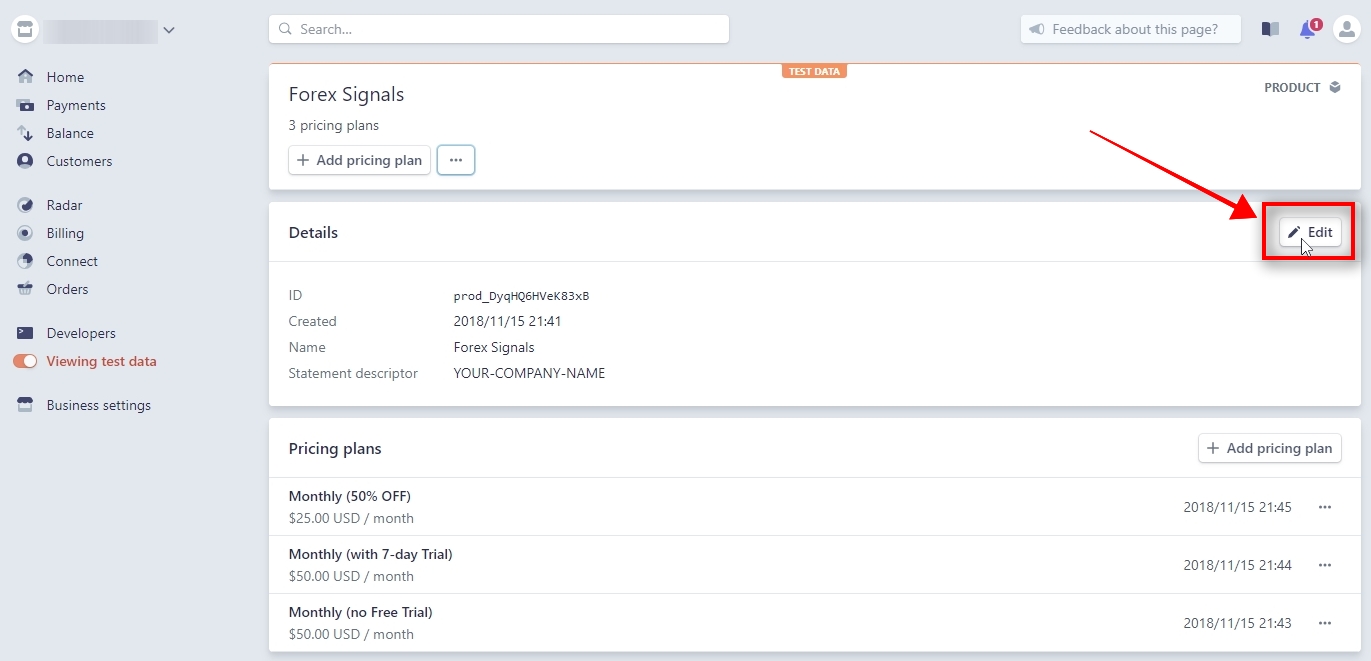
If you ever need to edit product parameters, click on the “Edit” button on the right side on the product page.
Create a product and pricing plans in Stripe LIVE mode
To create products and pricing plans in a LIVE mode we need to open the “Billing -> Products” page and switch OFF the “Viewing test data” mode.
Make sure the “Viewing test data” switch in the left menu is NOT orange.
Then, click the “+ New” button on the upper right side of the page.
Remember, for best “test purchase” experience we should have products and pricing plans by the same name in TEST mode and LIVE mode.
So we’ll create the same “Forex Signals” product in a Live mode as we did in Test mode previously.
Then, we’ll create the same pricing plans for that product in a Live mode as we did in Test mode.
Type a Product name and Statement descriptor.
Click on “Create product” to continue.
Adding a pricing plan in Live mode
When the product is created, you’ll be redirected to add a pricing plan for that product.
We’ll create the same 3 monthly pricing plans as we did in Test mode. A plan without trial, a plan with a 7-day trial, and a 50% discount plan.
We will choose the same plan nicknames and same IDs.
First plan nickname is “Monthly (no Free Trial)” and its ID is plan_1_notrial
We choose the same settings for this pricing plan as we did in Test mode.
The monthly price of $50 USD without a trial period.
Click on “Add pricing plan”.

Our first “Live mode” pricing plan was created, and we land on the “Forex Signals” product page.
We can see all plans there in the “Pricing plans” section.
Let’s add two more pricing plans.
Click on “+ Add pricing plan”.
For the second pricing plan in a Live mode, we’ll use the same nickname as in test mode – “Monthly (with 7-day Trial)“. The ID will be the same as well: plan_2_trial7days
We set the same monthly price of $50 USD for the second plan as well.
Click on “Add pricing plan”.
Remember, we need to set the trial period length on Stripe to 0 (zero). We’ll set this on Signal Magician when creating an Offer for this plan.
Now we have two pricing plans created in Live mode.
Click on “+ Add pricing plan” to create the 3rd pricing plan.
For the third pricing plan, we’ll use a nickname “Monthly (50% OFF)” and an ID plan_3_50off to make it easy to remember.
This time we set a monthly price of $25 USD because the third plan must be priced at 50% off.
Click on “Add pricing plan”.
We’ve created three pricing plans in Live mode for a product “Forex Signals”.
All pricing plans are visible on the product page now.
IMPORTANT: If you change or delete a pricing plan which already has subscribers it might lead to unexpected errors. Best practice to remove a pricing plan is when all subscribers on this plan have their subscriptions canceled. If you edit plan parameters, make sure you edit Offer in Signal Magician accordingly.
Creating one-time purchase products in Stripe Test Mode
This tutorial is mostly focused on recurring products, but let’s take a break for a minute now and see how you can also create one-time purchase products on Stripe.
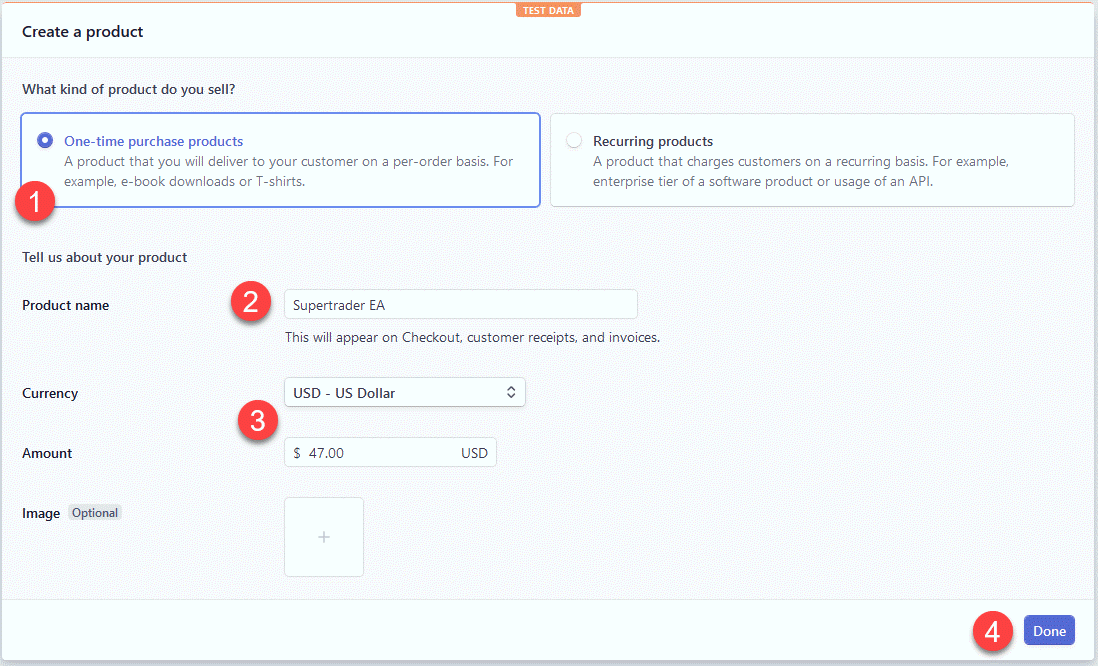
When creating a new product, choose the “One-time purchase products” option and then enter product name and choose pricing.
Click “Done” to get to the next step.
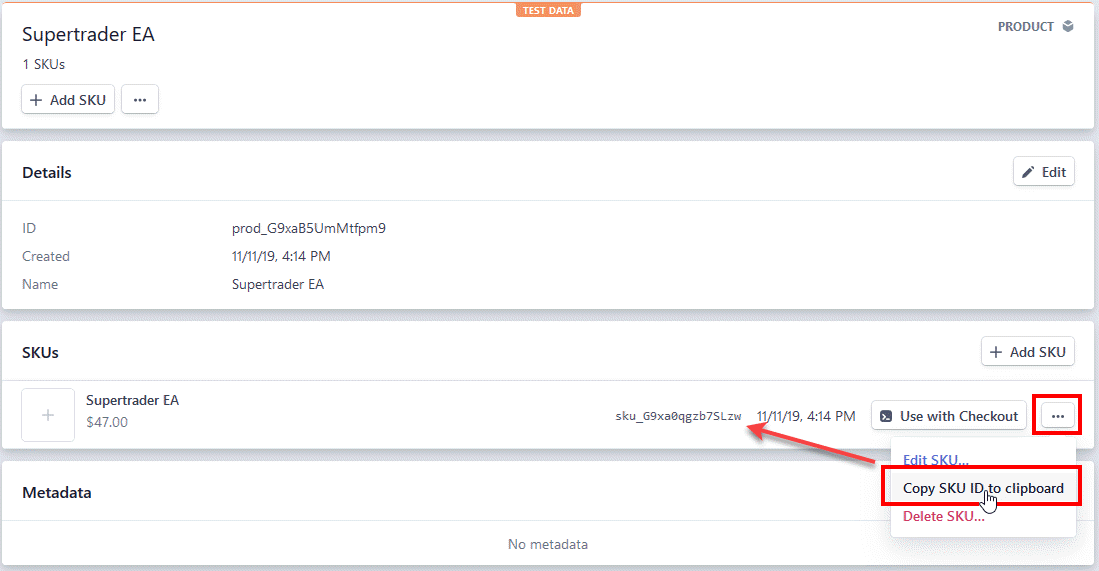
After creating a product, Stripe will create a first SKU for that product too. SKU means stock-keeping units, and it describes specific product variations, taking into account any combination of attributes, currency, and cost.
Only one-time purchase products have SKUs, and it is kind of an equivalent to the pricing Plan ID of a recurring product.
Any product can have many SKUs, and you can link each SKU to a separate SM Offer should you need to.
So as you probably understand by now, you’ll use SKU ID in your SM Offers.
You can use the “Copy SKU ID to clipboard” menu option for your convenience and then paste it into specific SM Offer.
Creating Signal Magician Offers
What is Offer in Signal Magician?
Offers tell the Signal Magician which Signal Providers, Services, and Products it should enable when a Webhook from the payment processor triggers the Offer.
Each Offer must link to a specific Stripe Plan ID, ClickBank Item Number, or PayPal Subscription ID. This is how the system knows which Offer it needs to trigger when Signal Magician receives a Webhook call from the payment processor.
Each Offer can be activated by more than one Subscription/Plan ID (i.e., three plans at different prices activate the same Offer). But each Subscription/Plan ID can be linked to only one Offer which means you cannot assign the same plan to multiple Offers.
When you link an Offer to the Subscription/Plan ID make sure the Interval and Trial period match these parameters on the payment processor system.
Note Signal Provider IDs before creating Offers
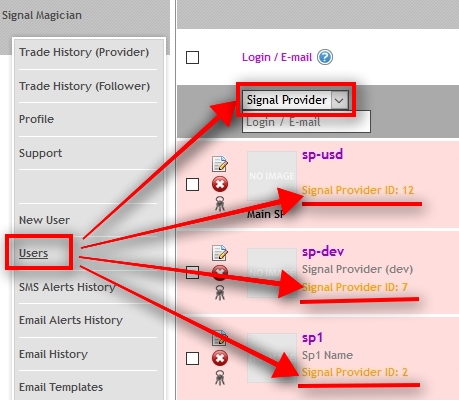
Go back to the Signal Magician and open Users page from the left menu.
Select “Signal Provider” from the top search bar and click on “Search” button.
Each Signal Provider has a unique ID number. Note these numbers as we’ll need them when creating an Offer.
Create a new Offer
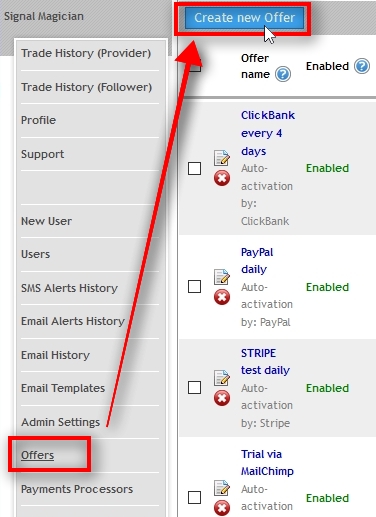
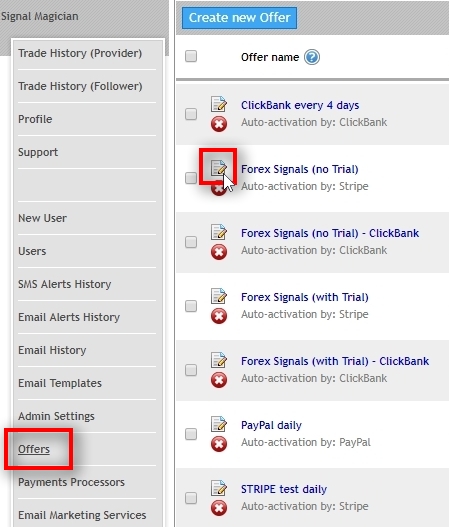
Open the Offers page from the left menu and then click on “Create new Offer” button at the top.
We need to create an Offer and connect it with the product pricing plans we’ve just added on Stripe.
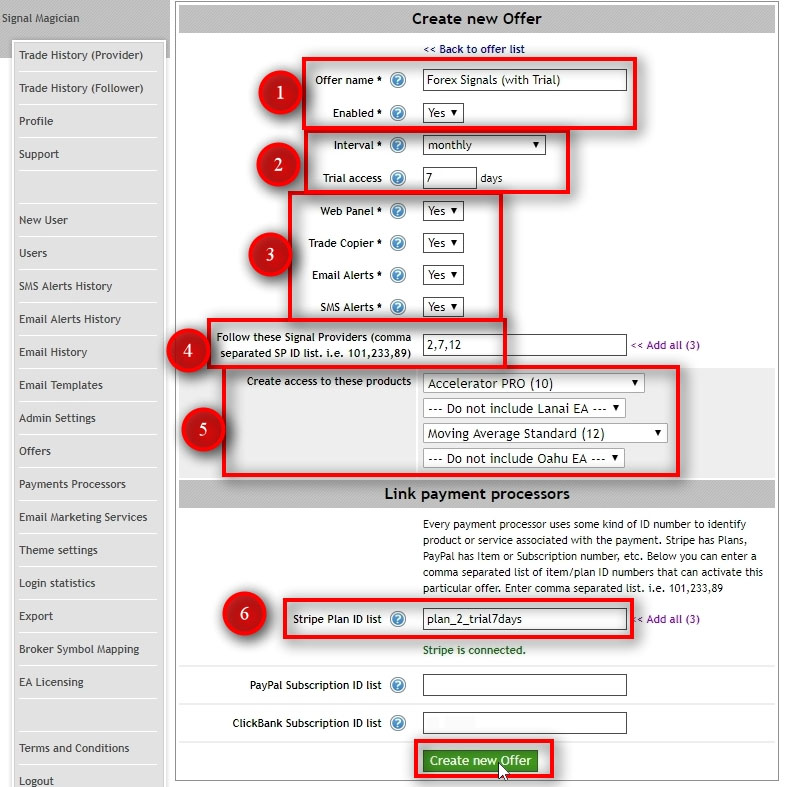
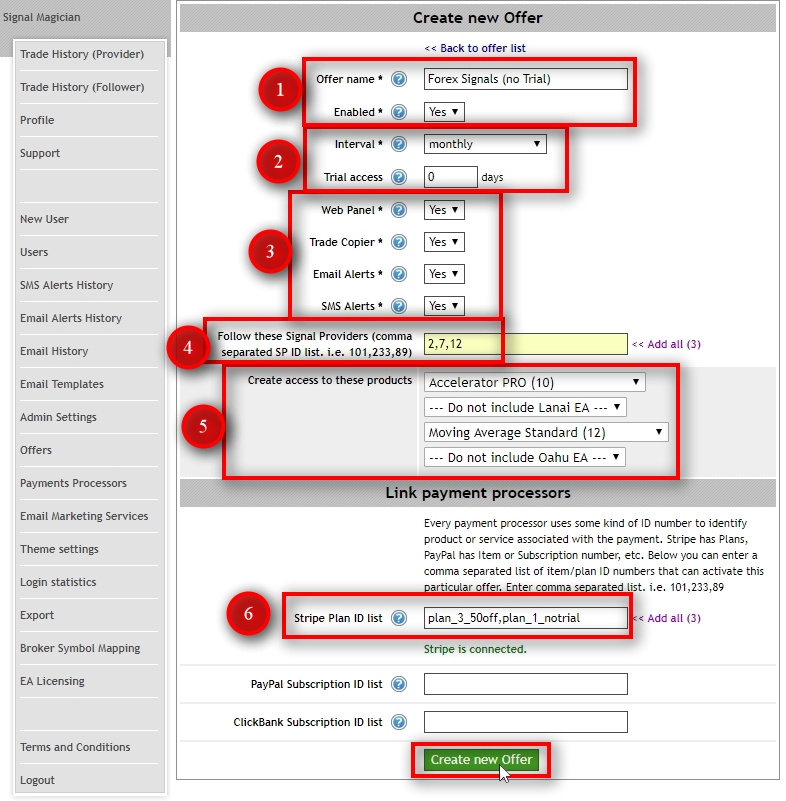
Before creating the Offer, you need to know which Stripe pricing plans you’ll connect it with. We’ll connect this particular Offer “Forex Signals (with Trial)” to the Stripe pricing plan ID plan_2_trial7days. We’ll set the ID in step #6.
Offer name – give a name for your Offers. Customers will see this on the Subscriptions page so name it accordingly.
Enabled – this is where you can enable or disable offers. When the Offer is disabled, it won’t listen to any messages from Stripe.
Interval – set the billing cycle interval for this Offer. It should match with the Stripe product billing interval.
Trial access – set the number of days for the trial period. When set to 0 (zero) the trial period is disabled for this Offer. Trial period length on Stripe must always be set to 0 (zero). If you want a trial period for any plan, you have to set it here in the Offer.
In this example, I use 7 days trial.
Web Panel – tells the Offer whether it should enable Web Panel access for the customer or not.
Trade Copier – tells the Offer whether it should enable Trade Copier service for the customer or not. You should set this to Yes if this Offer is subscribing customers to Signal Providers.
Email Alerts – tells the Offer whether it should enable Email Alerts for the customer or not. Email Alerts are sent by Signal Providers when a trade is opened or closed.
SMS Alerts – tells the Offer whether it should enable SMS Alerts for the customer or not. SMS Alerts are sent by Signal Providers when a trade is opened or closed.
Follow these Signal Providers – enter the list of Signal Provider IDs and separate them with commas. We’ll use all three ID numbers we’ve collected in the previous step from the Users page.
Create access to these products – select which products to include in this Offer. The EA Licensing module will create License Keys for each selected product.
Stripe Plans ID list – enter the list of Stripe pricing plan IDs and separate them with commas. It tells which pricing plans must trigger this particular Offer. In this example, this Offer will get triggered by a plan ID plan_2_trial7days.
Click on “Create new Offer” button.
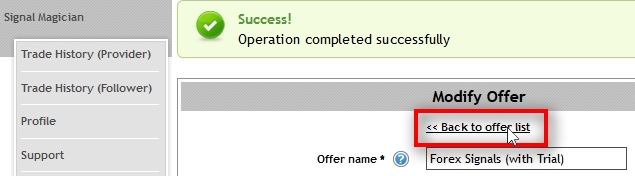
When the button is created click on “Back to offer list”.
Create a second Offer
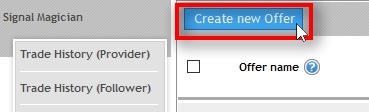
Click on “Create new Offer” button to create a second Offer. This time for the buttons without a trial period.
You already know what to input in each field.
We use the same parameters for most of the fields except these three:
Offer name is different. This Offer is without a trial period, so we name it accordingly.
Trial access set to 0 (zero).
Stripe Plan ID list is set to plan_3_50off,plan_1_notrial. It means this Offer will get triggered by two pricing plans (with and without discount).
Click on “Create new Offer” button.
Offer list
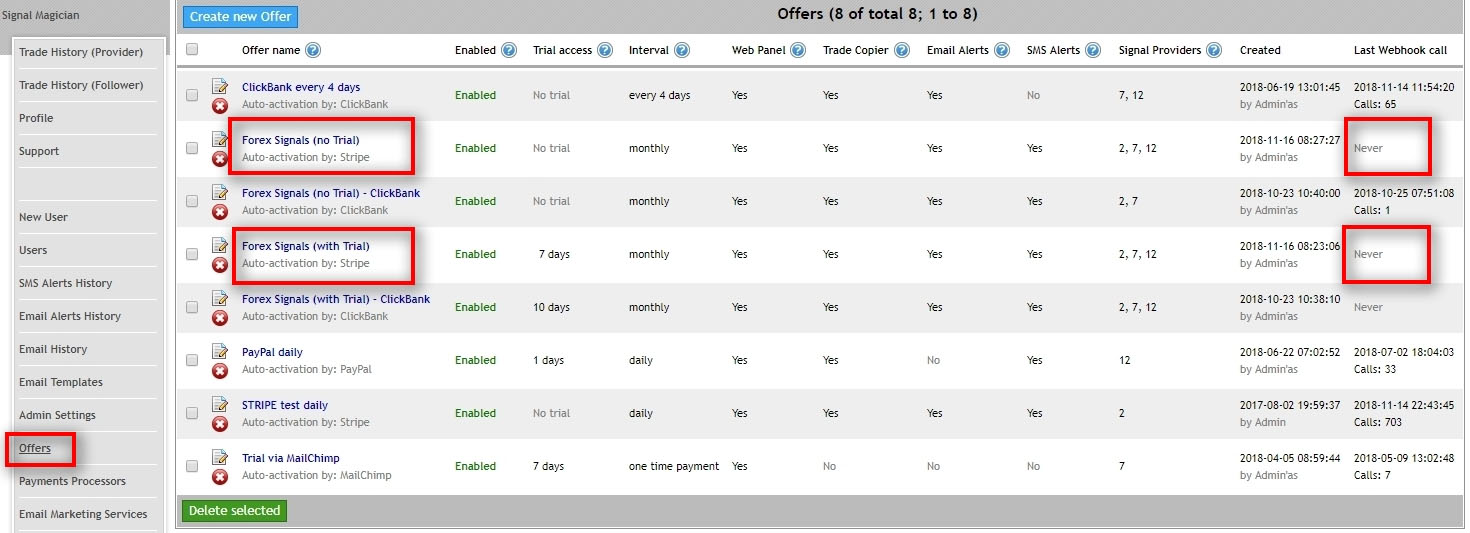
Now we have two Offers created, and we can see them on the Offers page. Pay attention to the “Last Webhook call” column. It says “Never” for both new Offers because they were never triggered yet by Stripe Webhook.
Making a Test Purchase of Forex Signals or Products
Before we make a test purchase, let’s set up some essential settings on Stripe like 3D Secure and email reminders.
Enable Important Stripe settings for payment retries, billing emails, and subscriptions
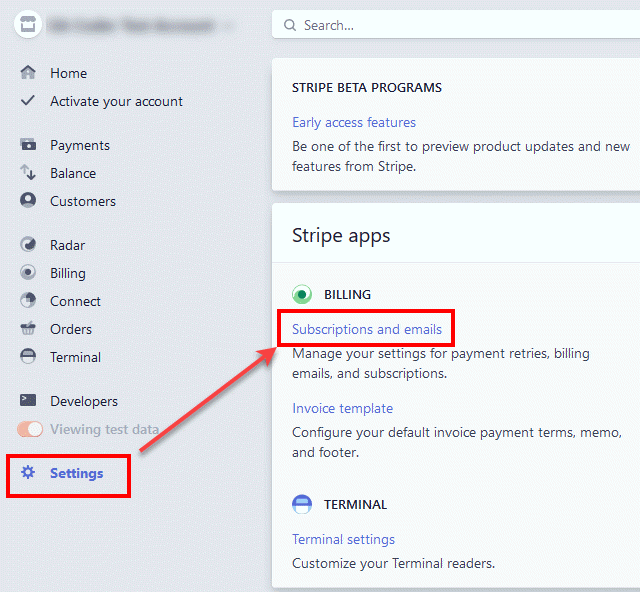
Open Subscriptions and emails setting page. You can find it in the Billing section on the main Settings page.
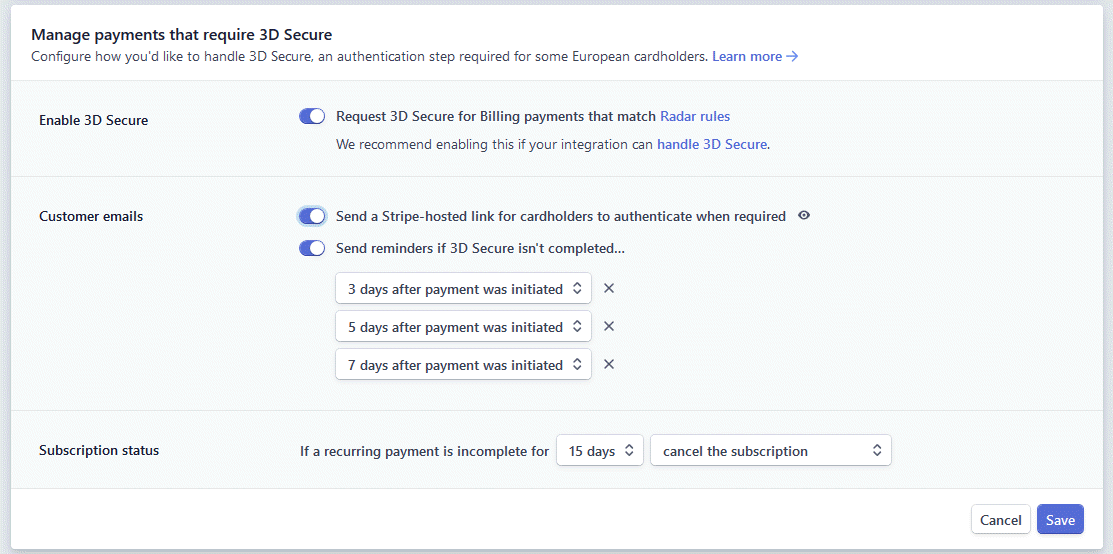
I’d recommend setting your Stripe to the following settings as seen in the picture above. This way, Stripe will help your clients to finish payments if they fail because of 3D Secure authentication.
Make sure Test mode is enabled for Stripe integration on Signal Magician
Before making a test purchase, make sure you have “Stripe Operational mode” set to “Test mode”.
Next, to make a test purchase, we need to have a Test Credit Card Number.
Stripe provides several of those, and you can read more detailed information about it here: Stripe test card numbers
But for a simple, successful test purchase we are going to use the following information:
- Valid email address (username will be created by that email)
- Stripe test card number 4242424242424242
- Any three-digit CVC code
- Any expiration date in the future
Choose a pricing plan for test purchase
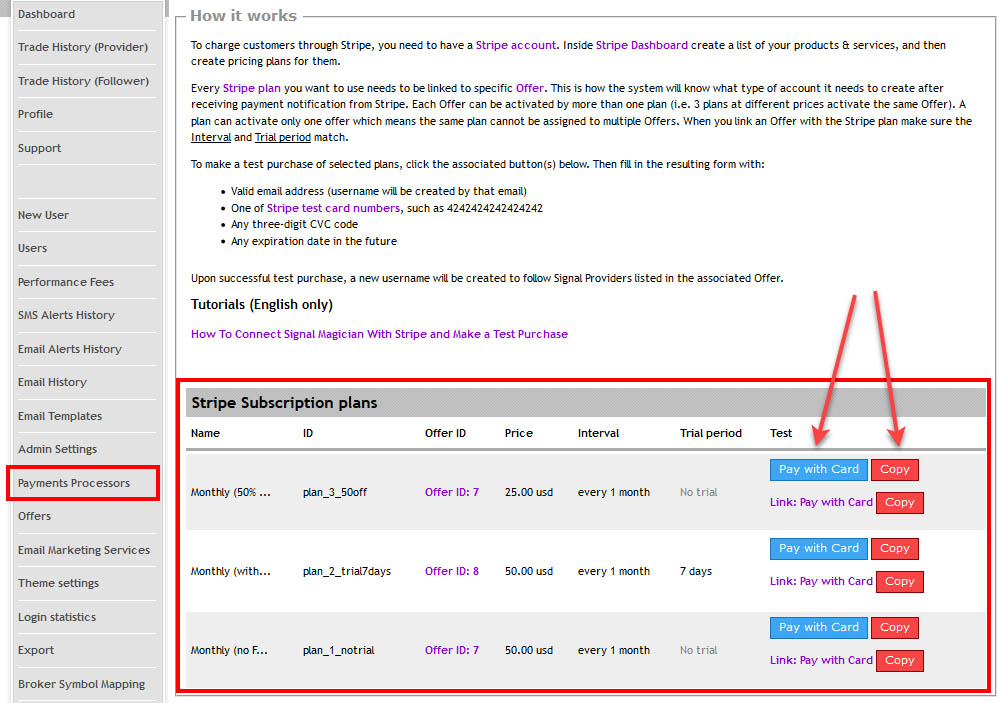
When you have pricing plans created on Stripe, you can view them on Signal Magician as well.
Notice there are Payment links and blue and red buttons next to each plan.
You can use links or blue “Pay with Card” buttons to make a purchase/subscription.
You can use red “Copy” buttons to copy HTML code of each payment button so you can place it on your website.
To copy the link, right-click on a payment link and choose “Copy”.
IMPORTANT: When “Stripe Operational mode” is set to “Live mode” then Signal Magician will display Live Stripe payment plans, and these payment buttons will create real transactions and charge real money.
In this tutorial, I have “Stripe Operational mode” set to “Test mode”, and Signal Magician displays Test Stripe payment plans. It means these payment buttons will lead to making test purchases.
We recommend connecting Stripe Test Mode with Signal Magician Sandbox. It will allow you to make test purchases any time without affecting your Signal Magician Live environment.
If you have real active subscriptions in Stripe Live mode and switch “Stripe Operational mode” into “Test mode” on Signal Magician, then users will not see their subscriptions or payments because they do not exist on Stipe Test mode.
To make a test purchase, click any of the blue buttons from the Stripe Subscription plans list.
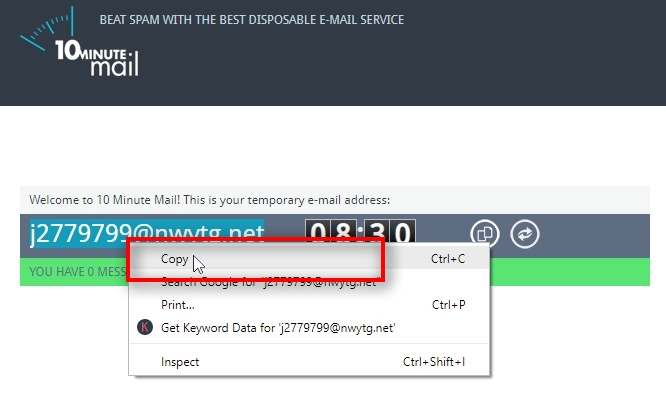
We will use 10minutemail.com to create a temporary email address for this test purchase.
Copy the email address to the clipboard.
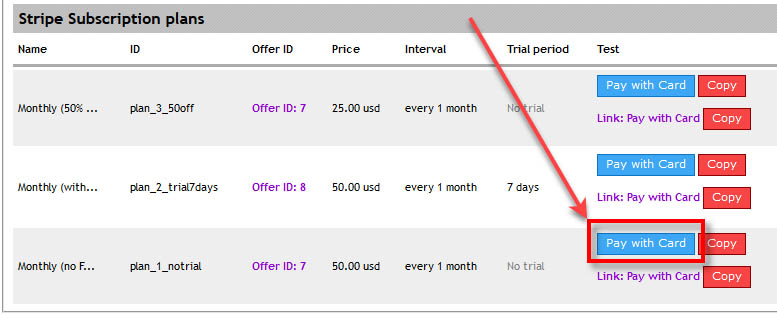
To begin a test purchase process click on a blue “Pay with Card” button next to the subscription plan you want to test.
In this example, we’ll make a test purchase of a plan_1_notrial plan.

Signal Magician will redirect you to a Stripe Checkout page hosted on Stripe domain.
Fill it with the email address and other necessary information.
For this test purchase, we are going to use the following credit card information:
- Stripe test card number 4242424242424242
- Any three-digit CVC code
- Any expiration date in the future
Useful article about Stripe test credit cards.
Click on the “Subscribe” button to continue.

After a successful test purchase, you’ll be redirected to a default Thank You page.
You can set your URL for the Thank You page, but earlier in this tutorial, we’ve left the URL field blank on purpose to illustrate how a default TY page looks like.
Note that the menu on the left is visible because I am logged into the Signal Magician. Usually, new customers will not see this menu on the left, just the notification.
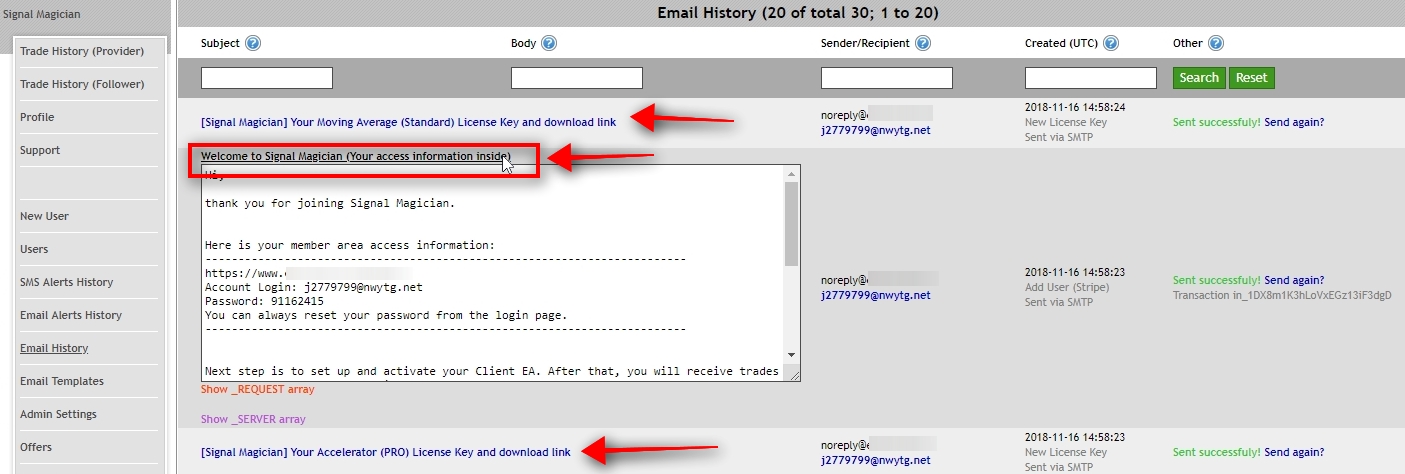
After a successful purchase, Signal Magician sends a Welcome email message and additional emails with License Keys (if you have any included in the Offer).
We can see those email messages in the “Email History” menu on the left.
Also, notice there’s an option to resend those emails by clicking the link “Send again?” in the column on the right side of the page.
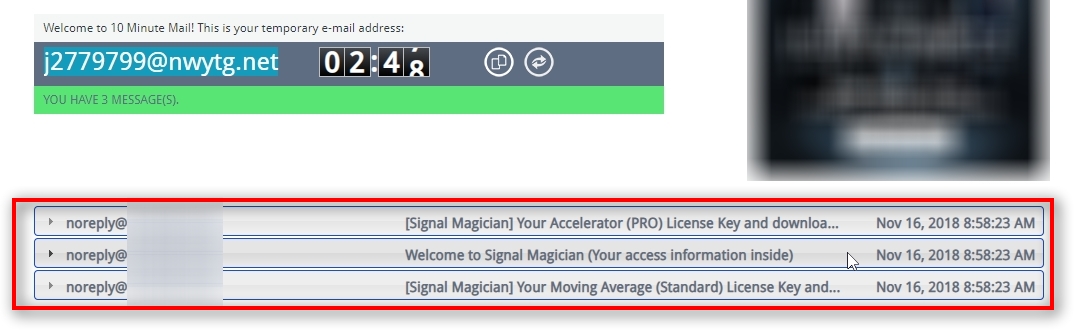
Let’s check the inbox of our temporary email.
Inside we find the same three emails.
This is what your customers will receive after they purchase products and services from you.
Email #1 – Welcome email message from Signal Magician system. It contains URL and login information to the member’s area so that user can access his products and services.
Email #2 – License Key and download link to “Accelerator” product which was included in the Offer triggered by Plan ID plan_1_notrial.
Email #3 – License Key and download link to “Moving Average” product which was included in the Offer triggered by Plan ID plan_1_notrial.
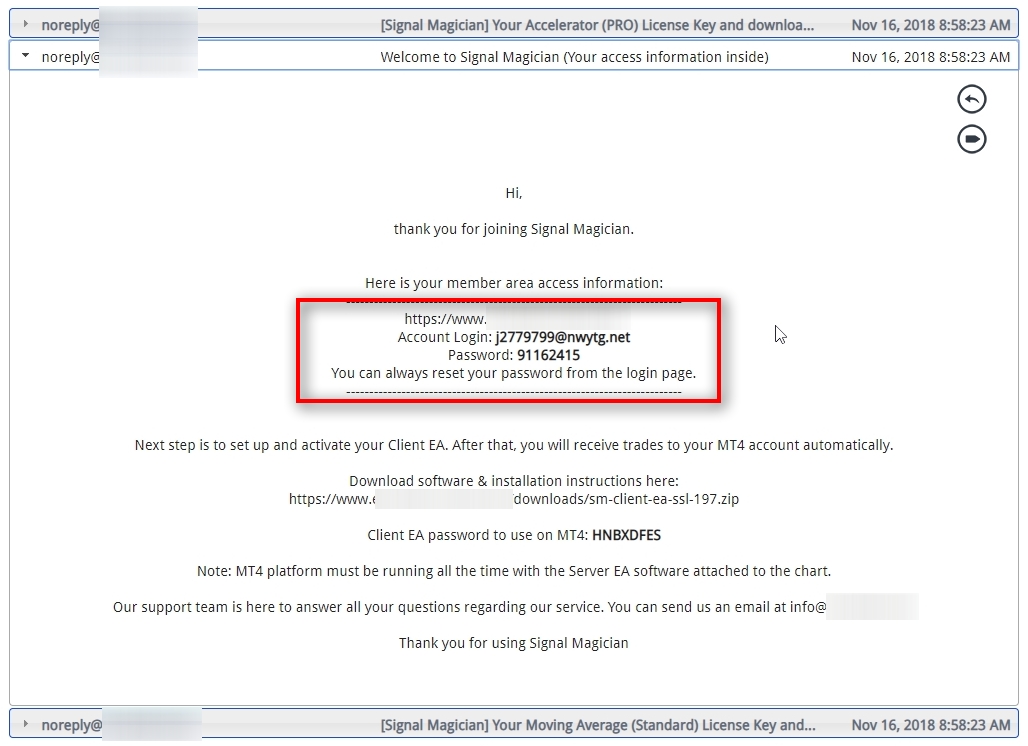
This is how a Welcome email looks like with member area access information.
It also includes information for the Client EA which allows copying trades to MT4 account because this particular Offer triggered by Plan ID plan_1_notrial included subscriptions for three Signal Providers.
If an Offer does not include subscriptions for Signal Providers, then Client EA information would not be included in the Welcome email.
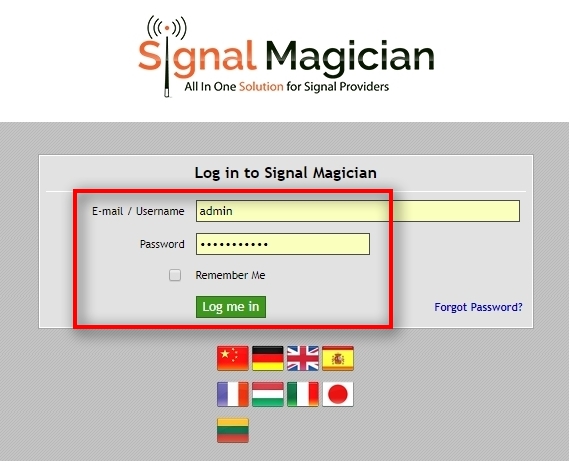
Log in as a new customer to see the member’s area
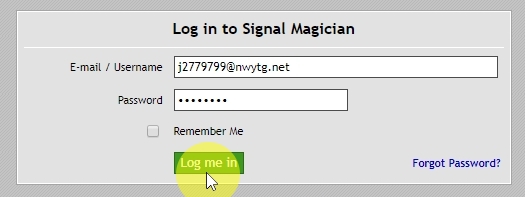
We use login information of the newly created username to access the member area.
This is to show you how customers will see it.
You might need to logout from your Signal Magician account first.
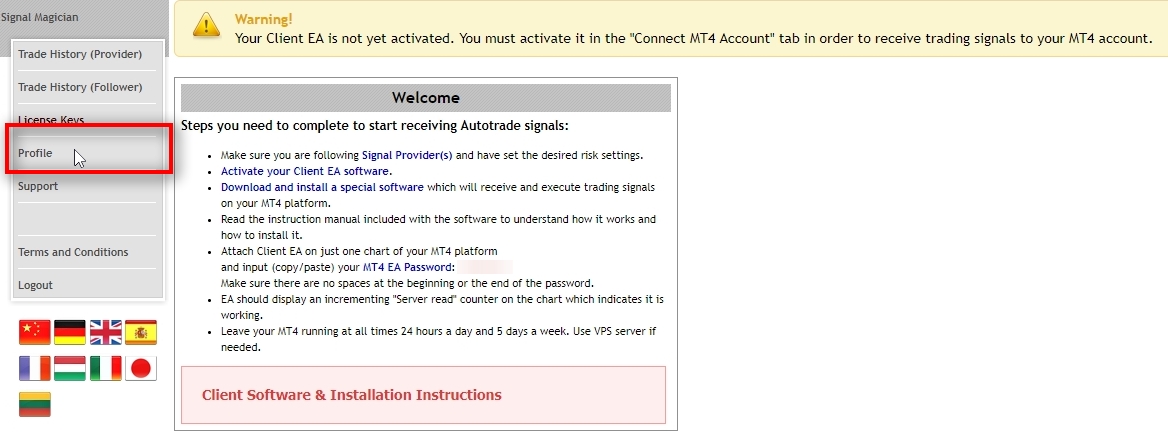
On the Welcome page, we see some important information and the next steps to take to start receiving trading signals from Signal Providers.
Also, there’s a download link to the Client EA software which also includes installation instructions.
At the top of the page, there’s a notice for the customer that his Client EA is not yet activated. It is recommended to leave the activation task to the customer so that they take action before receiving trading signals to their MT4.
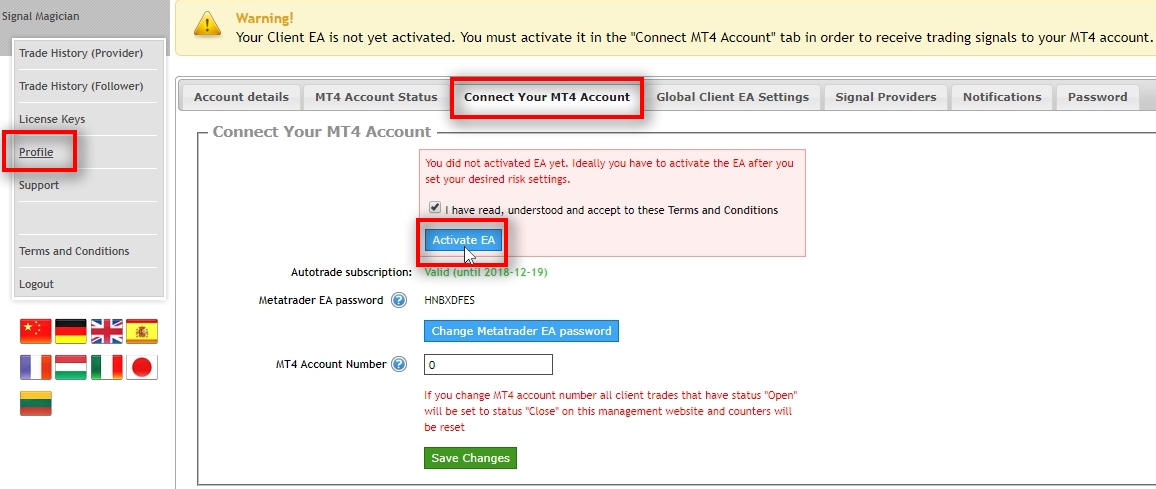
To activate the Client EA, the user must open “Profile” page and navigate to the “Connect Your MT4 Account” section. Then, the user must agree with the Terms and Conditions and click the “Activate EA” button.
Once EA is activated, it can be attached to the MT4 account and start receiving trading signals.
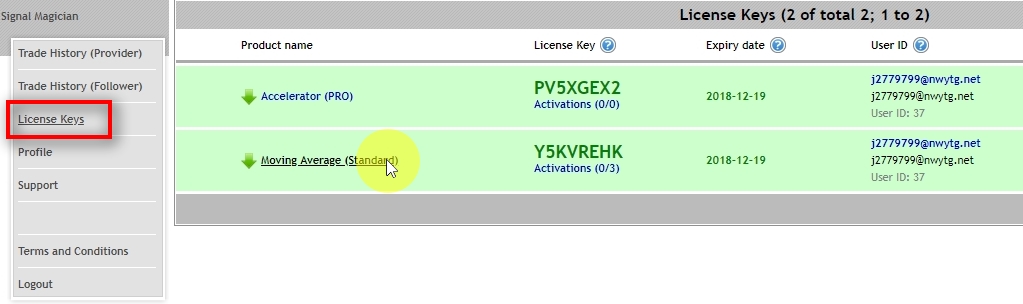
When a customer opens “License Keys” page, there will be download links and License Keys for all products available to him.
In this example, there are two products which were included in the Offer activated by Plan ID plan_1_notrial.
To download the software user must click on the product name and then enter the assigned License Key into the “Inputs” section when attaching the software on the MT4 chart.
Log in back as admin
Now let’s login back as “admin” to see how this new username looks like.
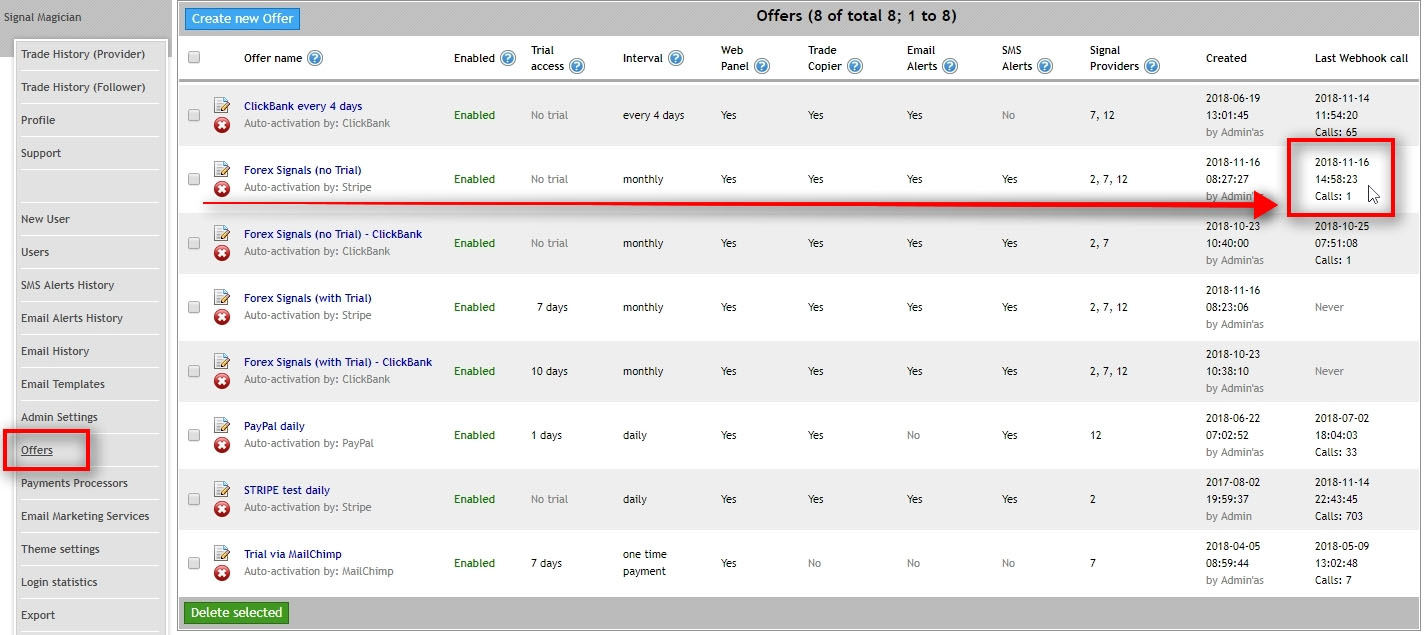
If we switch to the Signal Magician and open Offer page, we’ll see that one Stripe Webhook call was received already by the Offer which has Plan ID plan_1_notrial assigned. It means our test purchase triggered this Offer.
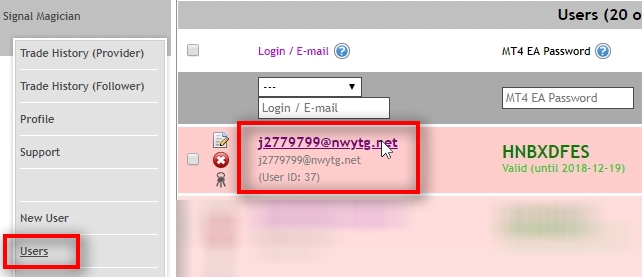
Open Users page and find the new username created after the test purchase. Click on that username to open its Profile.
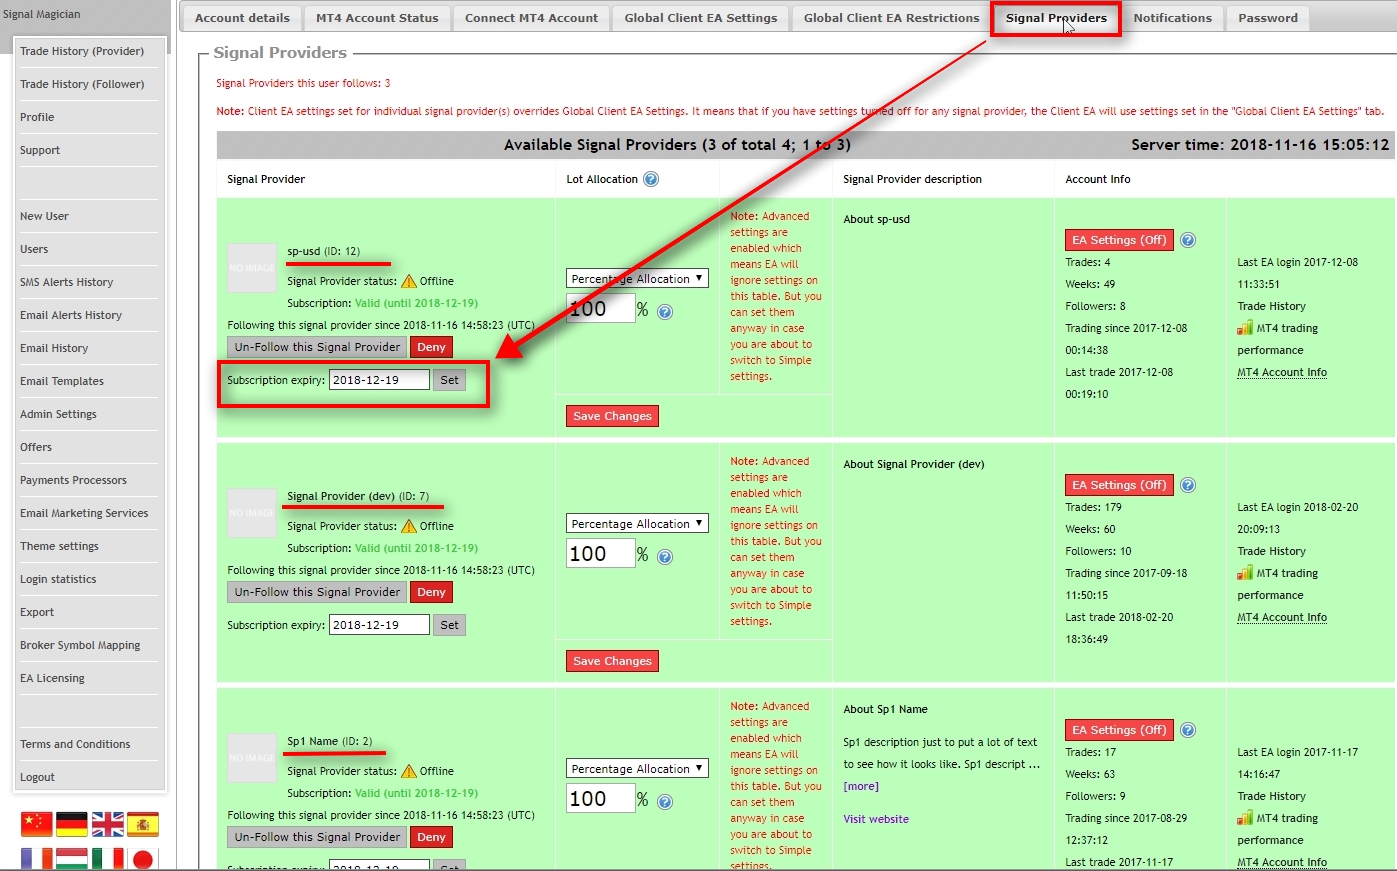
We switch to the Signal Providers section to see that all three Signal Providers were enabled.
The expiry date is 1-month + 3 days in the future.
Stripe will charge the user’s account after 1-month. If it’s a success, then the expiry date will be extended, and the user will continue using services without interruption.
If Stripe isn’t able to charge user’s account after 1-month then after an additional three days the customer will lose access to these services.
Why the system sets expiry date to have a few extra days?
When the system creates a new username or extends a subscription for an existing customer, it adds a few extra days to the expiry date. For example, for monthly subscriptions, an expiry date is one month + 3 days.
The reason for this is simple. Those extra days are like a grace period to allow for timezone differences or failed payment attempts. It is always a question if the payment provider will charge the customer after 30 days or 31 days. Moreover, different payment providers do that differently.
Another example would be if the payment provider must charge the next payment on the 22nd of December, and the expiry date is also 22nd. The system does not know the exact hour at which the payment provider charges the customer on 22nd, and it might be 23rd already on the web-server because of the timezone difference. In such a case, the customer access would expire before the payment and interrupt the service.
Adding three extra days always solves these small problems. In this example, when auto payments happen on 22nd, and the expiry date is 25th, there will be a much lower chance for auto-renewal problems.
Note that these extra days are just for the expiry date, and the user will get those additional three days in case of payment problems or if he cancels the subscription with the payment provider. But if the subscription is active, then the payments will still happen on the right day according to your payment provider (in this example on 22nd).
Now let’s check the newly created License Keys of this new customer.
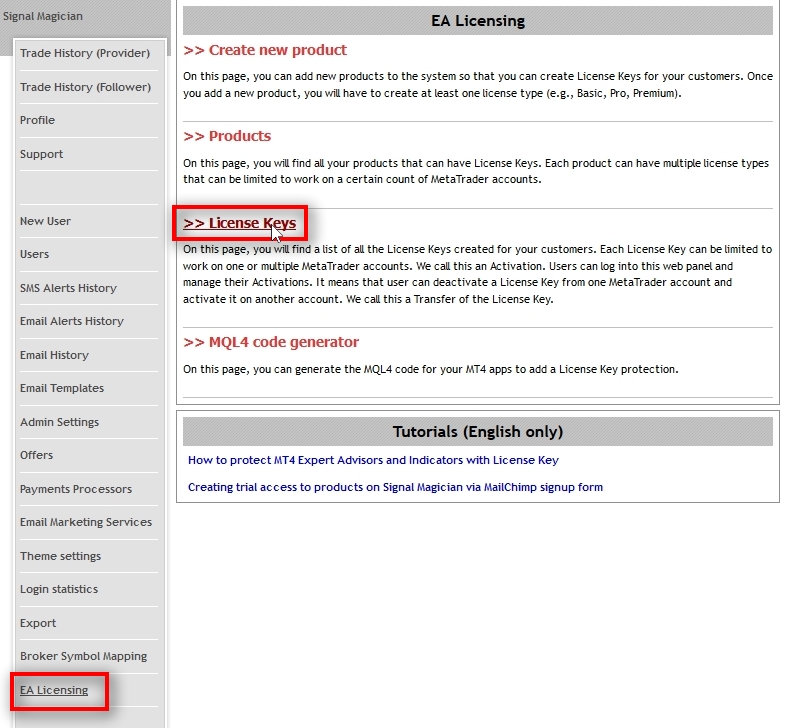
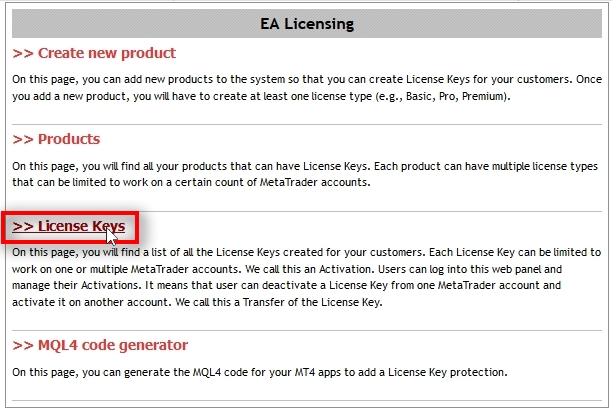
Go to the “EA Licensing” on the left menu and open “License Keys” page.

Here are two License Keys created for those particular products that are added in the Offer which is triggered by the Stripe Plan ID plan_1_notrial.
Canceling subscription on Stripe and how it affects user services on Signal Magician
Let’s cancel this subscription on Stripe
There are two ways the cancellation can happen.
One way is when the customer cancels the subscription by himself. Another way is when you cancel the subscription on behalf of a customer.
If users contact you and ask to cancel their subscription, then you can do that from Stripe, or the Subscriptions page on Signal Magician found in the Payments Processors page.
Canceling subscription on Stripe on behalf of a customer
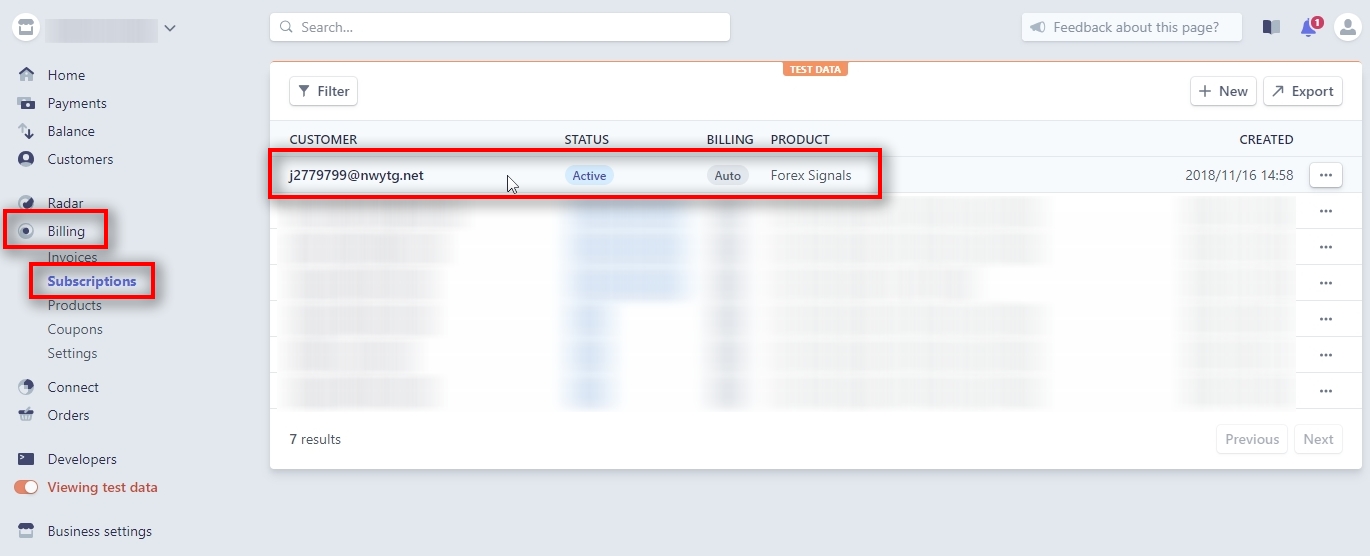
Open “Billing -> Subscriptions” page and locate the subscription you want to cancel.
You can also you the search box at the top to find the subscription easier.
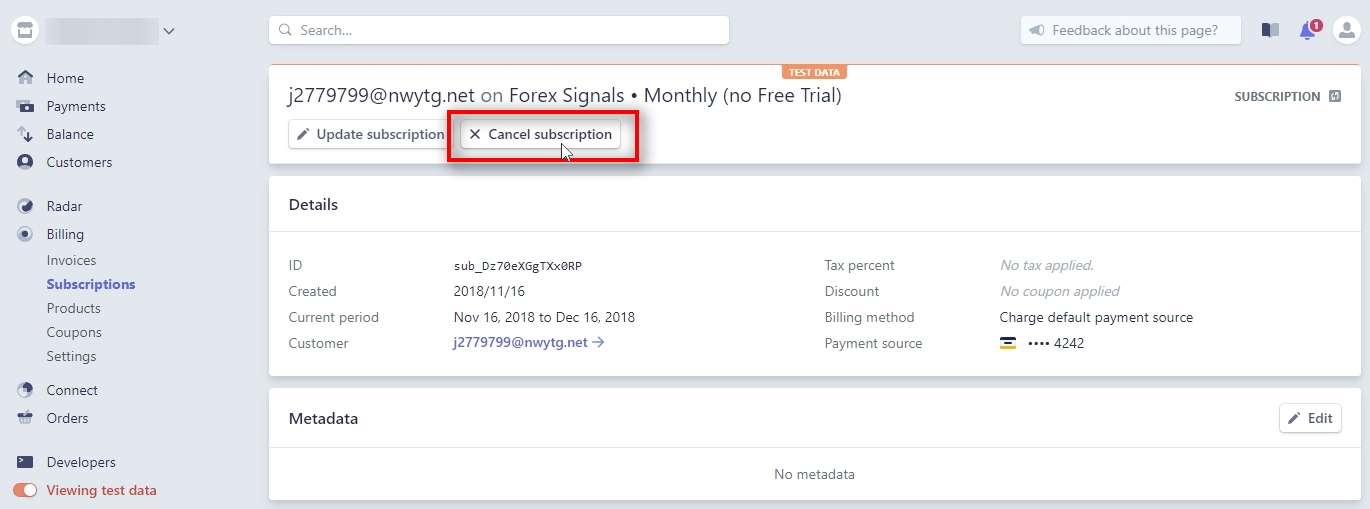
Click on “Cancel subscription”
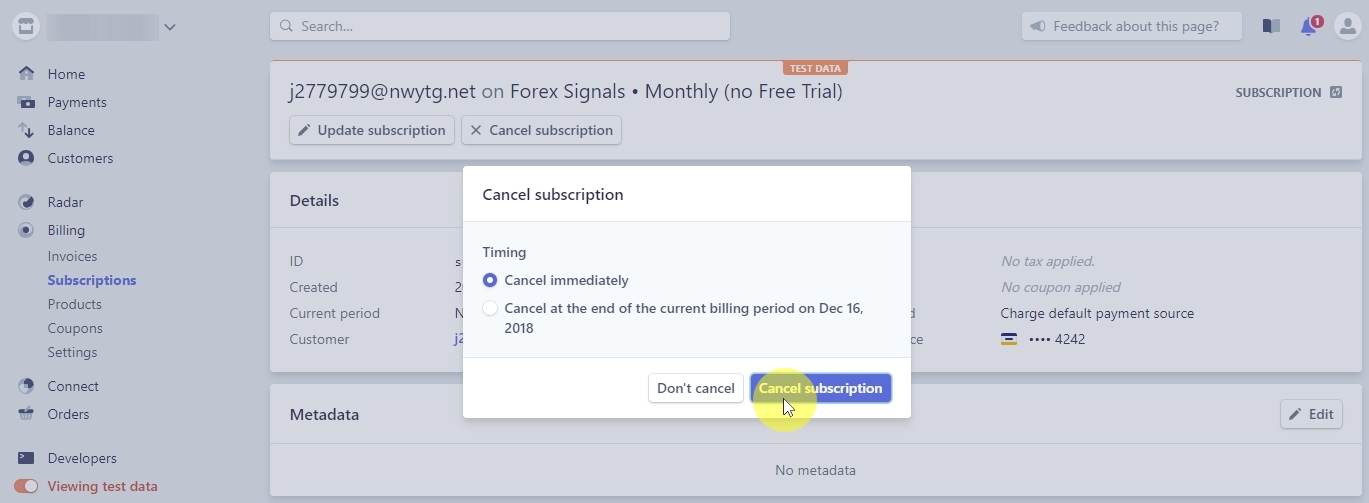
Stripe gives you two timing options when canceling the subscription.
It would be best if you chose the “Cancel immediately” option and then click on “Cancel subscription” button.
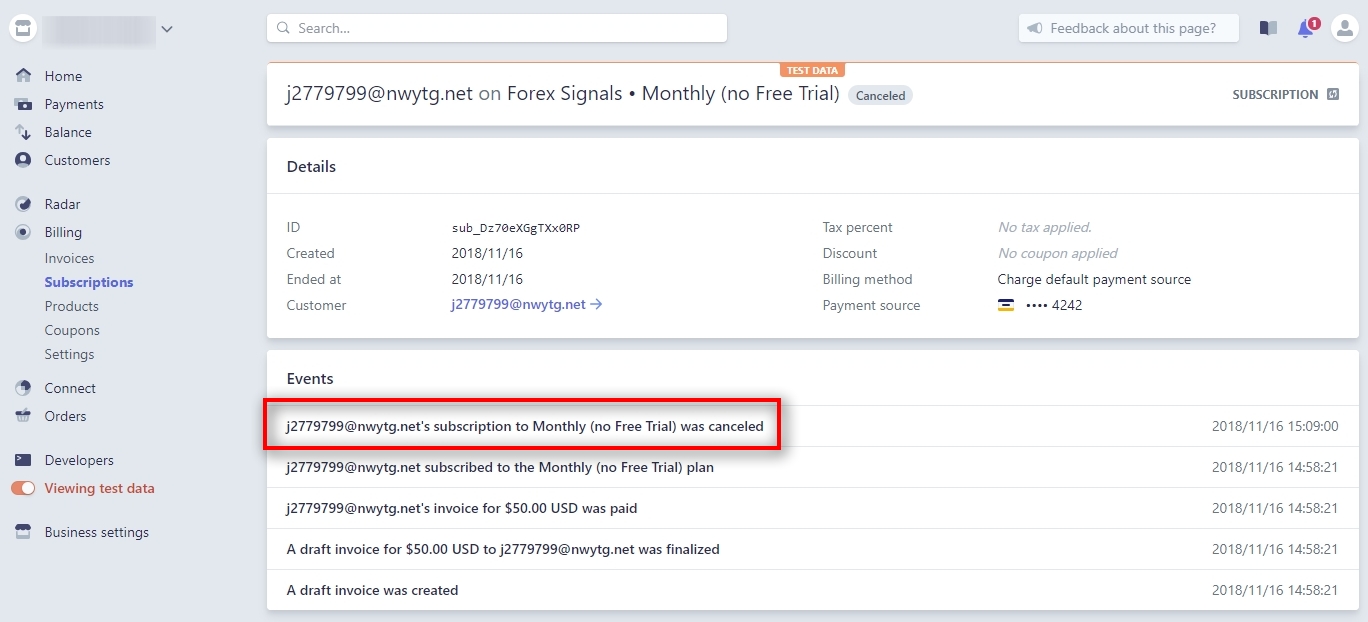
When the subscription is canceled, you’ll be redirected back to the Subscription page.
Take a look at the Events section. It will have an event logged saying that the subscription was canceled.
How can a customer cancel the subscription from their member’s area

Customers can cancel subscriptions from their member’s area on Signal Magician.
Open the “Subscriptions” page which they can access from the Billing page.
Clicking on “Cancel subscription” link for any subscription will cancel it on Stripe, and there will be no further charges.
Refunding purchases on Stripe and how it affects user services on Signal Magician
Let’s experiment before we process the refund on Stripe.
It will help you to understand better how Offers work.
As you already know, Offers can have multiple services and multiple Stripe Payment Plan IDs assigned. It is how Signal Magician knows which Offer each Plan ID triggers and what services must be created for the user.
For this experiment, we’ll edit the Offer with the Plan ID plan_1_notrial and then process a refund for this particular subscription.
Open Offers page and click on the “Edit” icon next to the Offer which has Stripe Payment Plan ID plan_1_notrial assigned.
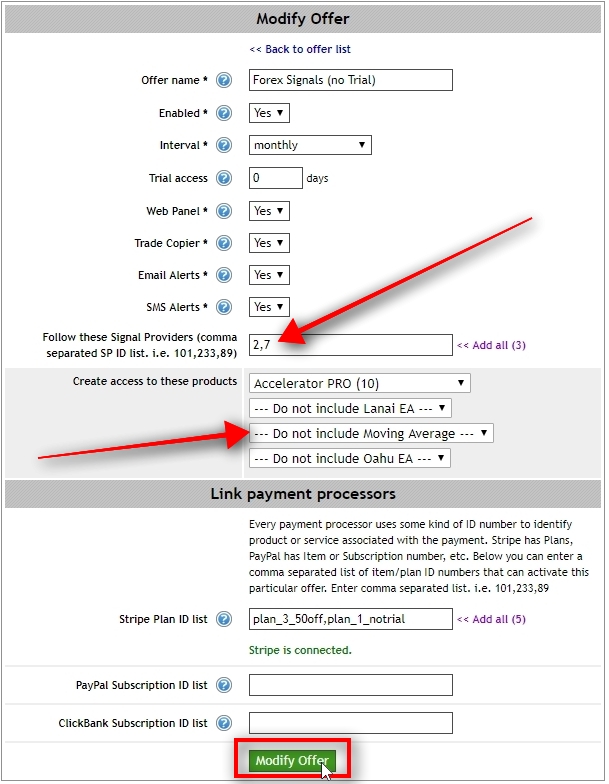
Change the list of Signal Providers and Products.
For this experiment, we’ve removed SPID 12.
We’ve also removed “Moving Average Standard” from the Products list.
Only “Accelerator PRO” left on the Products list.
To make the experiment more interesting we’ll create an additional License Key manually for the new user.
Open the EA Licensing” page and then click on “License Keys”.
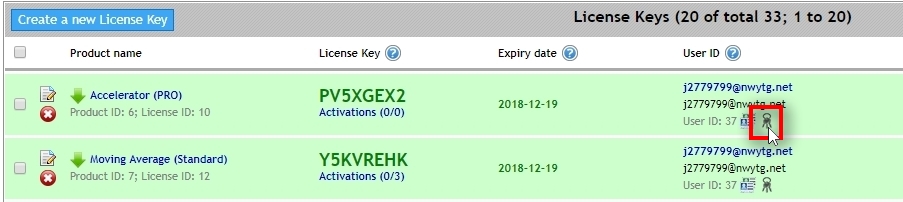
Click on “Keys” icon next to the new username to create a new License Key manually.

Let’s choose to create “Lanai EA Pro” License Key.
Click on “Create a new License Key” button.
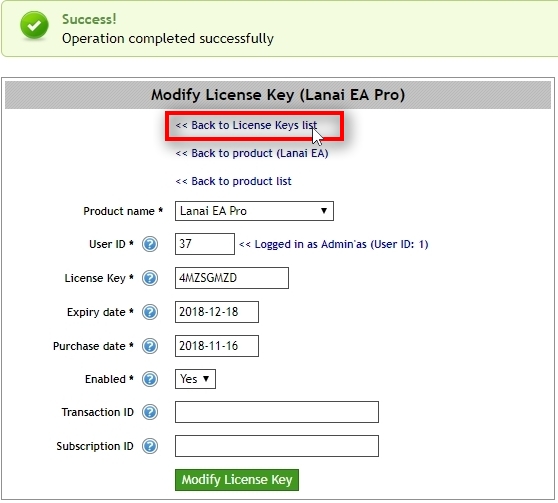
When License Key is created click on “Back to License Keys list”.
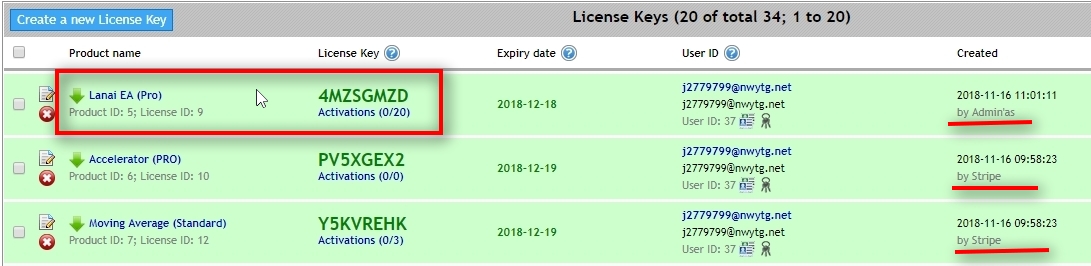
Here it is. A new License Key for a new product for a new user. You can see in the “Created” column it says created by Admin, but Stripe created other two License Keys for the same user.
So why we are doing this and how it makes this experiment more interesting?
Well, we want to illustrate how modifying the Offer affects the refunds that happen from time to time in any business. We want to show that it is not a good idea to modify Offers when you already have customers created through these Offers. And if you do need to change the Offer, then you should be aware of the consequences. We always recommend creating new Offer or even new products/pricing plans on Stripe if required instead of modifying existing Offer when there are already products and services created from that Offer.
Now, we will process a refund for the payment of this new user, and it will trigger the same Offer. But because it will be a refund request, it will revoke the access to all the services added to the Offer for that particular user.
But we’ve already removed SPID 12 and “Moving Average Standard” from the Offer. It means the Offer will not touch these services as well as those created manually.
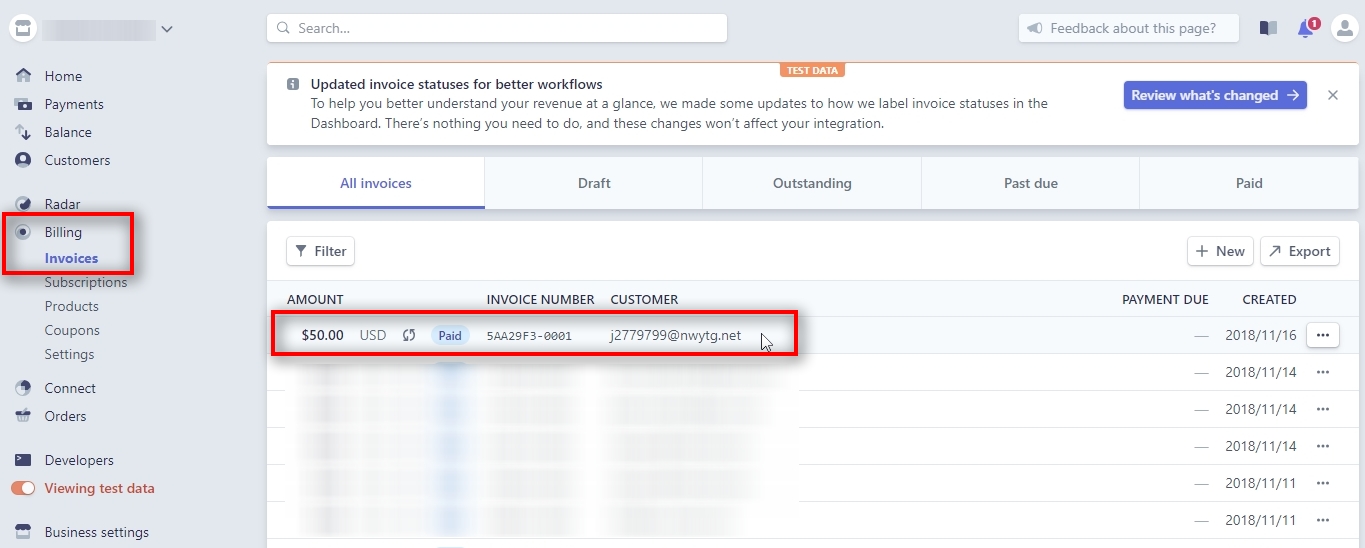
Go to “Billing -> Invoices” from the left menu in your Stripe account.
There you’ll find all invoices from all customers.
It is not payments, but invoices. We need to click on the invoice first to get to the list of payments.
Note: If the payment happened some time ago and it does not appear here on this page you can use a search box at the top to find it (explained later in this tutorial).
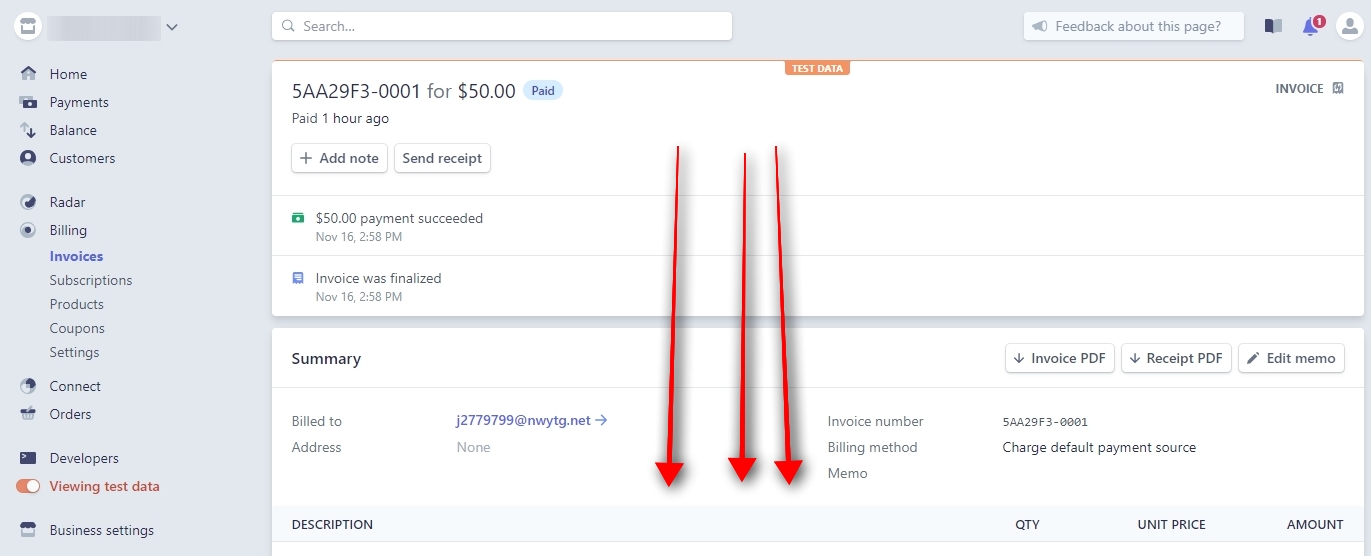
When the invoice details page is opened, we need to scroll down a bit to find the list of associated payments.
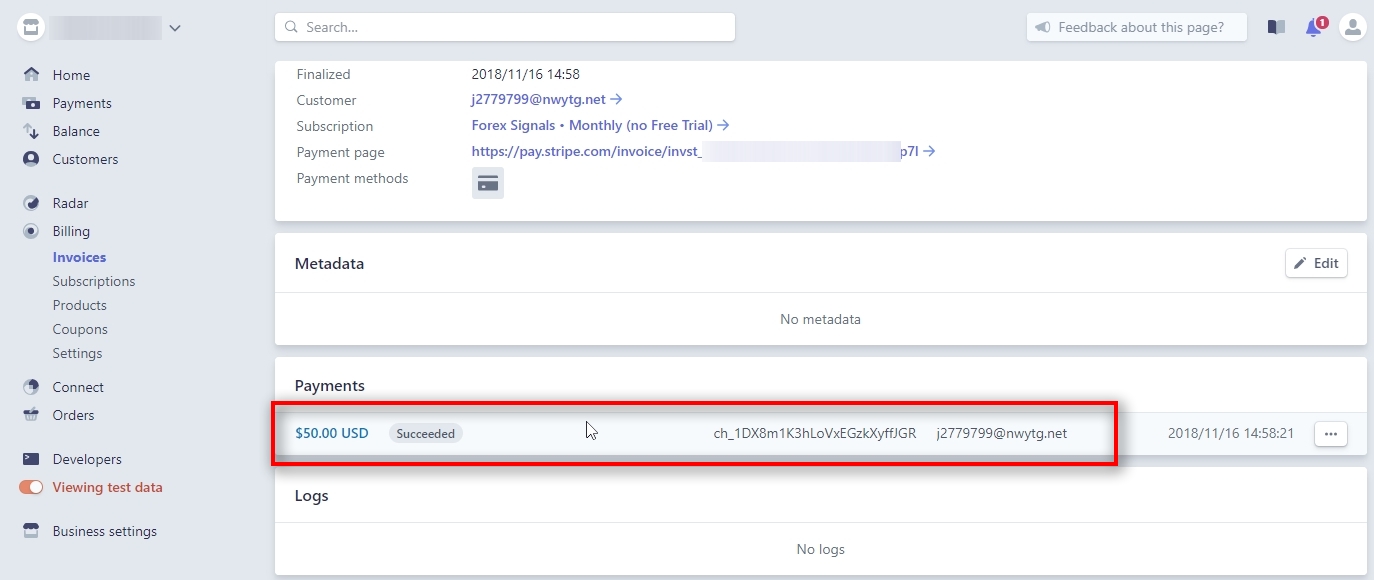
When you find a payment you need to refund, click on it to continue.
If the payment happened some time ago and it is difficult to locate it you can use a search box at the top to find it.
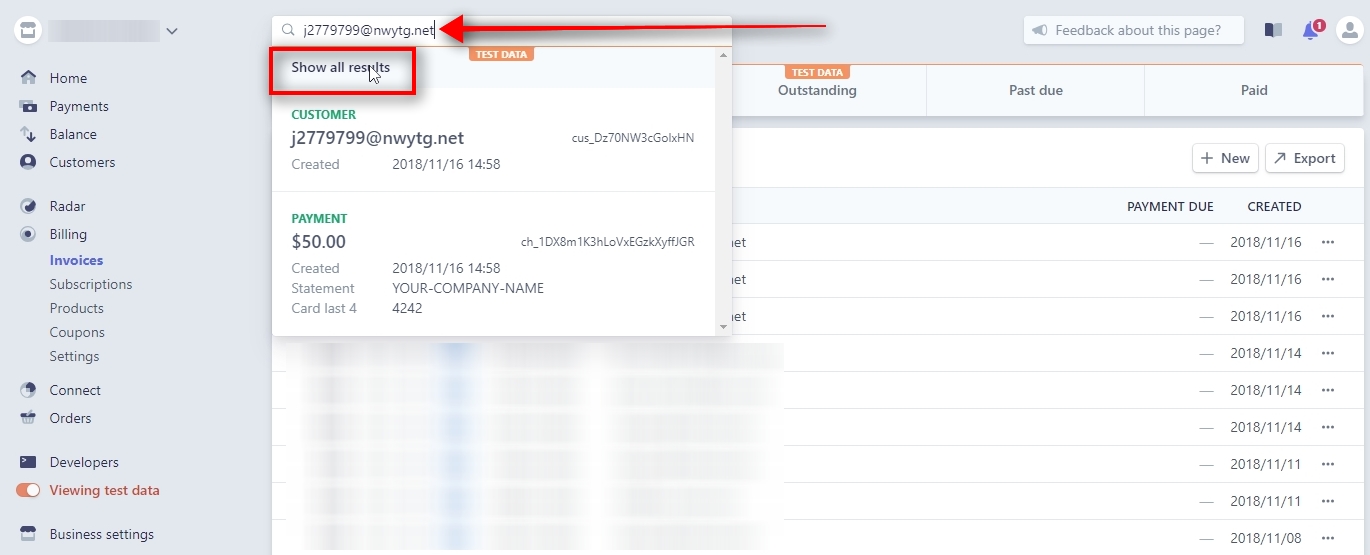
To find payments or other information about a customer type his email address into the search box at the top.
In a few moments, we already see search results, and there’s a payment on that list as well.
If we click on “Show all results”, it will list all results on a new page.
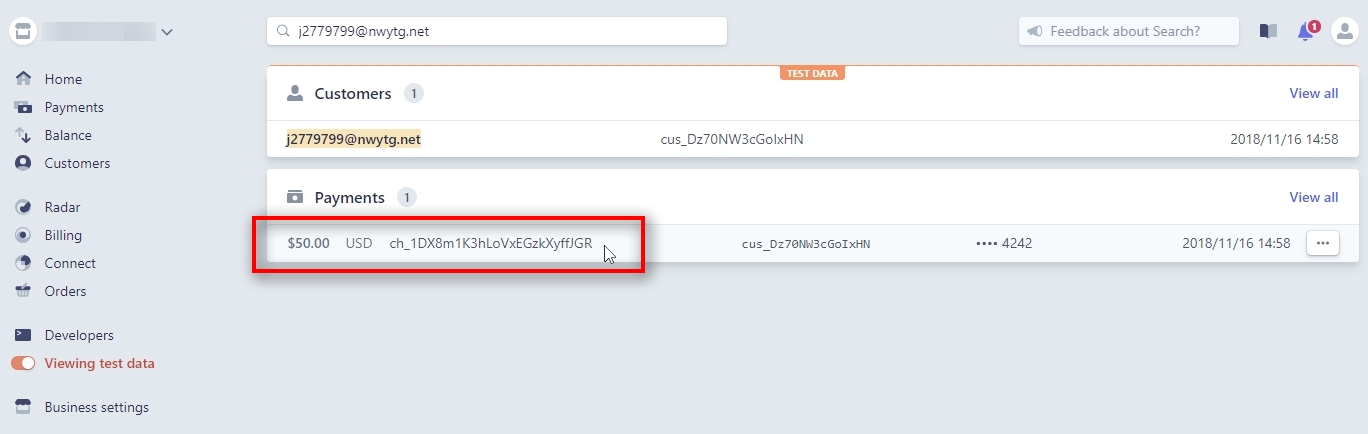
Here’s the payment we want to refund.
Click on that payment to continue.
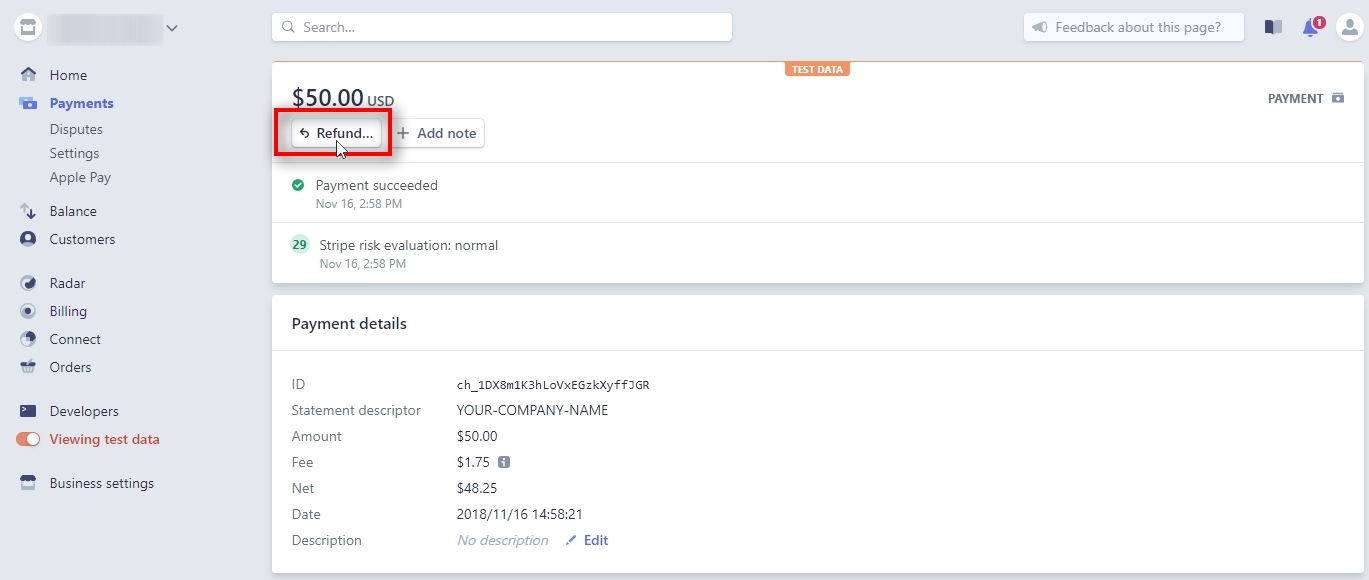
Click “Refund” when on the Payment details page.

In the “Refund payment” box select a reason and type in your comment.
Click on “Refund” button to process a refund.
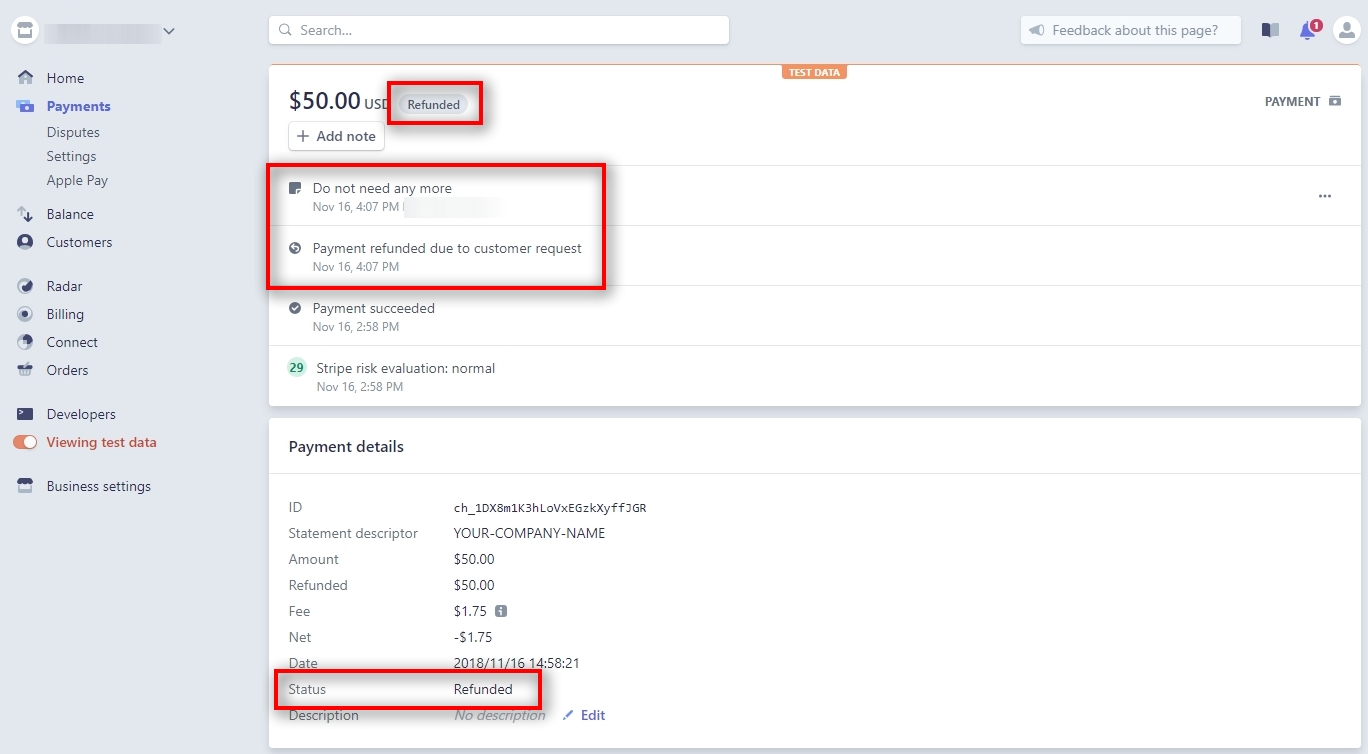
Once the refund is processed, you’ll see Payment details page reloaded.
The payment will show status “Refunded”.
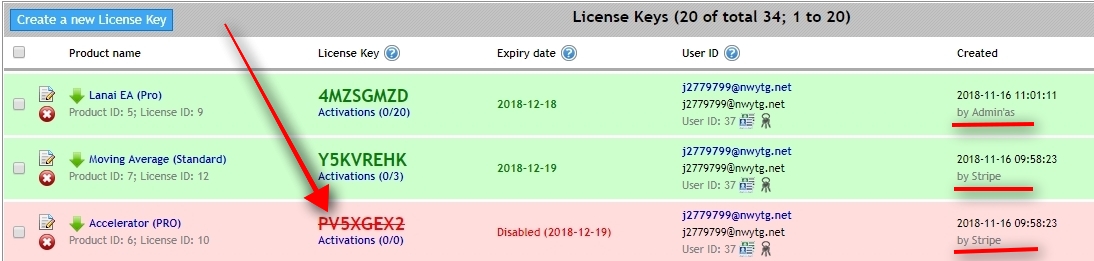
Once the refund request is processed, open the “License Keys” page to see that the Offer disabled only “Accelerator PRO” License Key. It is because this particular Product is still listed in the Offer.
We’ve removed “Moving Average Standard” from the Offer before the refund, so it did not disable its License Key, and the Lanai EA Pro was created manually. Offer cannot touch manually created License Keys.
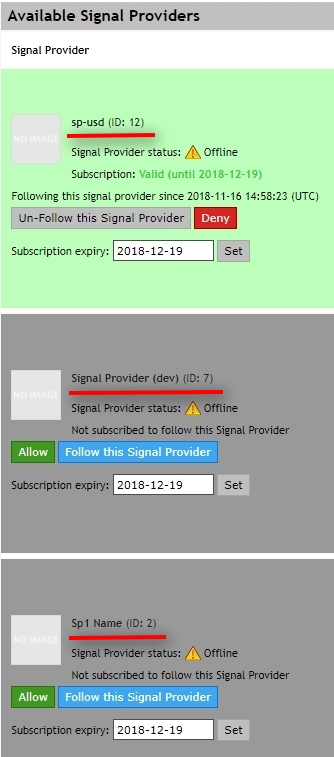
Open “Signal Providers” section to see that after the refund the Offer disabled Signal Providers by ID 7 and 2. It is because these particular SPIDs are still added to the Offer.
We’ve removed SPID 12 from the Offer before the refund, so it was not disabled.
Conclusion
Have you learned how to connect Stripe with Signal Magician and make a test purchase already?
No?! Then please reread this tutorial.
We understand it is a long one, but to learn this well you need to follow this tutorial at least a few times. Then it will be an easy task for you.